

Neglecting to set your targeted locations or forgetting to establish the right targeting locations for your Google Ads campaigns are a surefire way to quickly eliminate your daily budget.
Without location targeting, you’ll attract less than ideal website traffic and ineffectively use your ad spend on potential customers who aren’t as likely to turn into qualified leads. If you don’t specify a target location, Google Ads will assign all countries and regions to your campaign by default — resulting in wasted ad spend.
Keep reading to learn more about location targeting for Google Ads!
Want to gain insight into your current Google Ads performance? Get your free PPC audit today to find out where you can improve your ad campaigns!
Questioning the quality of your SMB’s PPC performance?
Get your FREE PPC audit from WebFX today!

How to select your location settings during campaign setup
When you first create a new campaign, Google will ask for the locations to target. Make sure to take care of the most important location settings first before moving into the granular location targeting for Google Ads.
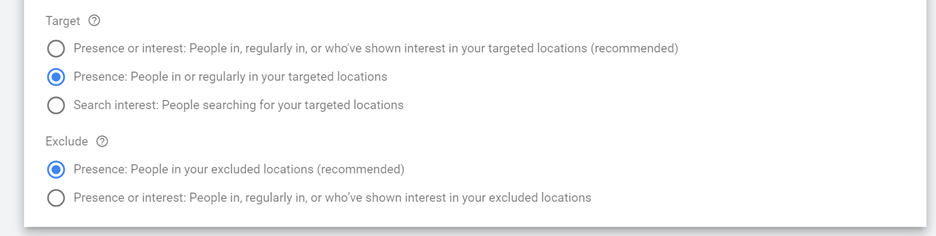
Google’s recommended setting for targeting means that anyone who searches for one of your targeted locations would also be eligible to see your ads. Using this setting puts you at risk of your ads showing in more places than intended.
So, my recommended choice is “Presence: People in or regularly in your targeted locations.” This setting helps you attract people in the United States or select areas that would be most likely to buy your product or service.
In some cases, the “recommended” setting is a viable option, like with these examples:
- Someone located in Boston who’s planning a vacation to Miami (frequently looking up attractions in Miami).
- A senior living facility can show ads to adults who don’t live in, but frequent, a particular area to visit their parents.
For “Exclude,” the recommended setting here is safe to use.
Now we can move on to selecting our location targeting!
How to select the appropriate location settings for your campaign
There are a few options for setting target locations, so how do you choose the right one?
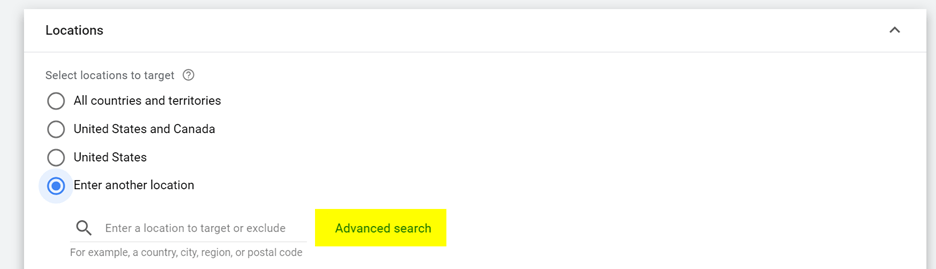
I recommend using “Advanced Search” since it gives you more flexibility than just the United States, U.S. and Canada, or all locations.
Location targeting options range from vast areas like countries and down to super granular areas like postal codes or neighborhoods. Here is a full list of capabilities:
- Airport
- Borough
- City Regions
- Congressional District
- Country
- County
- District
- Municipality
- National Park
- Neighborhood
- Postal Code
- Region
- State
- TV Region (Nielsen DMA)
- University
3 Google Ads location targeting options
Google Ads location targeting offers three ways to select location targeting for your campaigns — manual search, by radius, and bulk entry.
Here’s a breakdown of these three options:
1. Manual selection
You may have an idea of the areas that you want to target but are also open to additional ideas. If so, select the “Location” button and type any area in the search bar. It will auto-populate any locations that match your search.
From there, you can select “Target” to include that location in your campaign targeting.
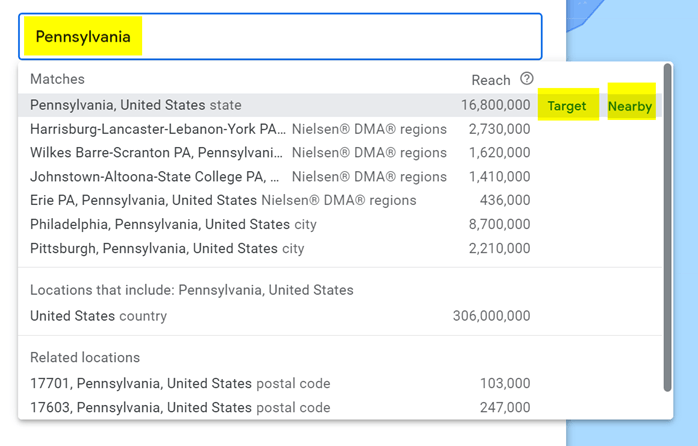
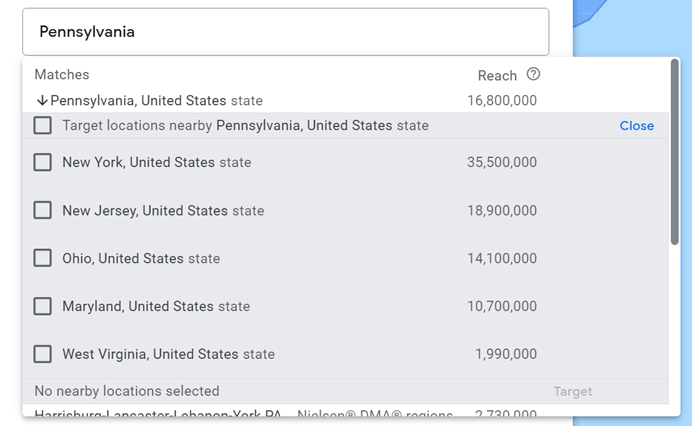
There is also a “nearby” option, which helps you to pull surrounding locations based on your search. To use any of those “nearby” locations, select the checkbox(es) to the left of the location to add them to your targeting.
2. Radius targeting
Click the “Radius” button. This allows you to enter a location or locations and designate a distance surrounding your point of interest, also known as proximity targeting.
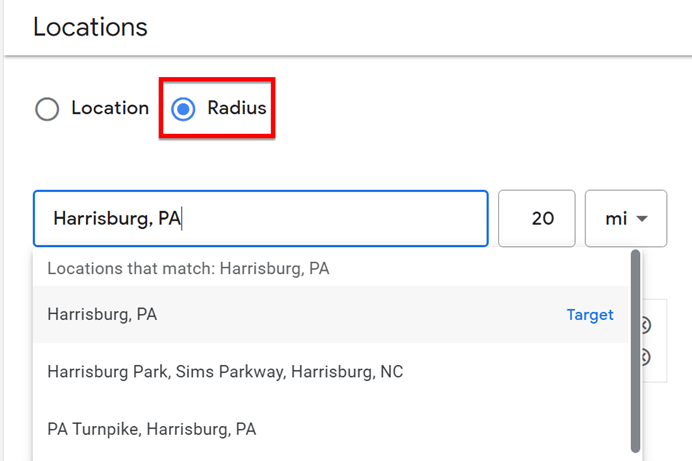
Enter any location option into the box from the bulleted list of location options above (cities, postal codes, states, etc.). A list auto-populates below matching any areas that fit your initial search.
Choose the ones you want by clicking “Target” to the right of the location in the list. This selection becomes the initial location. Then determine how much of the surrounding area you want to include by adding a number in the field to the right.
Then you’ll use the dropdown menu to select miles or kilometers to finalize the location and radius that you want to target. Google Ads also provides a helpful chart with a radius circle to make sure you included all desired locations.
Need to pull back on the area? Reduce the mileage or kilometer you initially entered.
Need to expand further? Simply increase the mileage or kilometer amount and watch the map radius adjust to your desired area.
Feel free to zoom in or out on the map to help refine your search. To finalize your location targeting, click “Save” on the bottom of the screen.
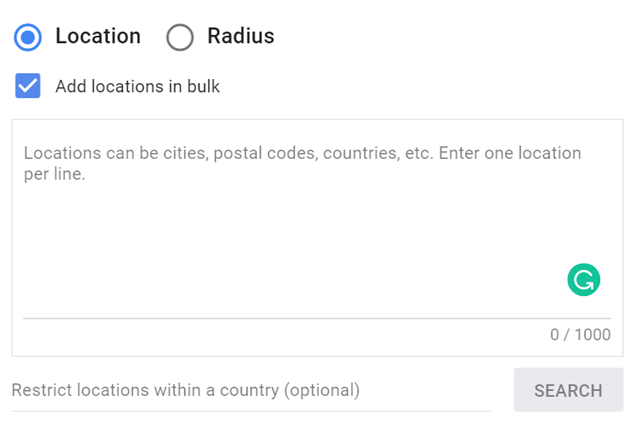
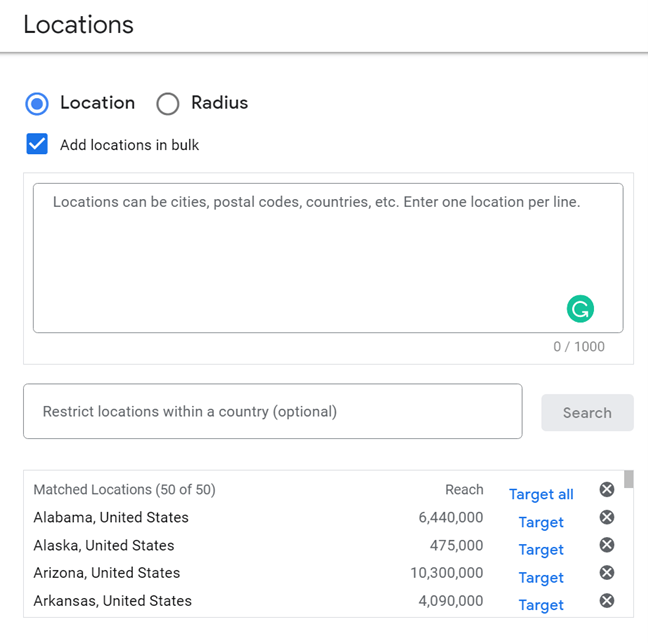
3. Bulk location entry
The last option for adding location targeting to your campaigns is using the bulk input method. You can enter or paste a large amount of pre-determined areas to target or exclude with this option.
The bulk option is only available when the “Location” radio button is selected. You can’t bulk add radius locations at this time. To use the bulk input option, make sure to select the checkbox for “Add locations in bulk.”
If you wanted to target the whole United States, you could either add “United States” as a location initially, then wait for the location data to populate from your campaigns and optimize based on performance.
Let’s say that you wanted to start out with certain areas that you already know are top-performing locations for your business. You could paste those states into the text box to start targeting those areas.
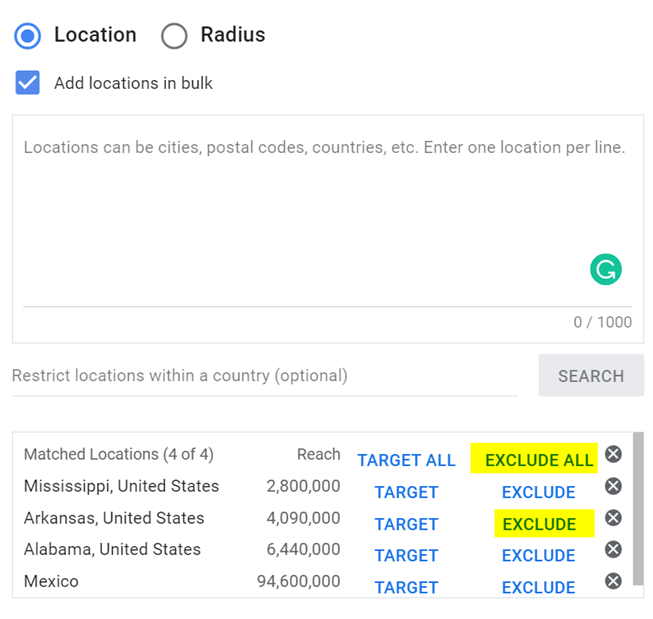
When you enter a list of locations in the bulk location field, then click the blue “Search” button. This brings up the “Matched Locations” from your initial list, where you can easily select “Target All” or individually “Target” locations.

Not sure what this targeting would look like? Here’s an example of location targeting in action:
- New England area states are important to your campaign, so you target Massachusetts, Connecticut, Rhode Island, and other states with your location targeting settings.
- In addition to New England, you want to expand to target states in the Midwest. As a result, you add states in the Midwest to your target locations and adjust your bid amount to be more competitive.
- You don’t want to include any West Coast states to start off, so you set exclusions for states like California, Oregon, and Washington.
Bonus tip: Consider your daily and monthly budgets when selecting your target locations. Selecting too large or broad for your selected locations may stretch your budget thin. It’s best to start out where you’re located and the surrounding areas and expand further if your budget is not fully used each month.
How to exclude locations
While you’re in the same window, you can also bulk add locations that you don’t want to target. Don’t leave the default Google exclusion setting that we defined earlier in our setup. You want to set your own exclusions to give you control over your budget and where you target.
Enter your locations in the text box and click the blue search button to bring up your desired locations to exclude. In this case, you can choose “Exclude All” or “Exclude” by location.
Once finished adding and excluding locations, click the blue “Save” button at the bottom of the page to complete your location setup, and you’re ready to move on!
How to see where your ads appear in an existing campaign
There are two ways to analyze where your ads appear.
Matched locations
Go to “Locations” in the left-hand side menu to view your location data. There is a small dropdown at the top right of the chart. Select “Matched locations.”
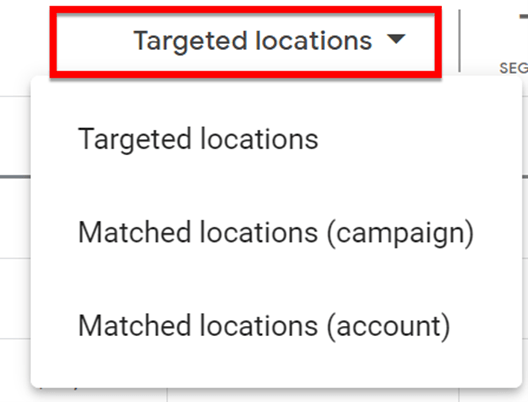
Here you can see where you can compare your location targeting to where your ads appear. See any areas that you didn’t intend to? Add them as excluded locations to eliminate your ads from showing in there moving forward.
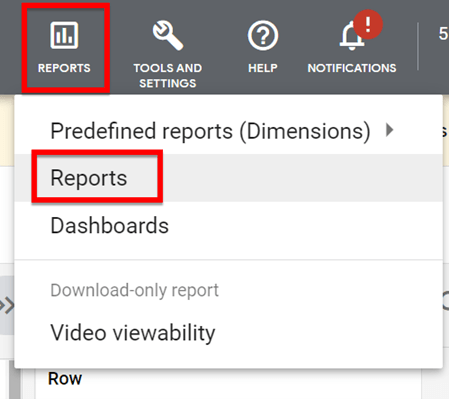
Create a custom report
To create a custom report, at the top of the screen in the dark gray bar, select Reports.
Select a “table” report style and name your report something like “User Location Reporting.”
Then build your report using the “Search metrics and dimensions” drop downs on the right side of the page.
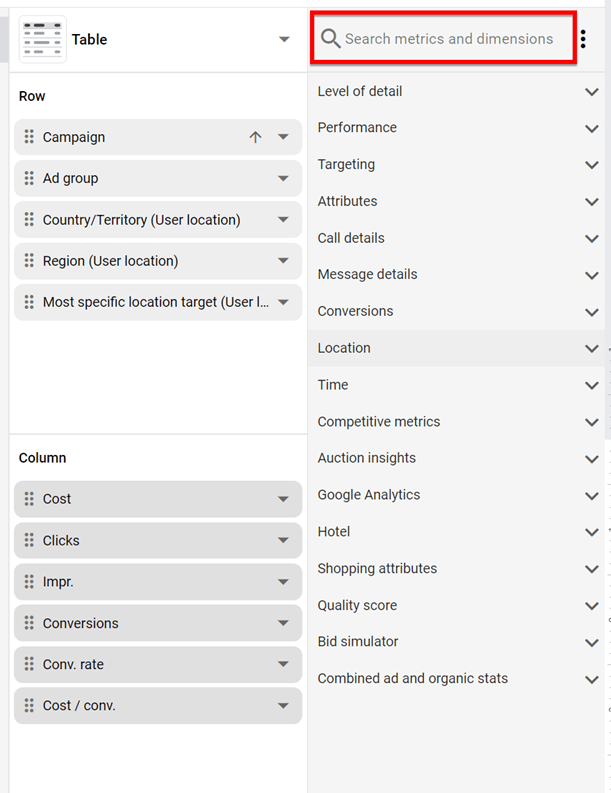
Once finished pulling in your reporting columns, you should end up with a report that looks like the one below. Don’t forget to select your desired date range.
Now you can easily see where your ad appears. With this information, you can:
- Find locations to add as negatives/exclusions
- See a top converting location that you may want to add a bid increase to become more competitive in that area and drive more leads
- Identify high impression areas that did not lead to ad clicks or conversions
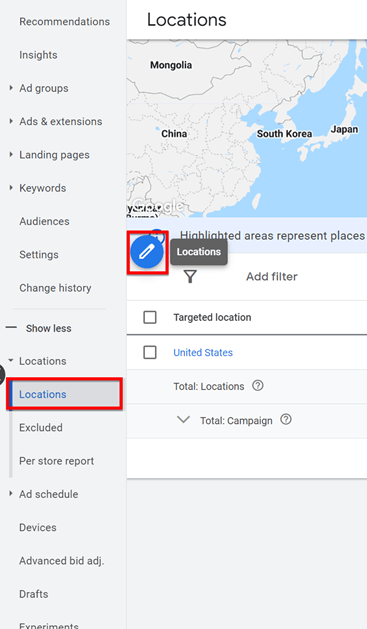
How to edit locations for an existing campaign
To edit locations in an existing campaign, select the campaign you wish to edit, then click on locations in the gray sidebar and the blue pencil circle icon to edit. Then follow the instructions.
On small caveat, when entering exclusions, you don’t have the bulk option like you do when setting up a campaign. You can only enter them one-by-one from the “Restrict locations within a country (optional)” text field.
3 tips for doing Google Ads location targeting right
If you want to successfully set up location targeting for Google Ads, check out these three tips!
1. Enter locations in bulk by the changes you’re going to make
If you have a segmented location setup like the example above, I’d recommend tackling your set up this way. Add any locations that you have bid adjustments or decreases for first, then save.
After saving, this will take you to your list of targeted locations, where you can easily add bid increases or decreases by selecting all locations. When finished with your bid adjustments, make sure to save. Then you can go back in and finish adding any targeted or excluded locations since they don’t need any other changes.
This allows you to easily select those regions needing adjustments. If you add everything at once, you have to work from the whole list of targeted locations, and it takes a little extra time to sort through the list and check each region to make any bid adjustments.
2. Use Google Trends to identify additional locations
Have an idea of the top-performing locations for your business but want to explore where people are showing extra interest in your product or service that you weren’t aware of initially? Use Google Trends!
Type in your product or service in the search bar and see which locations are showing the most interest. You can even change the “subregion” of the results data to go as granular or broad as you desire!
3. Always review before saving
Always review the list before you use “Target All.” Using just “Georgia” alone as a location can pick up either the state of Georgia or the country of Georgia.
If you select “Target All” without reviewing, try zooming out on the map to make sure no other areas are highlighted in blue (targeted) or highlighted in red (excluded). Taking this step ensures you add and remove the right locations from your targeting.
Need help with your location targeting for Google Ads?
If you need help setting up your Google Ads location targeting, WebFX can help. Our Google Ads Certified team of 500 experts can help you create and launch revenue-driving campaigns.
Contact us online or call us today at 888-601-5359 to speak with a strategist about our pay-per-click (PPC) advertising services!
-
 Angie is an Internet Marketing Consultant at WebFX specializing in SEO, PPC, email marketing, and CRO. Getting her start in design and marketing in 2005, she’s designed marketing materials, created, and managed marketing strategies and digital marketing efforts for hundreds of companies across many niche industries. Her experience on all sides of the spectrum is the driving force behind helping her clients save time, level up their businesses, and increase ROI through creative digital marketing campaigns. In her spare time, she enjoys spending time outdoors with her husband and rescue pup, going to the beach, coffee, music, movies, and art.
 -

WebFX is a full-service marketing agency with 1,100+ client reviews and a 4.9-star rating on Clutch! Find out how our expert team and revenue-accelerating tech can drive results for you! Learn more
Cost Per Click (CPC) Calculator
Do you advertise on platforms that charge per click? Use our calculator and figure out exactly how many clicks will fit within your budget.
Calculate Your CPC
Table of Contents
- How to Select Your Location Settings During Campaign Setup
- How to Select the Appropriate Location Settings for Your Campaign
- 3 Google Ads Location Targeting Options
- How to Exclude Locations
- How to See Where Your Ads Appear in an Existing Campaign
- How to Edit Locations for an Existing Campaign
- 3 Tips for Doing Google Ads Location Targeting Right
- Need Help with Your Location Targeting for Google Ads?
Share this article
Cost Per Click (CPC) Calculator
Do you advertise on platforms that charge per click? Use our calculator and figure out exactly how many clicks will fit within your budget.
Calculate Your CPC


