
CSS is the fundamental way of styling our web pages. Its deceptively easy syntax allows us to do many things to affect the visual layer of our work. And especially with CSS3, the language has gotten even more powerful.
There are many useful CSS techniques and tricks out there for you to take advantage of.
This is a collection of a few useful CSS snippets that you might want to keep in your toolkit.
1. Set body font-size to 62.5% for Easier em Conversion
If you would like to use relative units (em) for your font sizes, declaring 62.5% for the font-size property of the body will make it easier to convert px to em. By doing it this way, converting to em is a matter of dividing the px value by 10 (e.g. 24px = 2.4em).
body { font-size: 62.5%; /* font-size 1em = 10px */ } p { font-size: 1.2em; /* 1.2em = 12px */ }2. Remove outline for WebKit Browsers
When you focus (:focus) on an input element, perhaps you have noticed that Safari adds a blue border around it (and Chrome, a yellow one).
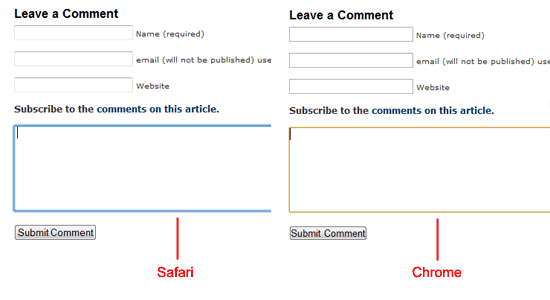
If you would like to remove this border outline, you can use the following style rule (this removes the outline from text fields):
input[type="text"]:focus { outline: none; }Please note that outline is used for accessibility purposes so that it is easier to see what input field is active. This is beneficial for those with motor impairments who cannot use a point-and-click device (such as a mouse), and thus must rely on alternative means of navigating a web page, such as the Tab key. The outline is also useful for able-bodied users who use keyboard shortcuts to get to web form input fields (it’s easier for them to see which input is currently active).
Therefore, rather than completely taking out the outline, consider styling your input fields such that it indicates that it is the focused element.
3. Use CSS transform for Interesting Hover Effects
For progressive enhancement, you could use the transform property that is supported by many browsers that have CSS3 support.
Here’s a trick for enlarging a elements on hover by 110%.
a { -moz-transform: scale(1.1); -webkit-transform: scale(1.1); -o-transform: scale(1.1); }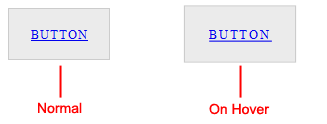
4. Target IE6 and IE7 Browsers without Conditional Comments
Need to target IE browsers? Here is a quick hack that doesn’t require conditional comments (note that your CSS will therefore not pass auto-validation, which is fine if you are aware of why it doesn’t).
The code below will change the background-color of divs depending on what browser the user is viewing the web page under. Since * cascades down to IE7 and below, we use _ after that declaration so that IE6 (and below) has a different background color from IE7.
div { background-color: #999; /* all browsers */ *background-color: #ccc; /* add a * before the property - IE7 and below */ _background-color: #000; /* add a _ before the property - IE6 and below */ }5. Support Transparency/Opacity in All Major Browsers
This example gives the div element a 70% opacity. We need to use proprietary CSS to get it to work on Internet Explorer (which will invalidate our code under W3C standards).
div { /* standards-compliant browsers */ opacity:0.7; /* The following is ignored by standards-based browsers */ -ms-filter: "progid:DXImageTransform.Microsoft.Alpha(Opacity=70)"; /* IE8 */ filter: alpha(opacity=70); /* IE 5-7 */ }6. Use !important to Override Normal CSS Precedence Rules
In CSS, when two properties apply to the same element, the one that is farther down the stylesheet is the one that will take effect. However, by using !important at the end of a property value, this can be changed.
Let’s take, for example, this set of style rules:
h1 { color: green; } h1 { color: red; }The h1 element will have a red color with the CSS above.
If we wanted to change the style rule’s priority without changing the order of the property declaration, then we simply do the following:
h1 { color: green !important; } h1 { color: red; }Now, the <h1> element will be green.
7. Centering a Fixed-Sized Element
Here is one way to center a fixed-width/fixed-height div at the center of its container. This could be adapted to centering text, images, etc. within their containers.
Essentially, we do a bit of arithmetic to get the fixed-sized element centered using absolute positioning and margins. Note that the parent container must have a position: relative property for this to work.
div { position: absolute; top: 50%; left: 50%; width: 400px; height: 300px; margin-top: -150px; /* 1/2 of your element height*/ margin-left: -200px; /* 1/2 of your element width */ }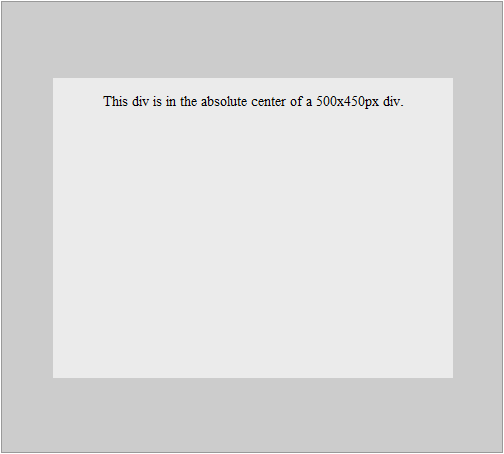
8. Easy Web Fonts with Google Font API
Web fonts allow you to step outside of the normal web-safe fonts by taking advantage of CSS’s @font-face rule. However, right now, browsers aren’t uniform in its implementation of @font-face. More specifically, web browsers differ in the types of font files they support (hopefully this will change with the WOFF standards).
Additionally, you must be careful with the fonts you use since some of them might not be licensed for web use.
To sidestep the issues with @font-face, the Google Font API is here to the rescue.
Here is an example of using the Cantarell font on <h1> elements that takes advantage of Google Fonts API.
If you want to use the Cantarell font from Google Font API, first reference the remote stylesheet inside your <head> tags as such:
<link href="http://fonts.googleapis.com/css?family=Cantarell" rel="stylesheet" type="text/css">
To use the font in h1 elements, simply use the font-family CSS property.
h1 { font-family: 'Cantarell', Arial, serif; /* Use a font stack, just in case. */ }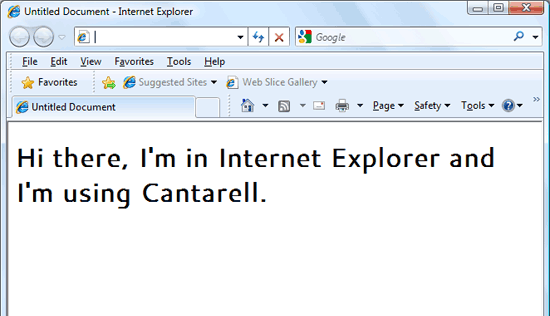
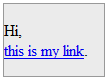
9. Prevent Line-Wrapping of Text Elements
Sometimes, you don’t want your text to wrap to the next line if it happens to reach the end of the width of its containing element.
Here is how a normal anchor text works when it reaches the end of its parent element’s width:
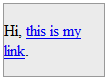
Notice that the link wraps at a whitespace in the text. What if we always want our links to be on the same line all the time (i.e. to prevent wrapping)?
Simple. We just use the white-space property.
a { white-space: nowrap; }Now, our links won’t wrap.
10. Vertically Align Text
We can use a variety of methods for horizontally aligning text (such as text-align: center or margin: 0 auto) but it’s slightly trickier to vertically align text.
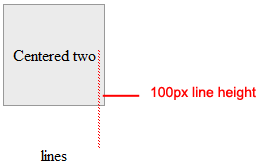
However, for single-line text, we can use the line-height property. By setting the line-height property of the text element to the same height of its container, it will become vertically centered.
Here is a p element that is horizontally-centered inside a 100x100px div using text-align: center:
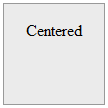
As you can see, text-align doesn’t center it vertically. To fix that, we can set line-height to the same height as the containing div (100px).
div { width:100px; height:100px; } div p { line-height:100px; }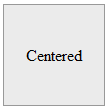
Note that this assumes the p element has no margin or padding.
If you have margin or padding at the top or bottom of the p element, you need to compensate for them accordingly or just simply set padding and margin to 0 to make life easier.
Also, this trick becomes troublesome when there is more than one line of text (i.e. when the text wraps) because there will be a space between the text lines that is equivalent to the line-height value.
It’s your turn to share.
Share your own favorite CSS tricks and techniques in the comments.
Related Content
-
 President of WebFX. Bill has over 25 years of experience in the Internet marketing industry specializing in SEO, UX, information architecture, marketing automation and more. William’s background in scientific computing and education from Shippensburg and MIT provided the foundation for MarketingCloudFX and other key research and development projects at WebFX.
 -

WebFX is a full-service marketing agency with 1,100+ client reviews and a 4.9-star rating on Clutch! Find out how our expert team and revenue-accelerating tech can drive results for you! Learn more
Make estimating web design costs easy
Website design costs can be tricky to nail down. Get an instant estimate for a custom web design with our free website design cost calculator!
Try Our Free Web Design Cost Calculator
Share this article


Web Design Calculator
Use our free tool to get a free, instant quote in under 60 seconds.
View Web Design CalculatorMake estimating web design costs easy
Website design costs can be tricky to nail down. Get an instant estimate for a custom web design with our free website design cost calculator!
Try Our Free Web Design Cost Calculator


