- Home
- Blog
- Web Design 5 Easy Steps to Optimize Your Images in Photoshop
5 Easy Steps to Optimize Your Images in Photoshop
-
 7 min. read
-
 Trevin Shirey
 VP of Marketing
- Trevin serves as the VP of Marketing at WebFX. He has worked on over 450 marketing campaigns and has been building websites for over 25 years. His work has been featured by Search Engine Land, USA Today, Fast Company and Inc.
Before we start, I want to throw a caveat out there: this tutorial excludes other optimization processes such that of selecting the right image formats for your needs as well as optimizing SEO such as alt tags that can improve the search ability of your images in, say, Google Images. This short tutorial will show you how to reduce the final images that you are about to host online.
Step 1: Open Photoshop and Open Your Image
Go to File > Open (Ctrl/Command+O) and bring your image to your workspace.
Step2: Start Photoshop Actions
I want to use Actions to record every command in this process including Save for Web & Devices command so that I can batch process my images without having to open each one later. Bring up the Actions Panel up by going to Windows > Actions (Alt/Option+F9).
From the Actions Panel, click on Create new set icon: name your new set. I named my Images. 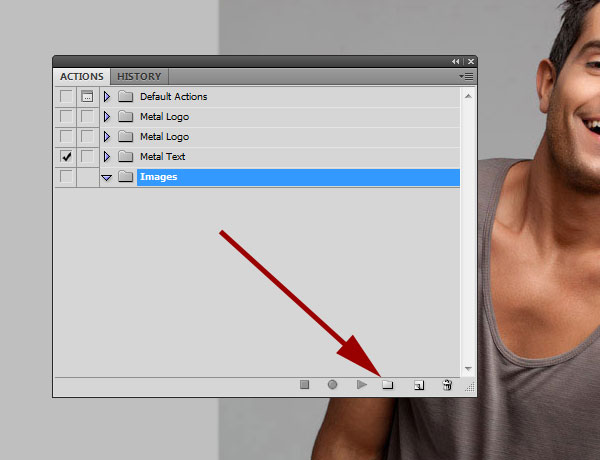 To start the recording process, click on Create new action icon; give your action a name.
I named my Image Optimization. Click Record to start. 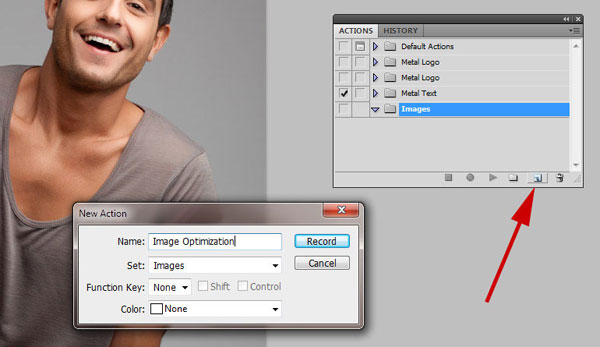 Remember: from now on all your commands will be recorded to your Actions Panel.
Step 3: Save your image for Web & Devices
Save your image for web and devices by going to File > Save for Web & Devices (Alt/Option+Shift+Ctrl/Command+S).
You should see Save for Web & Devices dialogue window in your workspace. I am going to keep my image at a decent quality, so I’m using the following settings:
- Preset: JPEG High (selects JPEG with Quality at 60)
- Optimized: Checked
- Convert to sRGB: Checked
- Image Size: change according to your site specifications
- Percent: 100%
- Quality: Bicubic
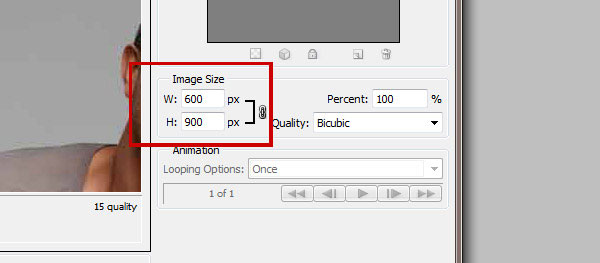
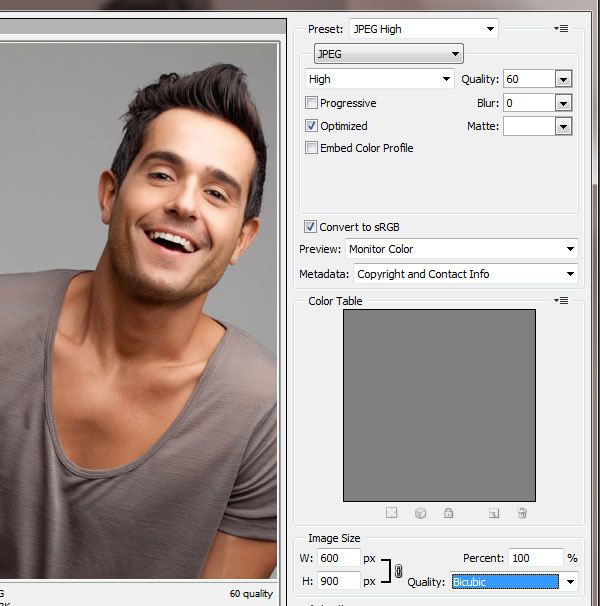 I need to make sure my image does not exceed 600 pixels in width, so I’m going to resize my image with the toggle on (link icon) to retain the original image proportions. Feel free to do the same if you need to meet a certain width/height requirement.
  Tip: Select 4-Up tab from your Save for Web & Devices window to preview your image as well as see the difference in file size and quality comparison.
Feel free to play around with the settings to find the quality and optimization that suits your loading needs. 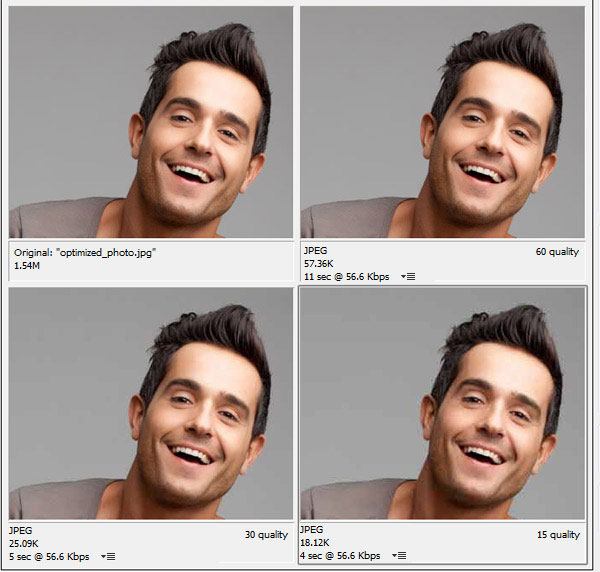 You can also click on the Select download speed icon to change the Size/Download Time to get an estimate on how long it will take to download your image at the selected Size/Download Time.
 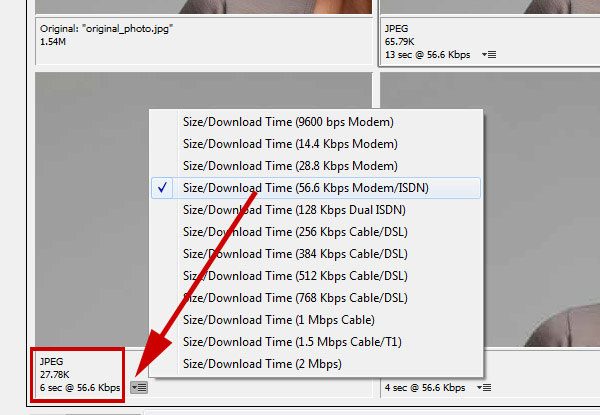 To preview your image in real size, click on the Preview button to see your image in the web browser.
 If you are happy with your image, click Save. I have chosen to save my images in a different folder as I want to preserve my original images with the larger dimensions for future use (remember I resize my images down to 600 pixels in width). Close your image file from your workspace.
Go to Actions Panel, click on the Stop playing/recording button to stop your Actions recording. This should record everything including closing your image. 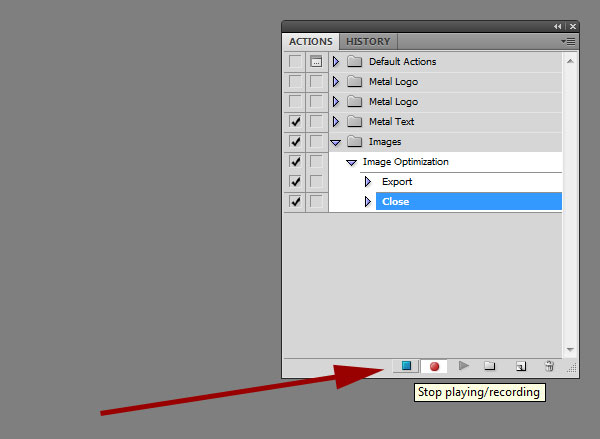 Remember: Since I chose to save my image to a new folder and did not save the original image after I close it, this will reflect in my recorded Actions.
If you want to replace your image, make sure you do so as you are recording. You can see the specifics of your recorded Actions by clicking to expand each Action. 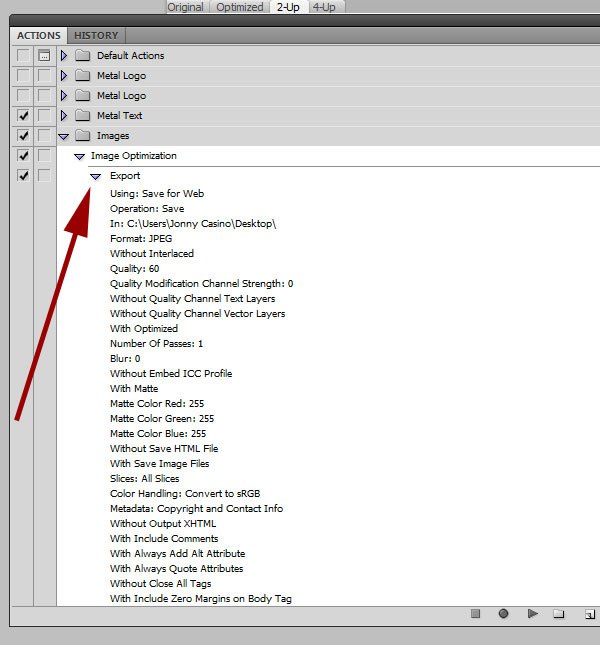
Step 4: Batch Process your Images
It’s time to do the same to the rest of your images.
Instead of going through them one by one, lets put our newly created Action to work! Go to File > Automate > Batch. Use my settings below.
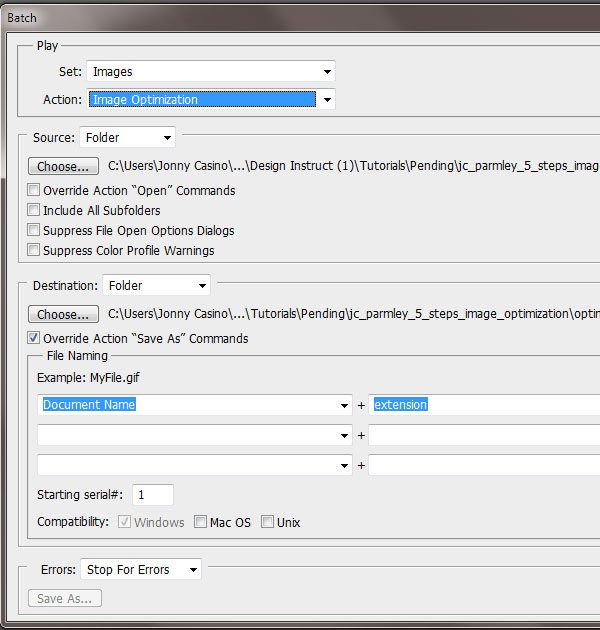 You should have selected the Actions Set and Action we have just recorded. Make sure you set your Source and Destination Folders, and check Override Action “Save As” Commands. By checking Override Action “Save As” Commands, we are allowing Photoshop to include our Save for Web & Devices command.
I’m keeping my File Naming as the original document name as well as extension.
Step 5: Use Image Optimizing Tools
We have already reduced our original image quite a bit in Photoshop, but let’s reduce it further by using an image-optimizing tool. There are many to choose from, but the one I like to use is Smush.it! It’s easy, fast, and free.
Go to Smush.it! from your browser (full URL: https://www.imgopt.com/. Click on the UPLOADER tab.
 Now, click on Select Files and Smush. From the file selection window that pops up, navigate to your image files. Select your images and click Open.
Now watch the optimizer in action! 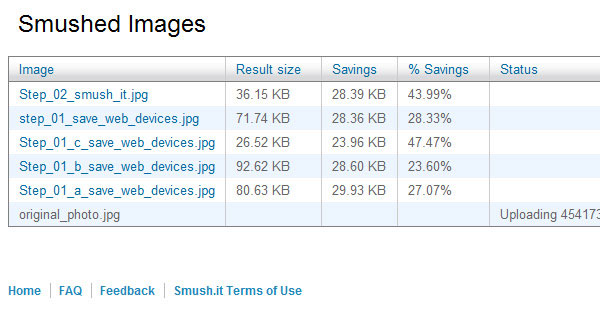 Once it has completed, you will get a message detailing the percentage and total size saved.
  Make sure “Keep directory structure in zip file” is checked—this will allow you to replace images easily if they are under different subfolders when you uploaded them.
Click Download Smushed Images. Open your zip file and replace your old image with the newly reduced image files.
Summary
You’ve just been through a quick run down on how to reduce your image size in Photoshop with 5 easy steps. You also created Actions to optimize your images in one go, saving you valuable time.
For a complete in depth guide on optimizing your images from selecting the right formats for your web projects, please check out The Comprehensive Guide to Saving Images for the Web.
-
 Trevin serves as the VP of Marketing at WebFX. He has worked on over 450 marketing campaigns and has been building websites for over 25 years. His work has been featured by Search Engine Land, USA Today, Fast Company and Inc.
 -

WebFX is a full-service marketing agency with 1,100+ client reviews and a 4.9-star rating on Clutch! Find out how our expert team and revenue-accelerating tech can drive results for you! Learn more
Make estimating web design costs easy
Website design costs can be tricky to nail down. Get an instant estimate for a custom web design with our free website design cost calculator!
Try Our Free Web Design Cost Calculator


Web Design Calculator
Use our free tool to get a free, instant quote in under 60 seconds.
View Web Design CalculatorMake estimating web design costs easy
Website design costs can be tricky to nail down. Get an instant estimate for a custom web design with our free website design cost calculator!
Try Our Free Web Design Cost Calculator


