

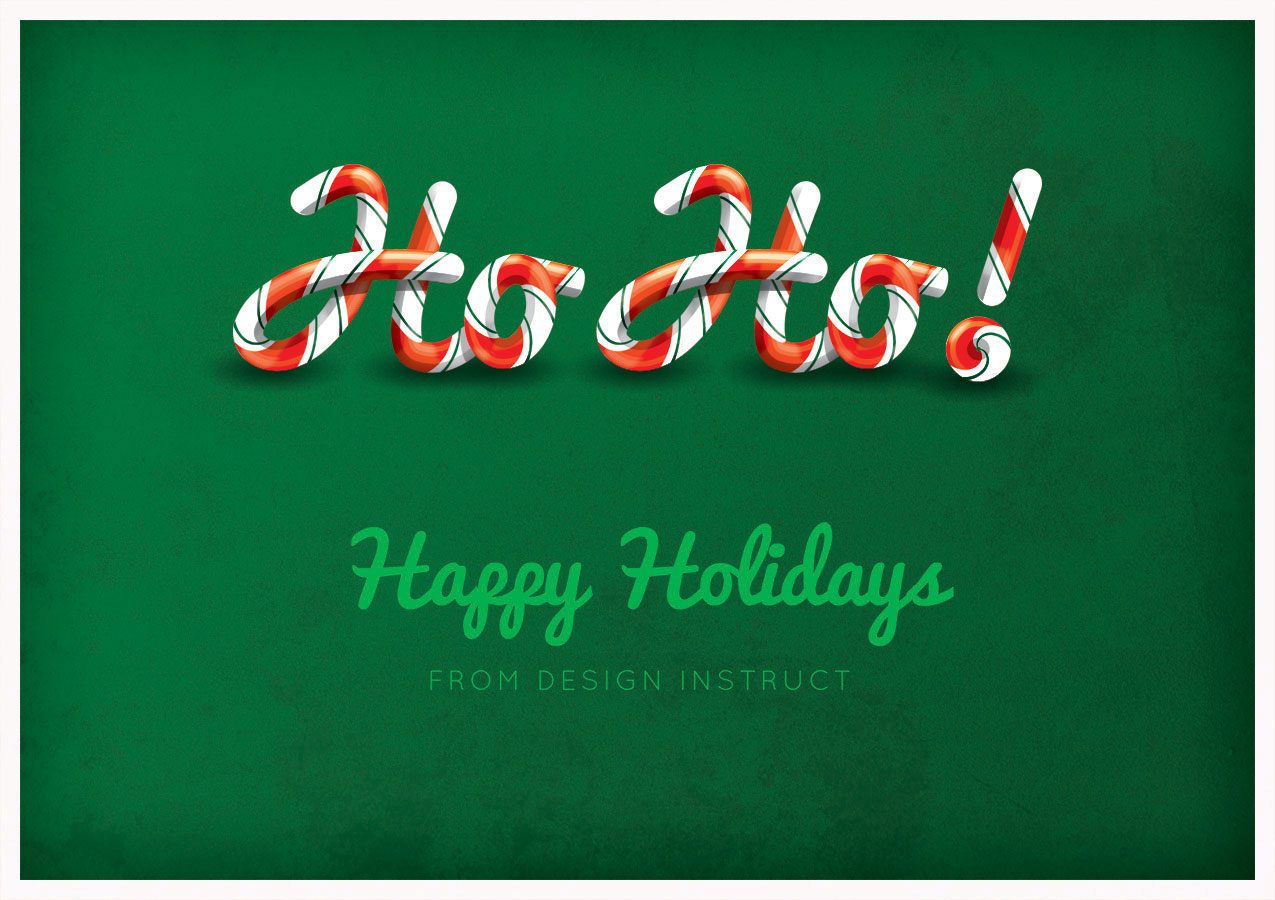
Preview
Click to view in full scale.
Tutorial Resources
Step 1: Setting Up the Illustrator Document
In Illustrator, go to File > New (Command/Ctrl+N) to create a new document. Set the Width at 8.5 in and Height at 6 in. This document size (8.5×6 in) is the size of a standard postcard.
This way, if you want, you can use your work later on as holiday greeting cards.
Next, use the Rectangle Tool (M) to make a rectangle around the artboard. Fill the rectangle with black (#000000). This will be our background — feel free to lock this layer so that you don’t accidentally move it.

Step 2: Creating the Red Stripe
To start the custom candy cane pattern, we’re going to make a white rectangle that’s about 1.2×0.2 in.
Next, draw a red rectangle using the Rectangle Tool (M).
Switch to the Direct Selection Tool (A).
Afterwards, hold down Shift and then drag the top side of the red rectangle to the right until the red rectangle is angled diagonally as shown in the image below.

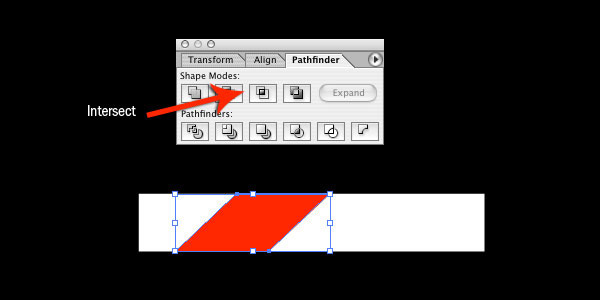
Now we want to remove the portions of the red rectangle that are outside of the white rectangle. First, duplicate the white rectangle by copying it (Command/Ctrl+C) and then pasting in front (Command/Ctrl+F). Next, select the white rectangle and the red rectangle using the Selection Tool (V).
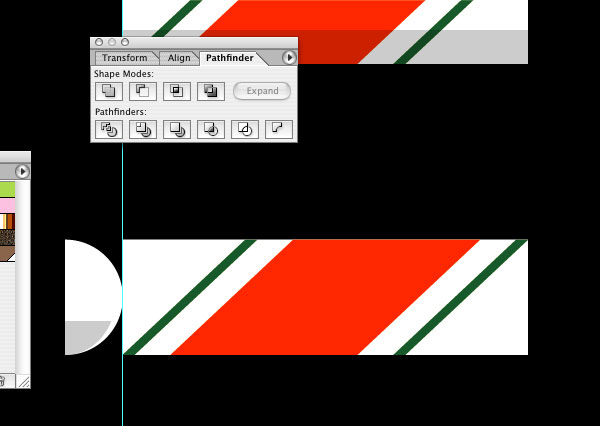
In the Pathfinder panel, click on the Intersect button. (If the Pathfinder panel isn’t open in your Illustrator workspace, go to Window > Pathfinder or press Shift+Command/Ctrl+F9.)
Our red stripe is now done and should look like this:
Step 3: Creating the Green Stripes
We also want to add green stripes beside the red stripe. To create the green stripes, we’ll use the red stripe as a starting point.
Begin by duplicating the red stripe: First, click on the red stripe to select it, copy it (Command/Ctrl+C) and then paste it in front (Command/Ctrl+F).
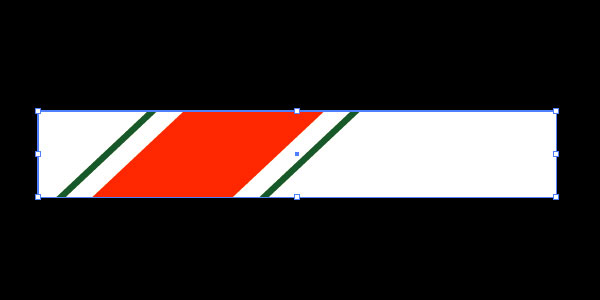
Afterwards, make sure that the red stripe duplicate is still selected and then go to Object > Path > Offset Path and then set the Offset option to 0.5. Just click OK to create the offset path object. Modify the object so that it has no Fill color and a green (#0d5327) Stroke color.
Now, like we did with the red stripe earlier, we want to remove the parts of the green stripes that are outside of the white rectangle behind them. Start by choosing Object > Path > Outline Stroke which will create an outline around the red stripe.
Then create a copy of the white rectangle (Command/Ctrl+C and then Command/Ctrl+F). Use the Selection Tool (V) to select the new white rectangle copy and the green stripes. Then, click on Intersect button in the Pathfinder panel.
Step 4: Modifying the White Horizontal Rectangle
We want to reduce the width of the white rectangle so that its left and right edges touch the green stripes.
First, we’ll need to turn on Smart Guides to make the width adjustment easier. If you don’t already have Smart Guides turned on, toggle it by going to View > Smart Guides (Command/Ctrl+U).
Next, with the Selection Tool (V), drag the top-right transform control and the bottom-left transform control of the white rectangle so that the corners line up with the edges of the green shapes. Use the image below as a reference.

Step 5: Creating a Glossy Effect
Candy canes usually have shiny surfaces, so let’s give our candy cane pattern a glossy effect.
Use the Rectangle Tool (M) to make a white rectangle that goes from the left to the right edge of the pattern and drop its Opacity to 20%.
Make another rectangle inside the first one, but make it narrower than the first.
Then, make a black rectangle at the bottom edge of the white rectangle. Change the black rectangle’s Blend Mode to Multiply and set its Opacity to 20%.

Step 6: Creating Rounded Ends
We need to round the ends of our candy cane pattern, so first we want to duplicate everything by selecting all of the objects, copying them (Command/Ctrl+C) and then pasting in front (Command/Ctrl+F).
Switch to the Ellipse Tool (L), hold down Shift and then make a white circle that’s the same height as the white rectangle (Smart Guides will help you do this accurately).
Move the duplicate white rectangle behind everything except the black background by going to Arrange > Send Backward (Command/Ctrl+[).
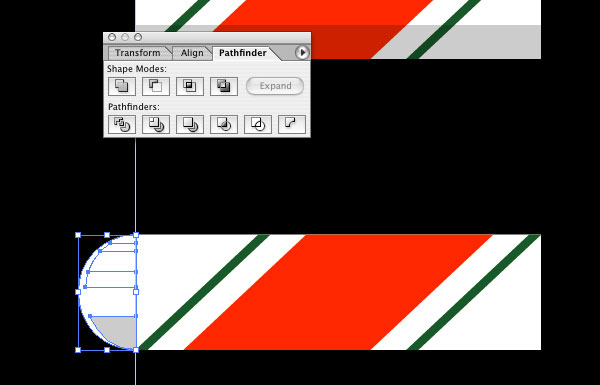
Choose the smaller white and black rectangles and then stretch them out past the circle. Click and drag a vertical guide out to the middle of the circle.

We only need half of the circle.
To do this, first, create a box using the Rectangle Tool (M) just on top of the left half of the white circle (the side we want to keep). Then, in the Pathfinder panel, press the Intersect button. It’s now a half-circle.
Duplicate the half-circle (Command/Ctrl+C, Command/Ctrl+F) then drag the left transform control to bring it in a little bit.
Copy the second half-circle. Paste it in front. Choose one of the small white rectangles, click on the Intersect button in the Pathfinder panel, and then click on the Expand button.
Do the same thing with the other small white rectangle and the black rectangle.
Step 7: Creating Pattern Swatches
Next, we will create a couple of pattern swatches out of the rounded end we just created in the previous step. Select the rounded end shapes and drag it into your Swatches panel.
We want to create another pattern swatch such that the rounded end of the shape is facing the other way. With the rounded shape still selected, go to Object > Transform > Reflect, choose the Vertical option in the Reflect dialog window that appears and then click OK to apply the transformation.
Afterwards, drag the object into your Swatches panel as well to create the second pattern swatch.
Step 8: Make a Custom Candy Cane Pattern Brush
Select the candy cane pattern, then click and drag it into the Brushes panel — this will open the New Brush dialog window.
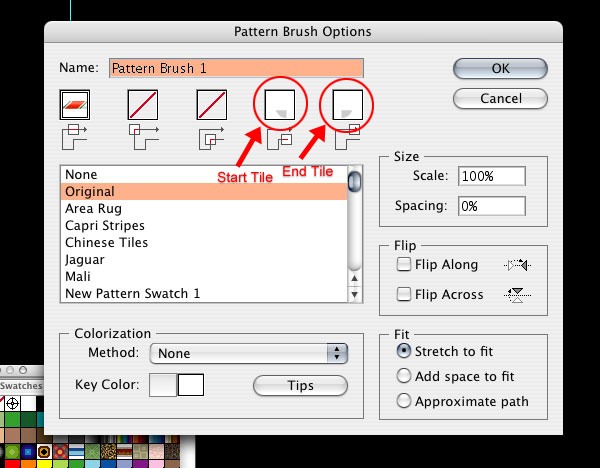
In the New Brush dialog window, choose the Pattern Brush option. Click OK and you should now be in the Pattern Brush Options dialog window. Click on the Start Tile swatch (second box to the right) and choose the rounded end pattern swatch facing left.
Click on the End Tile swatch (rightmost box) and choose the rounded end pattern swatch facing right. Use the following image as a reference.
Step 9: Creating the Candy Cane Text
Now that our pattern is ready to be applied, we can move on to creating our text. Since this is a holiday-themed post card, we are going to do “Ho Ho!” as our text.
I’m going to use the Pacifico font as an outline for the candy cane text. Feel free to use a similar font, or check out this font collection of free script fonts for other font options.
Use the Type Tool (T) to type out the text “Ho Ho!” on the artboard and fill it with white.
Next, use the Pen Tool (P) and start roughly tracing over the text. Play around with this until you get something you like.
Below, you can see the vector path I drew (in pink) above the white font.

Step 10: Applying the Candy Cane Brush
You can delete the white font outline that we used as a guide in the previous step.
Make sure that the pink vector path is still selected then, in the Brushes panel, look for the custom candy cane pattern brush we created earlier on and then click on it to apply the brush on the vector path. If done correctly, you should now have something like this:

Step 11: Moving to Photoshop
Now that our text is done, let’s finish our composition in Photoshop by refining some details such as shadows and highlights, as well as adding a textured background.
To start, create a new 8.5x6in Photoshop document by going to File > New (Command/Ctrl+N).
In the Tools panel, set the Foreground color to the same green color we used in the candy cane pattern and set the Background color to a darker green.
Switch to the Gradient Tool (G), set it to Linear Gradient and choose the Foreground to Background gradient preset (this can both be done in the Options bar). On the Background layer, create a gradient from starting from the left and ending at the right of the canvas.
Next, copy and paste the “Ho Ho!” text from Illustrator.
Rename the layer of the text to “Ho Ho!” in Photoshop.

Step 12: Adding Shadows
Go to Layer > New > Layer (Shift+Command/Ctrl+N). Rename the layer to “Shadow”.
On the “Shadow” layer, use the Pen Tool (P) to draw thick, black strokes on areas where you want shadows. Look at the following image as a reference.

Once you’ve drawn the thick, black strokes, drop the layer Opacity of the “Shadow” layer down to about 30% and change the Blend Mode to Multiply.
Step 13: Clean Up the Shadows
We want the shadows to just be on the text so we’ll need to remove parts of the shadows that are outside of the candy cane text.
To start, create a selection around the text by first clicking on the “Ho Ho!” layer in the Layers panel to make it the active layer, going to Select > Load Selection and then going to Select > Inverse (Shift+Command/Ctrl+I). This will create a selection of areas outside of the text.
Now click on the “Shadow” layer in the Layers panel to make it the active layer and press Backspace/Delete to remove the selected areas.

Step 14: Add Highlights
We’re going to give our candy cane text some highlights. First, create a new layer, name it “Highlight” and then change its Blend Mode to Overlay.
Start painting some of the top edges of the text with the Pen Tool (P) (or the Brush Tool, depending on your preference), set the Hardness option to 0%, choose a Brush Size similar to what you used to create your shadows and use white (#ffffff) as the brush color.
To get rid of the excess highlights outside the text, use the technique we used for cleaning up the shadows: Create a selection around the text by choosing Select > Load Selection, then go to Select > Inverse (Shift+Command/Ctrl+I) and then delete the selected area.
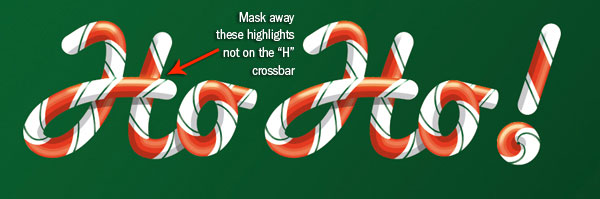
There are a few spots where some of the characters of the text overlap, like in the crossbar of the “H”, for example.
We need to clean this up. Create a layer mask on the “Highlight” layer by choosing Layer > Layer Mask > Reveal All. Then use the Brush Tool or the Pen Tool to mask out the unwanted highlights.
Step 15: Adding Ground Shadows
Let’s add shadows under the text to make our lighting as accurate as we can.
First, create a new layer (name this new layer as “Ground Shadow”), set the Blend Mode to Multiply and then put it behind the “Ho Ho!” layer.
Switch to the Gradient Tool (G), set it to Radial Gradient and select the Foreground to Transparent gradient preset.
Create a radial gradient on the spot under the first “H”. This is going to be one of our ground shadows.
Now let’s adjust the shape of the ground shadow. Using the Free Transform Tool (Command/Ctrl+T), squeeze or expand the ground shadow to make it fit the spot that’s touching the ground.
Add more ground shadows under the letters by duplicating the “Ground Shadow” layer (Command/Ctrl+J) and using the Move Tool (V) to position them.
In the Layers panel, select all the “Ground Shadow” layers, Control-click/right-click on top of any of the selected layers and then choose Link Layers in the contextual menu that appears.
With your linked layers still selected in the Layers panel, go to Layer > Merge Layers (Command/Ctrl+E) to combine all the ground shadow layers into just one layer. Then drop the Opacity of the layer down to 60%.

Step 16: Add More Text
Let’s complete our composition by putting the text, “Happy Holidays” under our candy cane text using the Pacifico font and then “From Design Instruct” under the “Happy Holidays” text using the Quicksand font.
Change the Blend Mode of the two text layers to Overlay so that they don’t distract from the candy cane text, which is the main attraction of the composition.

Step 17: Create a Textured Background
Let’s make the background of our text more interesting. First, unlock the Background layer by double-clicking on layer from your Layers panel, and simply clicking OK in the dialog window that appears.
Rename this layer to “Background” again.
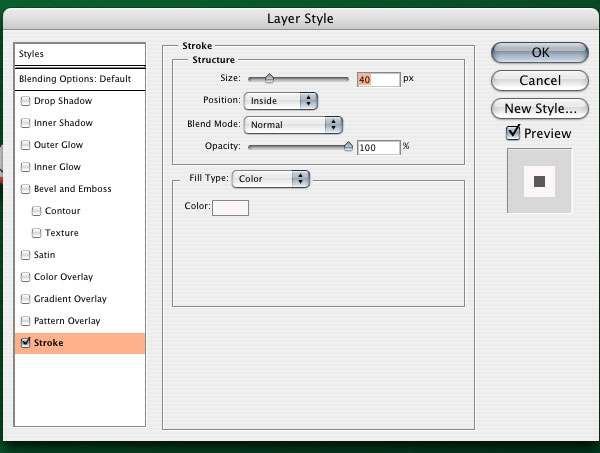
Go to Layer > Layer Style > Stroke to give the “Background” layer a white border around the canvas.
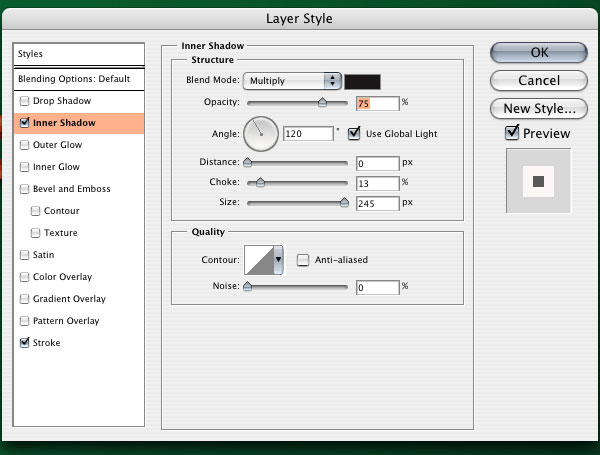
Also give the layer an Inner Shadow layer effect (Layer > Layer Style > Inner Shadow) using the following settings shown in the image below:
Download and open the Vandelay7 texture in Photoshop. Alternatively, browse Design Instruct’s texture freebies for more options. Place the texture on a new layer on top of the “Background” layer and name the new layer as “Texture”.
Change the Blend Mode of the “Texture” layer to Overlay and set the Opacity to 20%.

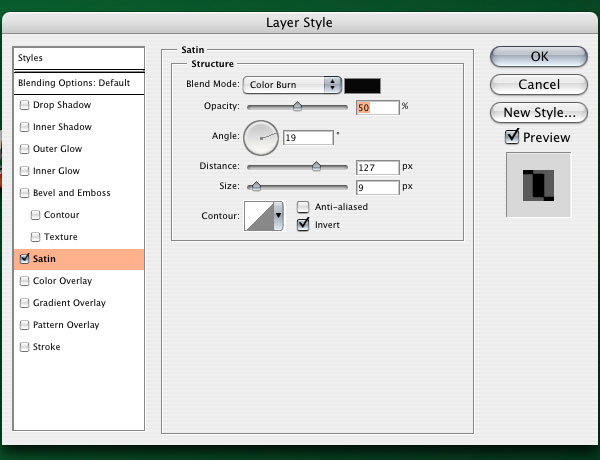
Step 18: Give the Candy Cane Text a Satin Layer Effect
This is our final step. Click on the “Ho Ho!” layer in the Layers panel to make it the active layer. Go to Layer > Layer Style > Satin.
Tutorial Summary
With the use of simple Illustrator techniques, we were able to create a festive candy cane text effect.
We built our candy cane pattern using various vector-drawing tools and the Pathfinder panel. We finished the scene in Photoshop by adding details such as shadows, highlights and a textured background. I hope you enjoyed this tutorial and picked up a technique or two!
Post your questions in the comments below.
Download Source Files
- candy_cane_text (ZIP, 6.27 MB)
-
 Trevin serves as the VP of Marketing at WebFX. He has worked on over 450 marketing campaigns and has been building websites for over 25 years. His work has been featured by Search Engine Land, USA Today, Fast Company and Inc.
 -

WebFX is a full-service marketing agency with 1,100+ client reviews and a 4.9-star rating on Clutch! Find out how our expert team and revenue-accelerating tech can drive results for you! Learn more
Make estimating web design costs easy
Website design costs can be tricky to nail down. Get an instant estimate for a custom web design with our free website design cost calculator!
Try Our Free Web Design Cost Calculator
Table of Contents
- Preview
- Tutorial Resources
- Step 1: Setting Up the Illustrator Document
- Step 2: Creating the Red Stripe
- Step 3: Creating the Green Stripes
- Step 4: Modifying the White Horizontal Rectangle
- Step 5: Creating a Glossy Effect
- Step 6: Creating Rounded Ends
- Step 7: Creating Pattern Swatches
- Step 8: Make a Custom Candy Cane Pattern Brush
- Step 9: Creating the Candy Cane Text
- Step 10: Applying the Candy Cane Brush
- Step 11: Moving to Photoshop
- Step 12: Adding Shadows
- Step 13: Clean Up the Shadows
- Step 14: Add Highlights
- Step 15: Adding Ground Shadows
- Step 16: Add More Text
- Step 17: Create a Textured Background
- Step 18: Give the Candy Cane Text a Satin Layer Effect
- Tutorial Summary
- Download Source Files
Share this article


Web Design Calculator
Use our free tool to get a free, instant quote in under 60 seconds.
View Web Design CalculatorMake estimating web design costs easy
Website design costs can be tricky to nail down. Get an instant estimate for a custom web design with our free website design cost calculator!
Try Our Free Web Design Cost Calculator


