

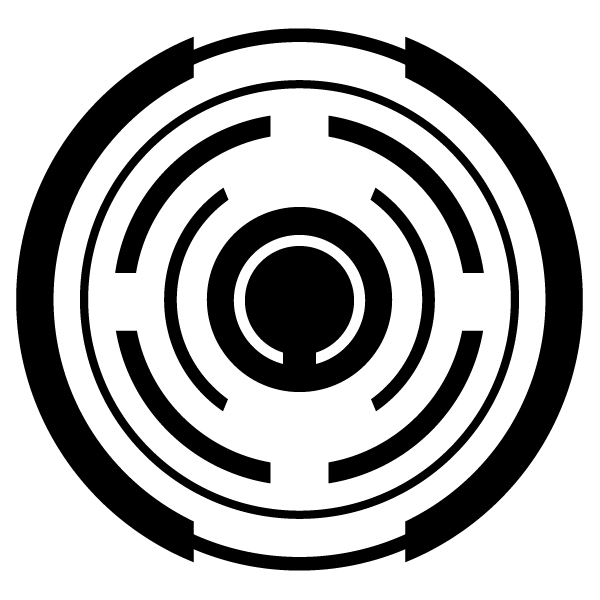
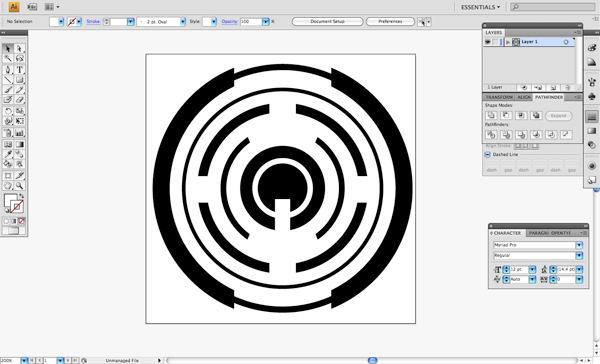
Preview
Step 1: Create a New Illustrator Document
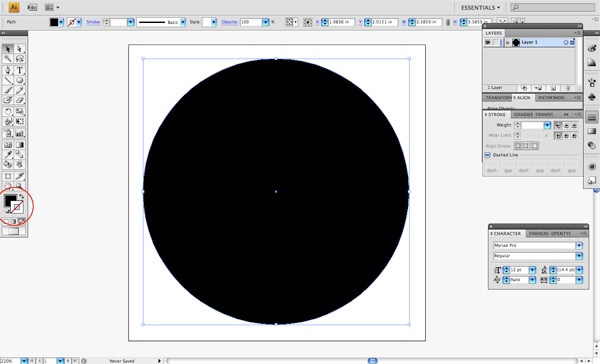
First we are going to create a new Illustrator document, and this can really be any size you want it to be; but for now let’s make our artboard a 4×4-inch square. You can make it either a print or a web document depending on how you want to use the end product. 
Step 2: Draw a BIG Circle
First, we are going to press the L key, which is the shortcut to the Ellipse Tool.
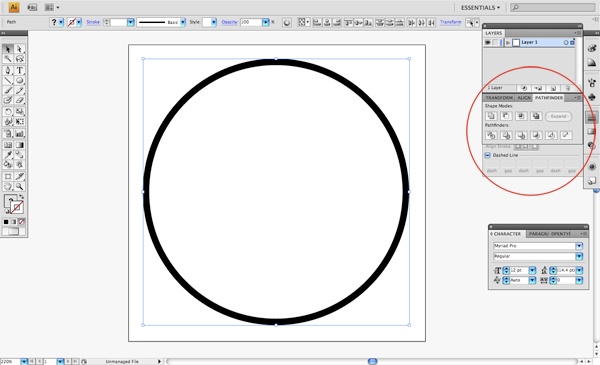
After that, make sure that you have a solid black Fill with no Stroke (you can set these options at the bottom of the Tools Panel, circled in red). While holding down the Shift key to ensure that our shape remains in proportion, click and drag to create a circle that spans almost the entire dimensions of the artboard. Of course, since we are in Illustrator and since we are working with vectors, we can rescale the design to make it larger or smaller later on without loss of quality and resolution.
Step 3: Create a Duplicate and Scale Down
Select the large black circle we have just made and press Cmd/Ctrl + C to copy and then immediately press Cmd/Ctrl + F, which is the shortcut for Edit > Paste in Front. Change the Fill color of this shape to solid white, and again, without any Stroke color so that we can see the difference between the two shapes accurately. 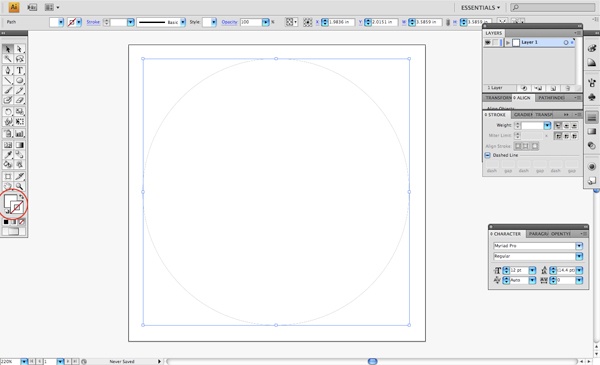 Now the white circle should be completely covering the black circle since it’s exactly on top of the shape and is exactly the same size.
We now want to hold down both the Shift + Option/Alt keys and then select one of the four corners of our white circle. While still holding the keys down, click and drag inwards so that we are now reducing the white circle from the center. Normally, if we were just holding down Shift, it would maintain the proportion of the shape but it would scale down from the corner rather than the center.
This is a bit of a time-saver, as we don’t have to try to center the shapes ourselves. 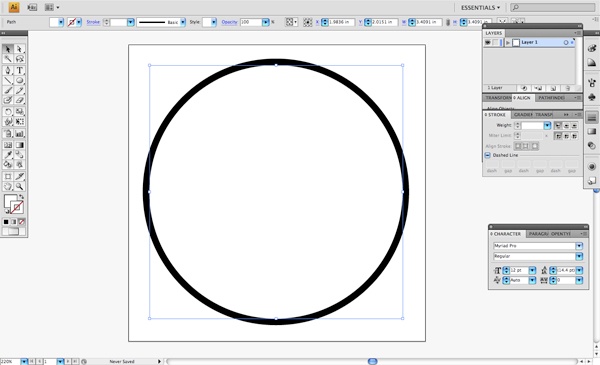
Step 4: Using Pathfinder
Make sure that the Pathfinder Panel is open (go to Window > Pathfinder or press Shift + Cmd/Ctrl + F9). Next, with the Selection Tool (V), select both circles.
While we still have both of our shapes selected, we want to click on the Minus Front command (circled in red) while holding down Cmd/Ctrl (so that the shape becomes a compound shape). 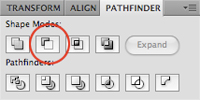 After clicking on Minus Front, you will notice that you have now knocked the white shape out of the black circle, essentially subtracting this area from the bigger circle in its background. This is the basic idea behind what we are trying to achieve and we will be using this method quite a bit in order to create some unique shapes.
Step 5: Repeat
Once again, select the Ellipse Tool (L) and create a slightly larger circle that is filled with solid black. 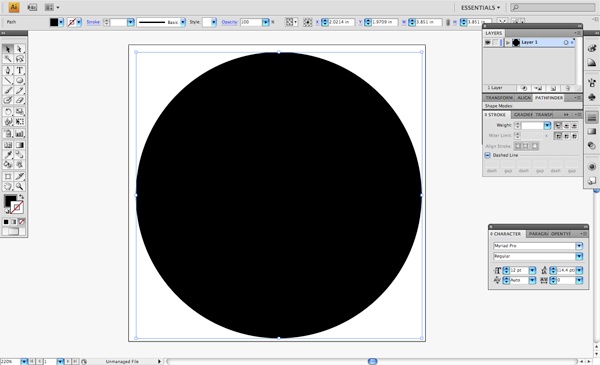 Using the same process we used before, we will again copy the shape by pressing Cmd/Ctrl + C followed by Cmd/Ctrl + F to paste to copied shape in front. Select one of the corners of the circle in front and hold down Shift + Option/Alt while dragging inwards to reduce the shape proportionally from the center.
Reduce this one further to create a thicker black outline. 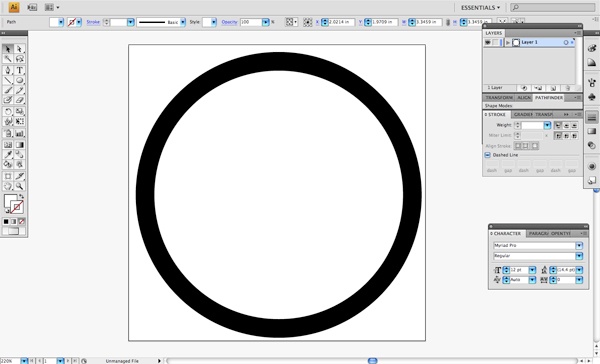 Select both of these shapes and use the Minus Front command while holding down Cmd/Ctrl from the Pathfinder to subtract the white circle from the larger black circle.
Step 6: Adding More Complexity
This step is basically what we have done in the earlier steps, but now we are going to add a bit more complexity so that we can create a slightly different shape.
Change from the Ellipse Tool to the Rectangle Tool (M) and create a vertical black rectangle that goes through the diameter of the newly created black shape. The size doesn’t have to be perfect, but just make sure that each end extends outside of the circle. 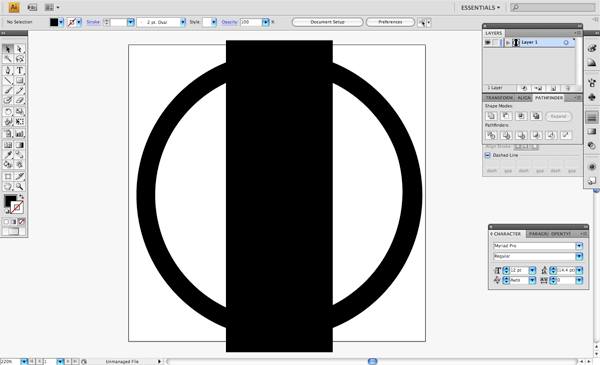 With the rectangle and the circular shape selected, we want to make sure that our two objects are centered.
We will use the Align Panel for this (open it up by going to Window > Align or pressing Shift + F7). This will bring up the panel that will give us several options for the alignment of objects, but the ones we are most concerned with are the Center Vertically and Center Horizontally commands. 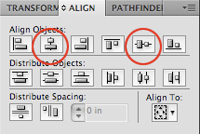 Now that we have done our perfect alignment and have ensured that our shapes are centered, press the Minus Front command in the Pathfinder Panel while holding down Ctrl/Cmd.
This will essentially subtract the rectangular shape from the circular shape — which is exactly what we want. You should now be able to see the thinner circle shape that we created beneath the gaps in the new shape. You may have to tweak it a bit so that the first shape intersects through the middle of the larger shape, but this can be done very easily now that we know how to rescale objects from the center and align them.
Step 7: Combining Shapes
Once our two shapes are lined up and everything is looking good, return to the Pathfinder Panel and press the Unite command (the first icon in the top row), which will combine these two shapes, rather than subtract one from the other. Using these same techniques, we can add more variation by placing different shapes — or combinations of shapes — on top of one another and either subtracting or uniting them. This is the foundation of our technique.

Step 8: Adding A Stroke
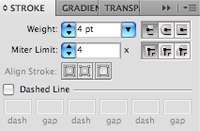
Next, we are going to select a solid black outline with no Fill color. Click on the Stroke at the bottom of the Tools Panel (or press X). In the Stroke Panel (Window > Stroke or press Cmd/Ctrl + F10 to show the panel), we want to set the Stroke’s Weight to 4 pt with a Miter Limit of 4 as well.
 Hold down the Shift key while making a large outline within our other shapes. Once you have done this, select both shapes that we currently have in our document and align them again to make sure everything is centered.
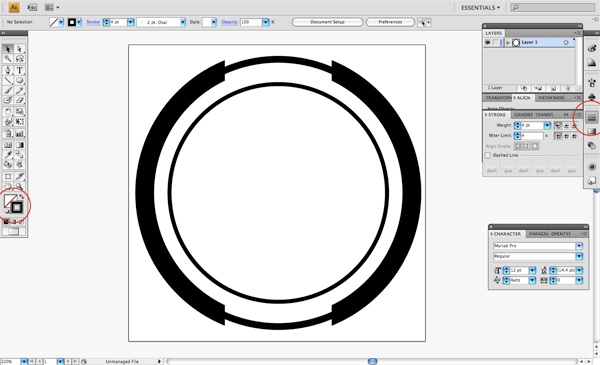
Step 9: Keep It Going
Change back to the Ellipse Tool (L) and create another circle inside of the other shapes.
Make sure that you have a solid black fill with no outline and that you are holding down Shift to constrain the proportions before drawing out the circle. 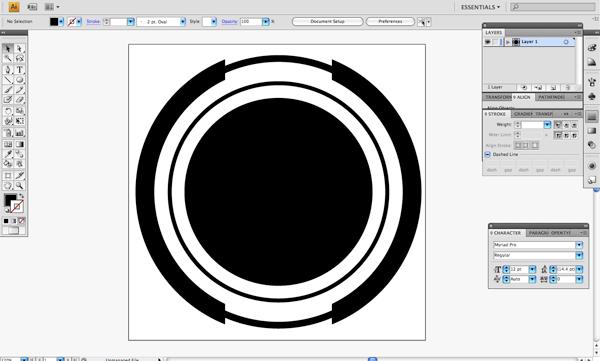 Copy this shape and fill it with solid white before pasting it in front using the Cmd/Ctrl + F shortcut we have been using so far.
 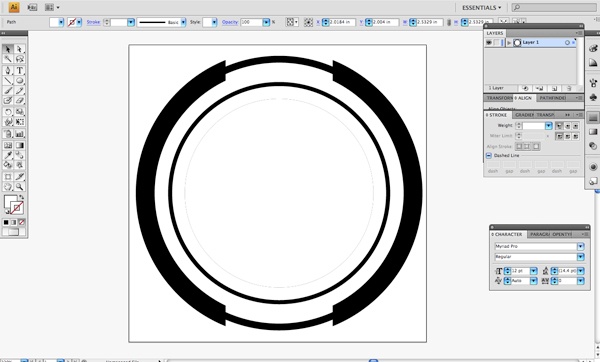 Hold down Shift + Alt and drag one of the corners inwards to create a slightly thicker black outline.
Select both of the shapes and return to the Pathfinder Panel where we want to use the Minus Front command again. (step09_reduce_and_subtract.jpg)
Step 10: X’s and O’s
Switch to the Rectangle Tool (M) and create a tall, thin rectangle. Rotate it slightly.
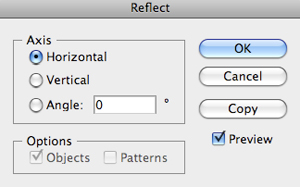
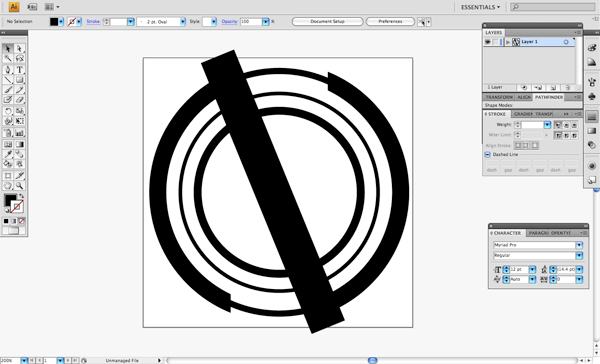 Copy this rectangle (Cmd/Ctrl + C) and paste in front (Cmd/Ctrl + F). Go Object > Transform > Reflect.
 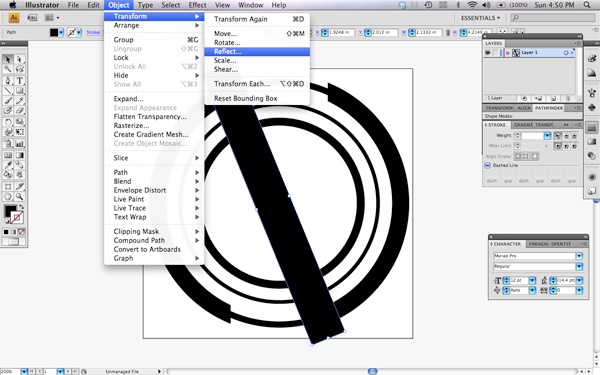 When prompted with the options, make sure that you have the Horizontal option selected.
 Once you have duplicated and reflected the rectangle, you will have an X shape, which at this point are two separate rectangles.
 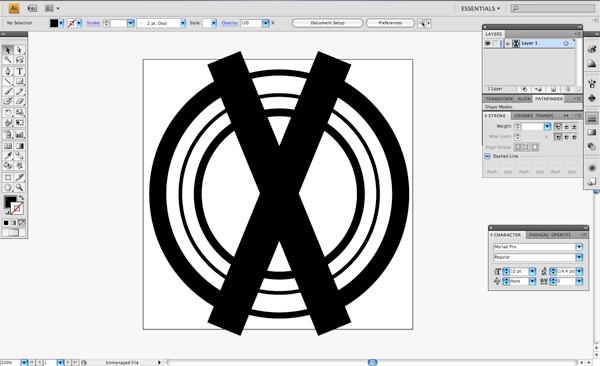 Select both of these shapes and press the Unite command from the Pathfinder Panel, just like we have done earlier on. This will combine both of the rectangles into one solid shape.
Before moving on, select both the X shape and the innermost circle shape and center-align them vertically and horizontally.
Step 11: Complete the Shape
Select the Pen Tool (P) and, with a solid black Fill, make a few anchor points on the top and bottom of the X shape, just to cover the exposed circle shape. 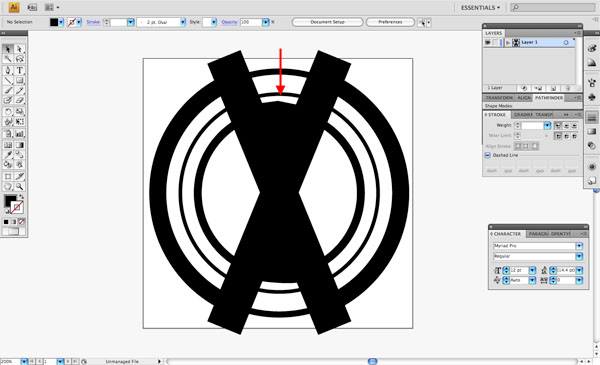 Select both of the X shape and the shape you drew with the Pen Tool, then press Cmd/Ctrl + G (shortcut for Object > Group) to group them together.
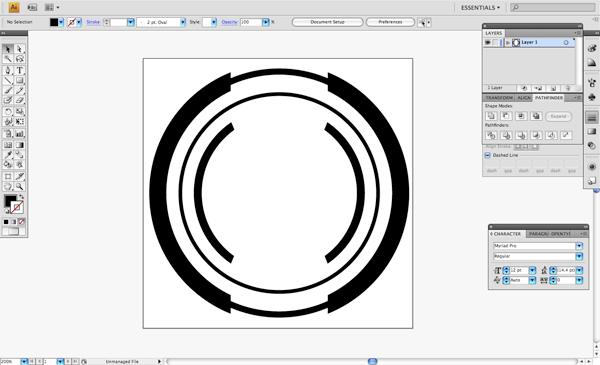
We now want to combine these two shapes with the X shape using the Unite command from Pathfinder Panel again. Now that we have combined the shapes together, we will select that shape, and while holding down the Shift key, we will select the innermost circle. Return to the Pathfinder Panel and once again use the Minus Front command to subtract this shape.
Step 12: Mama Said Knock You Out!
Next, choose the Ellipse Tool (L) and create yet another smaller black circle shape in the center of our other shapes. Hold the Shift key to constrain the proportions, and once you have created the shape, select all of the objects (Cmd/Ctrl + A) and align them all vertically and horizontally using the Align Panel commands. 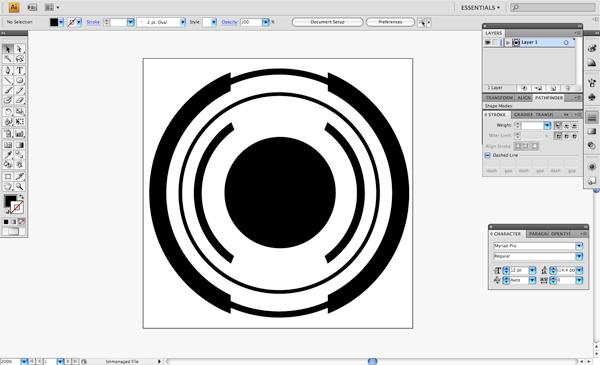 Return to the Rectangle Tool (M) and create a thin vertical rectangle. Copy this shape (Cmd/Ctrl + C) and paste it in front of the other shape (Cmd/Ctrl + F).
Grab the Selection Tool (V) and move the cursor towards one of the four corners of the newly created black rectangles. Your mouse cursor should change to a curved arrow cursor, which indicates that you can rotate the shape by moving your mouse left and right. Hold down Shift and rotate the shape so you are essentially creating a big plus (+) shape.
By holding down Shift while you rotate, the shape will rotate in 90o increments. Select both of these and combine the shapes using Unite from the Pathfinder Panel. 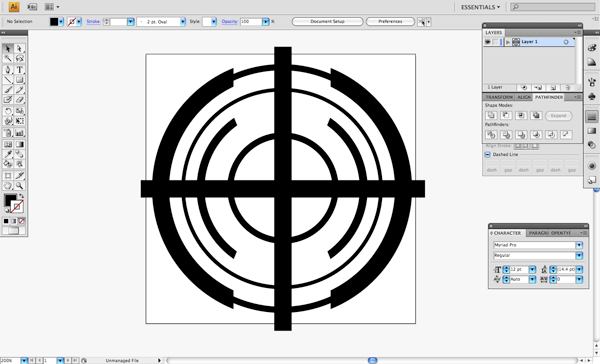
Step 14: More Circles
With our Ellipse Tool selected, create yet another black circle in the center of all of our shapes. Once you have done this, select all of our shapes (Cmd/Ctrl + A) and align everything horizontally and vertically using the Align Panel commands. 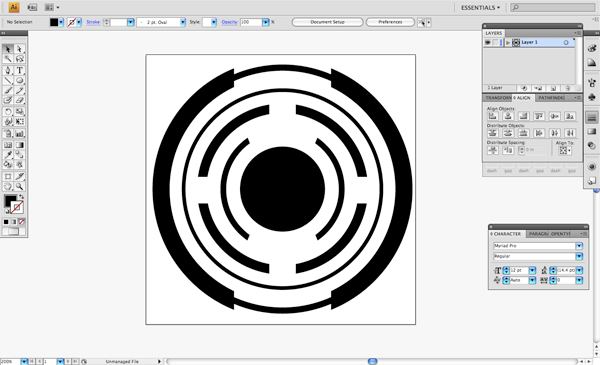
Step 15: Getting Centered
In our last step, we will want to copy the black circle we have just created and paste it in front, again using Cmd/Ctrl + F.
We want to change this shape to have a solid white fill with no stroke. While holding Shift + Alt, drag one of the four corners inwards so that the white circle will be reduced in size, but centered within the black circle. 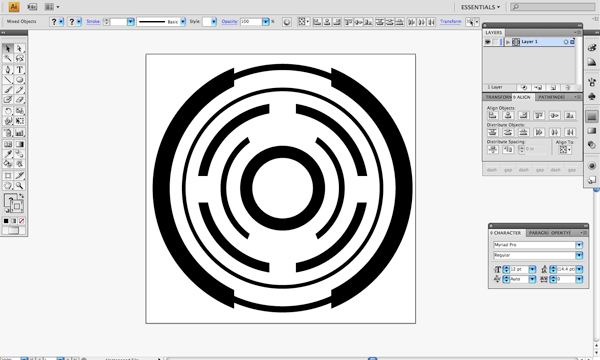 We will be repeating this step once more by copying the white circle, and pasting in front (Cmd/Ctrl + F).
Change the Fill to a solid black fill and make sure it doesn’t have a Stroke. Reduce the object proportionally within the white circle. Select this innermost black circle, and while holding the Shift key, select the white circle just outside of this shape.
Use our favorite command — Minus Front — to knock this black shape out of the white circle. You won’t really notice any difference here because both of these shapes are inside of a slightly larger black circle, but it is still necessary (as you will soon see).  Select the Rectangle Tool (M) and create a thin, vertical rectangle that only intersects the bottom portion of our newly created white shape at the center of the document.
 Hold the Shift key and select both the rectangle and the white circle we have just created, and once again, choose the Minus Front option from the Pathfinder Panel. Select this white shape and hold down the Shift key to also select the black circle that the white shape is contained in and select the Minus Front option one more time. This makes it so that the innermost white shape will be knocked out of the black circle rather than just being a white shape sitting on top.
Tutorial Summary
As you can see, there are quite a few steps involved in creating a geometric design like this, and the results may vary depending on how much or how little complexity you want it to have. You should now be prepared to create a nice variety of shapes using the same techniques we have covered here and you can move things around, add to it, or take things away. You can use shapes like this as a design element (see the tutorial that uses this shape as a major component), as an art brush, or export it to other programs like Cinema 4D and Photoshop.
I hope you have found this tutorial useful and can use this technique in some of your own artwork to create some interesting compositions. Thanks for following along!
Download Source Files
- circular_fragments_illustrator (ZIP, 0.96 MB)
-
 Trevin serves as the VP of Marketing at WebFX. He has worked on over 450 marketing campaigns and has been building websites for over 25 years. His work has been featured by Search Engine Land, USA Today, Fast Company and Inc.
 -

WebFX is a full-service marketing agency with 1,100+ client reviews and a 4.9-star rating on Clutch! Find out how our expert team and revenue-accelerating tech can drive results for you! Learn more
Make estimating web design costs easy
Website design costs can be tricky to nail down. Get an instant estimate for a custom web design with our free website design cost calculator!
Try Our Free Web Design Cost Calculator
Table of Contents
- Preview
- Step 1: Create a New Illustrator Document
- Step 2: Draw a BIG Circle
- Step 3: Create a Duplicate and Scale Down
- Step 4: Using Pathfinder
- Step 5: Repeat
- Step 6: Adding More Complexity
- Step 7: Combining Shapes
- Step 8: Adding a Stroke
- Step 9: Keep It Going
- Step 10: X’s and O’s
- Step 11: Complete the Shape
- Step 12: Mama Said Knock You Out!
- Step 14: More Circles
- Step 15: Getting Centered
- Tutorial Summary
- Download Source Files
Share this article


Web Design Calculator
Use our free tool to get a free, instant quote in under 60 seconds.
View Web Design CalculatorMake estimating web design costs easy
Website design costs can be tricky to nail down. Get an instant estimate for a custom web design with our free website design cost calculator!
Try Our Free Web Design Cost Calculator


