
Preview
You can click on the preview image below so that you may see the composition in full scale. 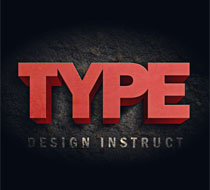
Tutorial Resources
- Texture: Lava Rock Texture 01 by Bill Chambers
- Texture: Experimental Grunge by Zen Textures
Step 1: Open Photoshop and Set Up Your Canvas
Open up Photoshop and create a new 1200x1200px document at 72 dpi. 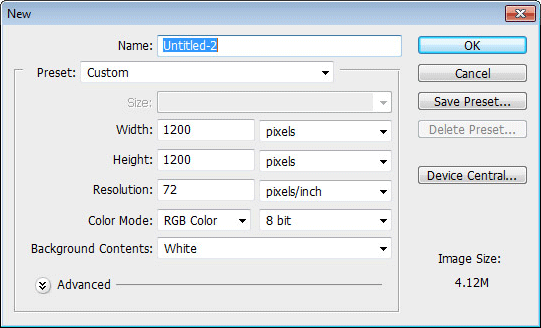
Step 2: Add the Text
Next, we want to create some text, so let’s use the Horizontal Type Tool (T) to type the text “TYPE” using Franklin Gothic Heavy, or a similar heavy font. We are going to change the text to a red color (#CC3333) so that it stands out from the black background that we will be creating later on.
We are also going to adjust the kerning of our text by holding down Alt/Option and using the left and right arrows so that the spacing between the letters are to your liking. 
Step 3: Duplicate the Text
To start making the 3D effect, we are going to duplicate the text we have by pressing Ctrl/Cmd + J. We should adjust the color so we will be able to differentiate the text face and the text sides.
Also, the text color of this text layer will be the base color for the darker text sides, so let’s use a darker red color (#990000). We are also going to shrink down the darker text because it will be farther away from us, in terms of perspective.Use the Free Transform command (Ctrl/Cmd + T), hold down Alt/Option + Shift, and then shrink the text down a little bit (to around 90%). Use the Move Tool (V) to move it down a bit and so we can give our text the depth and thickness that we want.

Step 4: Connecting the Text
We want to go around to each letter and connect the corners so that it creates the sides of the text. Create a new layer (Layer > New > Layer), and using the Polygonal Lasso Tool (L) make a shape that connects the two corners as shown below, then fill it with our dark red color (#990000). 
Step 5: Breaking the Text Sides Apart
Now that we have our 3D text all set up, we want to break apart the sides so we can add a shadow to them individually.
First, we need to take the dark red text and the sides we created and merge the two layers together. So make sure the text layer is on top (the stacking order you should have is light red text > dark red text > dark red sides) and go to Layer > Merge Down (Ctrl/Cmd + E). Make sure you have the dark red text layer selected, then using the Polygonal Lasso Tool (L) make a shape around one side of the text side.
Once you have selected an area, use Ctrl/Cmd + J to duplicate it. This will create a new layer with just the piece we selected so that we can have each side on its own layer. Repeat this for each side of our text.
As you go along, make sure you name each layer appropriately to keep your work tidy and intuitive, and also put each letter in its own folder (Layer > New > Group) so that it will be easier to work with as we go along. 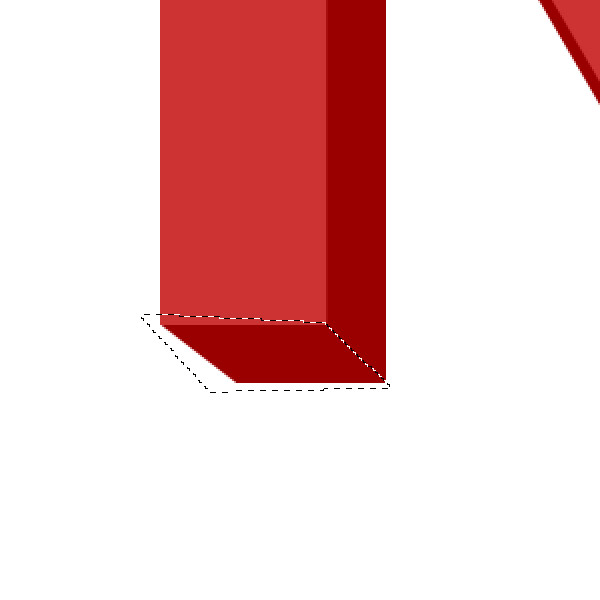
Step 6: Add the Shadows
Now we can start working on our shadows; we are going to have a light source coming from the top right of our canvas, so we will adjust our sides accordingly, having the darkest parts on the bottom left and the lighter on the upper right. Click on the first side and go to Layer > Layer Style > Gradient Overlay.
We will adjust the angle for each side so the lightest part is the closest to the light source at the top right. 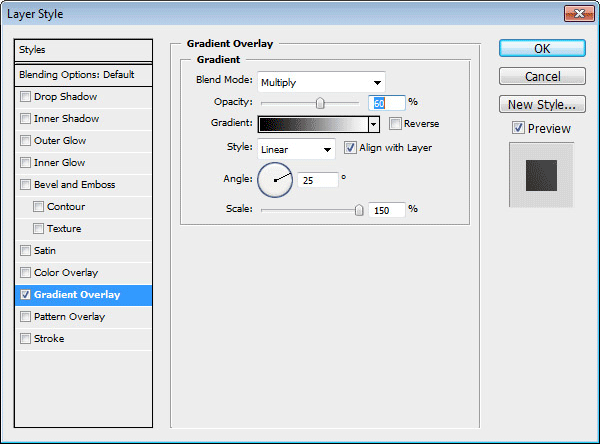

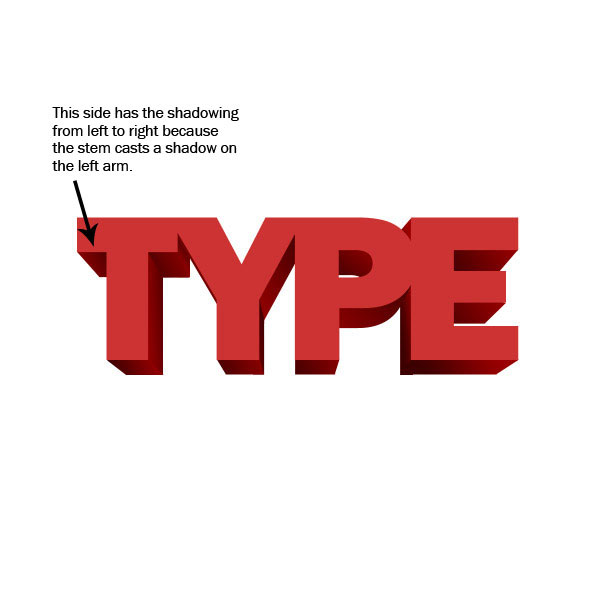
Step 7: Correct the Shadows
Although we want all the shadows to be the farthest away from the light source, there are a few exceptions. One exception is the left side of the letter T — we want the shadow of it to be the closest to the middle because the middle part of the letter will block the left arm.
Step 8: Darkening the Shadows
Now we want to take the sides that are going to be blocked the most from the light source and make them darker. To darken these sides, go to Layer > Layer Style > Color Overlay. Change the color to black and adjust the Opacity to between 20% and 60%.

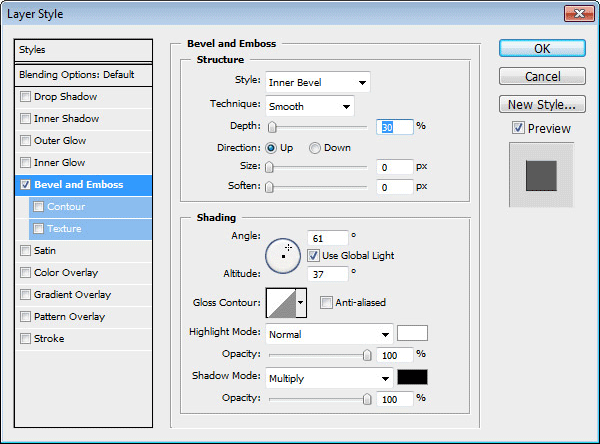
Step 9: Embossing the Text Face
Let’s add some effects to our text face. Click on the text face layer in the Layers Panel to make it our active layer, and then go to Layer > Layer Style > Bevel and Emboss. Make sure the angle of the bevel is pointed towards the top right so that our lighting is consistent.
Step 10: Adjust the Light of the Text
Now to add a little bit of lighting to the face of our text, we are going to give it a gradient by going to Layer > Layer Style > Gradient Overlay. 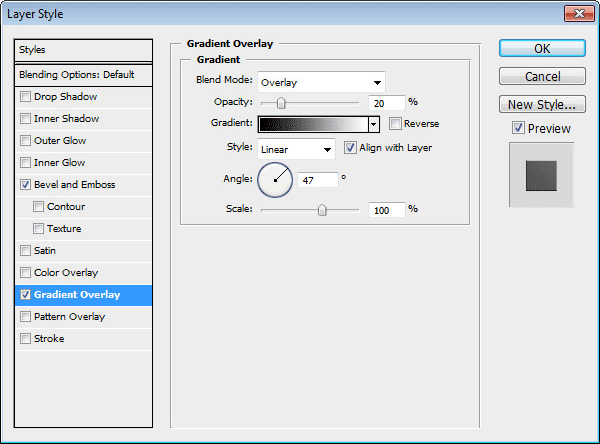

Step 11: Adding a Texture to the Background
We can now start working on our background. First, though, change the Background layer’s fill to black.
One way to do this is to press Ctrl/Cmd + A to select the entire canvas, then hit Shift + F5 to open the Fill dialog window, which you can use to fill the selection with black (#000000). Go and get the Lava Rock Texture 01 for our background (which is from the Design Instruct Freebies section, by the way). Bring the texture into our document.
Rotate the texture using Free Transform (Ctrl/Cmd + T) as well as shrink it down so that it is equal to the width of our canvas. 
Step 12: Fade Out the Texture
We are going to fade out the texture, and to do this, we first want to find the center of the canvas. Go to View and make sure Snap is checked (you can toggle Snap on and off by pressing Shift + Ctrl/Cmd + ;).
Now bring a horizontal guide to the center; when the guide reaches the center, it should snap in place. Do the same for a vertical guide. Now go to Layer > Layer Mask > Reveal All.
Fill the mask with black, and then use the Gradient Tool (G) with its gradient set to White, Transparent to make a gradient starting from the center. Click on the mask layer, and using the Free Transform command (Ctrl/Cmd + T), bring the top and bottom in by clicking-and-dragging the top transform control in while holding Alt/Option so that none of the edges of the texture show up. You should end up with the texture fading out in an oval shape as it gets closer to the edge of our canvas.

Step 13: Add Shadows Under the Text
To add the shadows under the text, we are going to Ctrl/Cmd + click on each layer of the text in the Layers Panel to produce a marquee selection around its edgest. Next, create a new layer and fill the selected area with black (#000000). Duplicate this layer by hitting Ctrl/Cmd + J so that we have 2 black text layers.
Move these layers behind all the other text layers. Go to Filter > Blur > Motion Blur and make sure the angle goes from the top right to the bottom left so that it is the same angle as our light source. 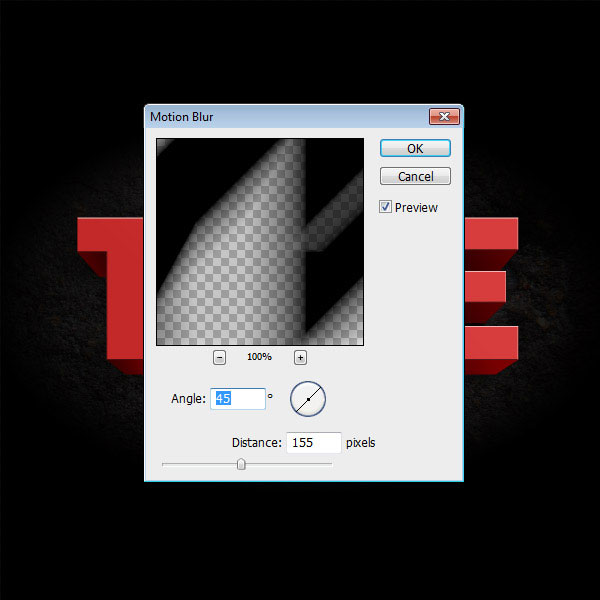
Step 14: Make the Shadow Darker
Duplicate the shadow layer by pressing Ctrl/Cmd + J.
Now link the two layers together and go to Layer > Merge Layers. 
Step 15: Blur the Shadow
With the other black text layer, go to Filter > Blur > Gaussian Blur and adjust the Radius to 12.0. 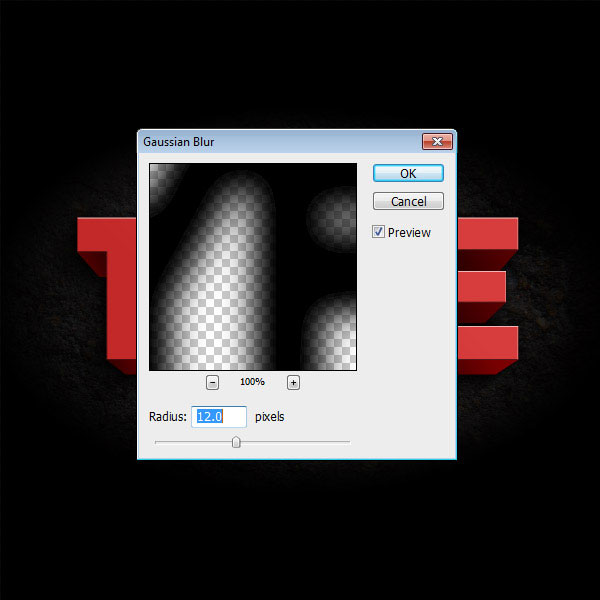
Step 16: Mask Away Parts of the Shadow
Go to Layer > Layer Mask > Reveal All. Using a black, 100px brush with Hardness at 0%, start painting away the black parts of the shadow on the top and right, where the light source would be for each black layer. 
Step 17: Adding a Texture to the Text
Get the grungy texture from Zen Textures and bring it into Photoshop.
Size the texture so that it is a little bit bigger than the width of the text. Ctrl/Cmd + click on each layer and go to Layer > Layer Mask > Reveal All. This will make the texture show up only on the text.
Change the Blend Mode of this layer to Soft light and turn the Opacity down to 40%. 
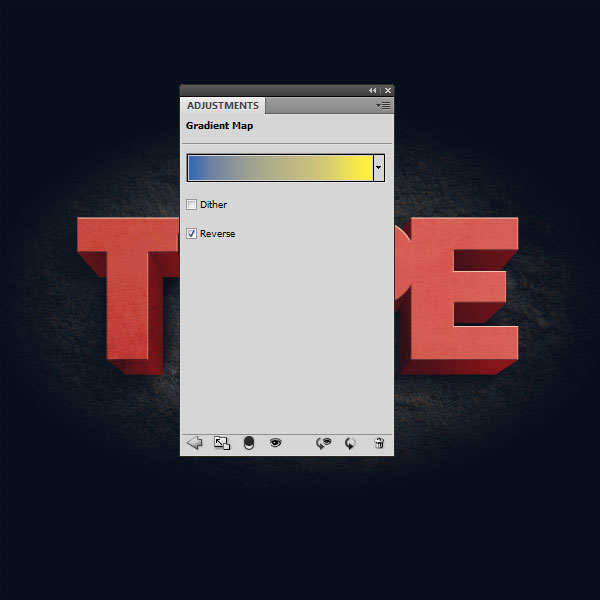
Step 18: Add a Gradient Map Adjustment Layer
Go to Layer > New Adjustment Layer > Gradient Map. Add a Blue to Yellow gradient and drop the Opacity down to 10%.

Step 19: Adding the Sub Text
Using Franklin Gothic Demi Condensed (or a similar font of your choice), let’s type out “DESIGN INSTRUCT” in white. Change the Blend Mode of the text layer to Overlay, and duplicate the text by pressing Ctrl/Cmd + J. This will give us a sort of lighted text look.

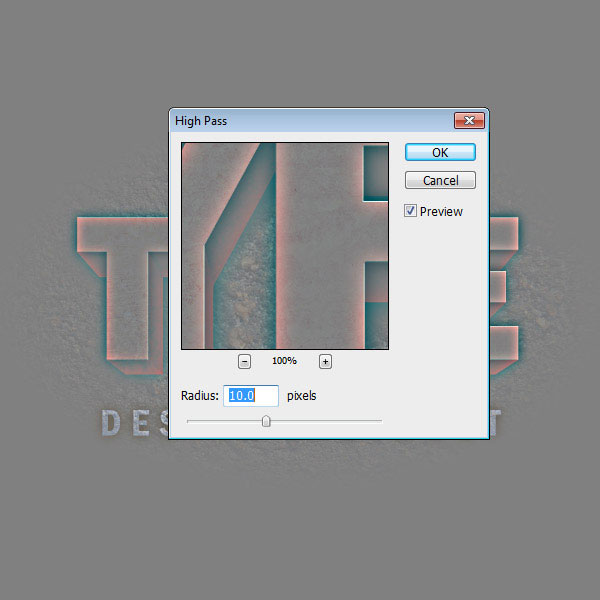
Step 20: Adding a High Pass
Alright, final step: We are going to go to Layer > Flatten Image to make one layer from all the layers we’ve created thus far. Duplicate this layer (Ctrl/Cmd + J) and then go to Filter > Other > High Pass. Change the Blend Mode to Soft Light to finish off our piece.
Tutorial Summary
With the use of simple Photoshop techniques and some stock textures, we were able to create a high-impact dark scene that has 3D text. We added shadows using a variety of techniques, made certain that our lighting is consistent throughout the way, used a few filters, and incorporated textures to make our scene more interesting. I hope you enjoyed this tutorial and found a few tricks that you can utilize in your workflow.
Download Source Files
- darkgrunge_3d_text (ZIP, 5.67 MB)
-
 Trevin serves as the VP of Marketing at WebFX. He has worked on over 450 marketing campaigns and has been building websites for over 25 years. His work has been featured by Search Engine Land, USA Today, Fast Company and Inc.
 -

WebFX is a full-service marketing agency with 1,100+ client reviews and a 4.9-star rating on Clutch! Find out how our expert team and revenue-accelerating tech can drive results for you! Learn more
Make estimating web design costs easy
Website design costs can be tricky to nail down. Get an instant estimate for a custom web design with our free website design cost calculator!
Try Our Free Web Design Cost Calculator
Table of Contents
- Preview
- Tutorial Resources
- Step 1: Open Photoshop and Set Up Your Canvas
- Step 2: Add the Text
- Step 3: Duplicate the Text
- Step 4: Connecting the Text
- Step 5: Breaking the Text Sides Apart
- Step 6: Add the Shadows
- Step 7: Correct the Shadows
- Step 8: Darkening the Shadows
- Step 9: Embossing the Text Face
- Step 10: Adjust the Light of the Text
- Step 11: Adding a Texture to the Background
- Step 12: Fade out the Texture
- Step 13: Add Shadows Under the Text
- Step 14: Make the Shadow Darker
- Step 15: Blur the Shadow
- Step 16: Mask Away Parts of the Shadow
- Step 17: Adding a Texture to the Text
- Step 18: Add a Gradient Map Adjustment Layer
- Step 19: Adding the Sub Text
- Step 20: Adding a High Pass
- Tutorial Summary
- Download Source Files
Share this article


Web Design Calculator
Use our free tool to get a free, instant quote in under 60 seconds.
View Web Design CalculatorMake estimating web design costs easy
Website design costs can be tricky to nail down. Get an instant estimate for a custom web design with our free website design cost calculator!
Try Our Free Web Design Cost Calculator


