
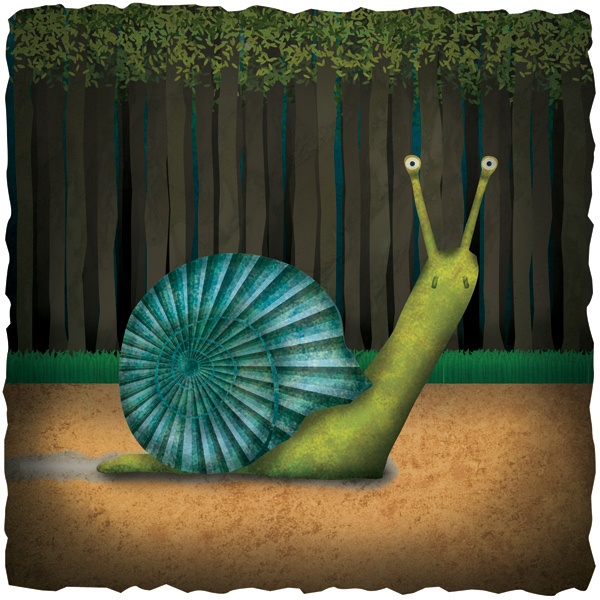
Preview
Resources
- Paper leather texture by Ervin Bartis (Creative Commons Share Alike)
- Marble texture by Telzey’s (Free Textures Set)
Introduction
When I started to explore texture use in my illustrations, I was mostly inspired by the credits in “Lemony Snicket’s A Series of Unfortunate Events“, with its unusual colors and texture layering, reminiscent of Tim Burton’s artistic visions—the most recent being “Alice in Wonderland“. Like my daughter, I am very much a touch/tactile person. When I see things through her eyes, she sees everything in texture—whether it is the touch of baking flour, or petting a cat, everything to her is about texture, touch and feel, so giving some thing greater dimension was important to me since she is my audience. Another artistic style I like can be seen in Granny O’Grimm, an Irish animated short that was nominated for an Oscar this year.
I love playing with color, but I chose to keep the tones of this piece more earthy and muted with hints of vibrancy. In this tutorial, I will share with you how all of that translates into my compositions.
Step 1: Rough Composition
The first step for me is working out the composition; my tools of choic—pencil and paper.
You can see that I wanted to plot out the scene that I wanted to create, which gives me an idea of what direction and what resources I need to be looking for to incorporate in the piece. 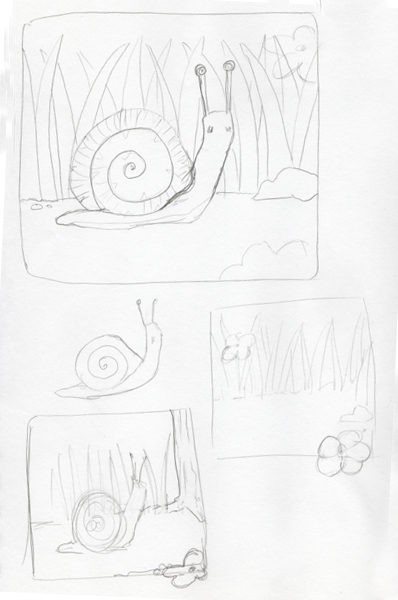
Step 2: Step up your workspace
Set you canvas to 7.5 x 7.5 at 300dpi and in CYMK Color Mode. CYMK is my default color mode since so much of the work that I do is 4-color print work, but feel free to work in RGB if that is your preference.
The unit of measurement is in inches instead of pixels because the artwork is intended to be printed as opposed to being displayed on the web, and the standard unit of measurement for paper is in inches as opposed to pixels. 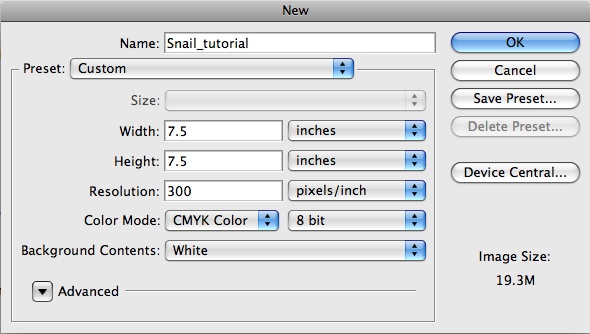 I sometimes use reference images to act as a guide in my canvas for my outlines so then I can transform, edit and angle them to the desired size.
Step 3: Draw the base shapes
Use the Pen Tool (P) to trace around shapes for your illustration.
I found some reference images of snails that I liked. If you are illustrating any subject using reference photos, the basic selection process is to find some that are large, highly-defined and preferably on a white background. 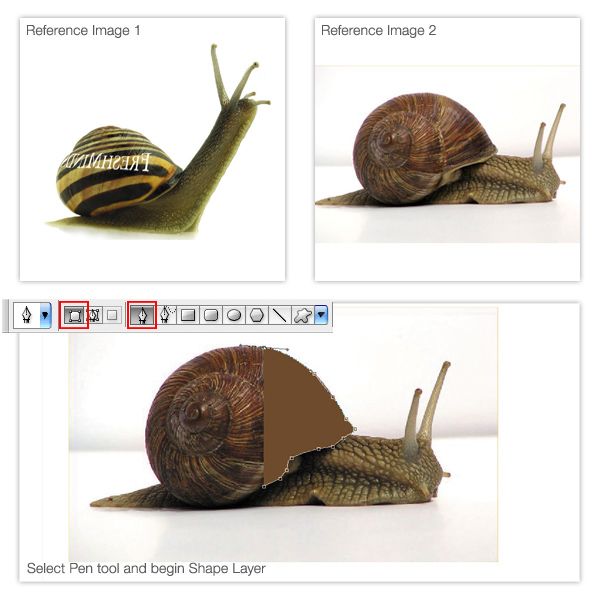 Here’s what the traced paths should look like.
Adjust their fill color as desired. 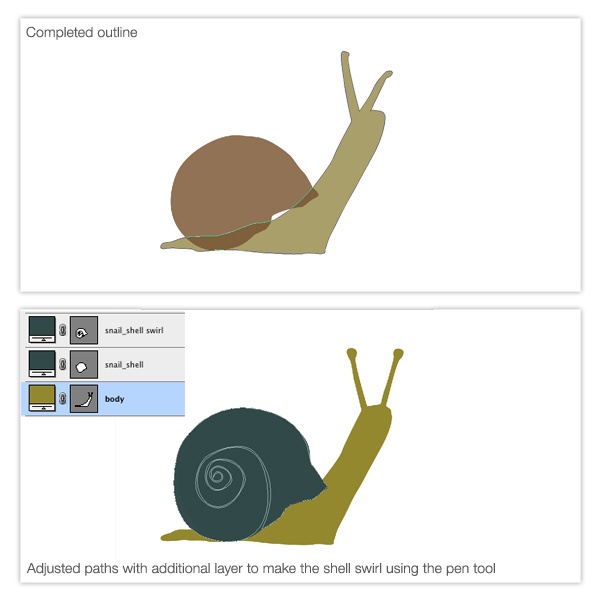
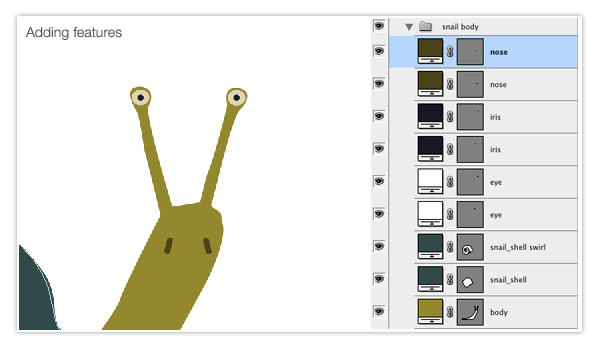
Step 4: Adding the snail’s features
Now that the outline of the main object is done, you can begin working on the details such as the eyes, shell, body and texture, making sure to create distinct layers for each feature to make them easier to edit and tweak individually. Create the features using the Pen Tool or shape tools, and using the appropriate color fills.
Step 5: Create the radial burst on the snail’s shell
To create the radial burst for the shell, first draw a wedge-like shape with the Pen Tool (P). Press Ctrl/Cmd + T to activate the Free Transform command. By default, the registration point of any shape that you modify with Free Transform is its center.
For our wedge, we want to move that registration point to the center top anchor point (you will see why in just a second). Simply drag the registration point from the center to the top (as indicated below). Next, you want to make a duplicate of the shape and then transform it.
So hold down Ctrl/Cmd + Alt/Option + Shift and then press T. You will notice that, since we relocated the registration point of our initial wedge, the shape will move around in a circle to complete the necessary burst, like below. Duplicate the layer, rotate and change the color to complete the spiral.
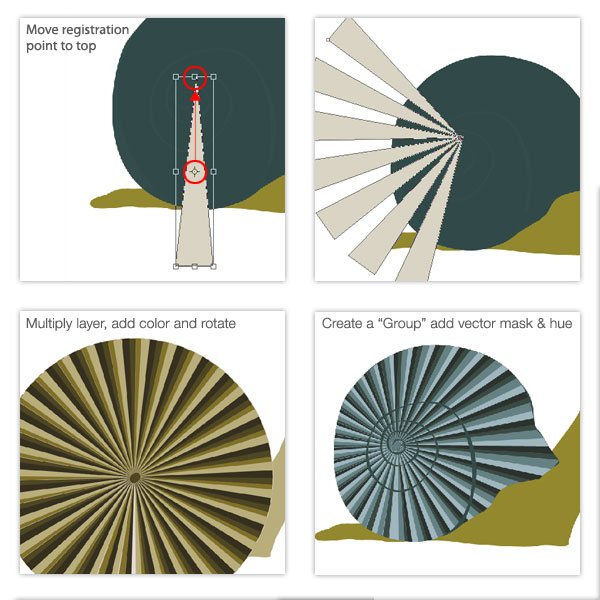 Add a Hue adjustment layer and vector mask to adjust the color of the snail’s shell.
  Also add an Inner Glow layer style to the Hue adjustment layer to give it some depth and shading.
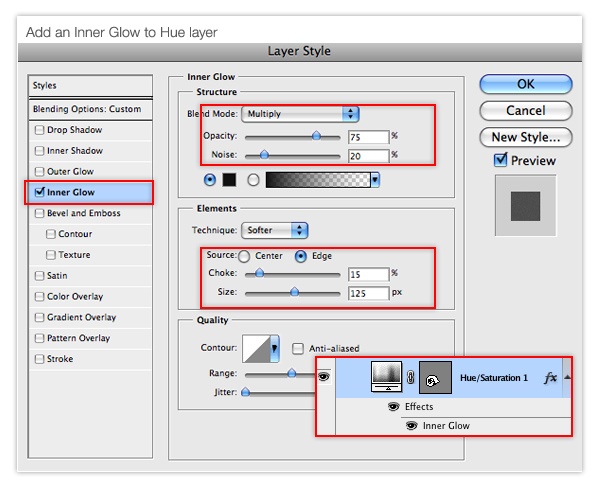
Step 6: Texturing the illustration
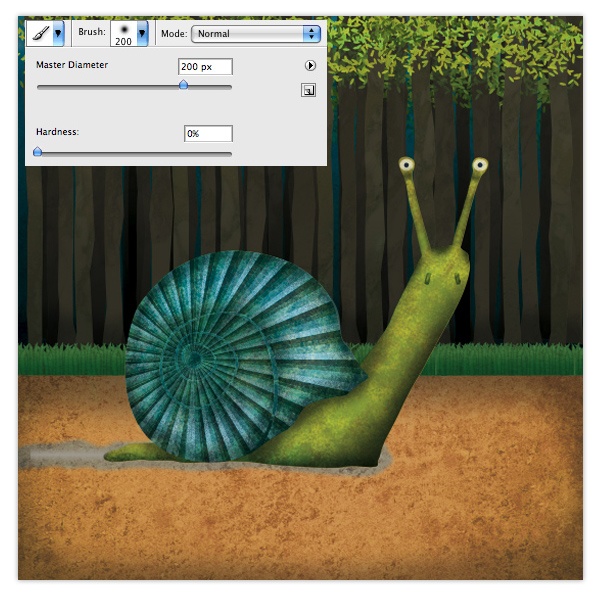
To create textures, select the Brush Tool (B) with a rough and grainy brush tip.
Create a green swatch palette. On a new layer, brush onto the snail, changing greens to make the texture feel organic. Don’t be afraid to spill outside of the edges, you can always clean it up later with the Eraser Tool (E); what’s imporant is that the texture is organic.
Afterwards, change the blending mode of the layer to Overlay and erase any brush strokes with the Eraser Tool (E). 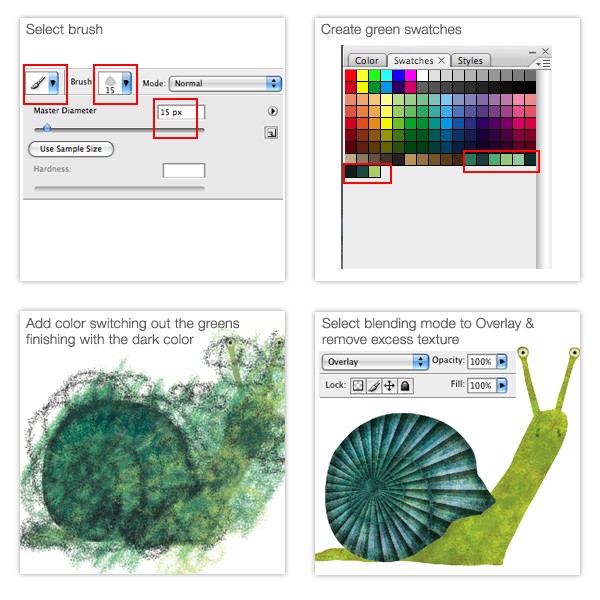
Step 7: Constructing the background
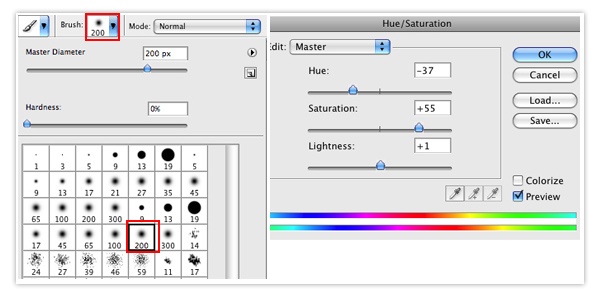
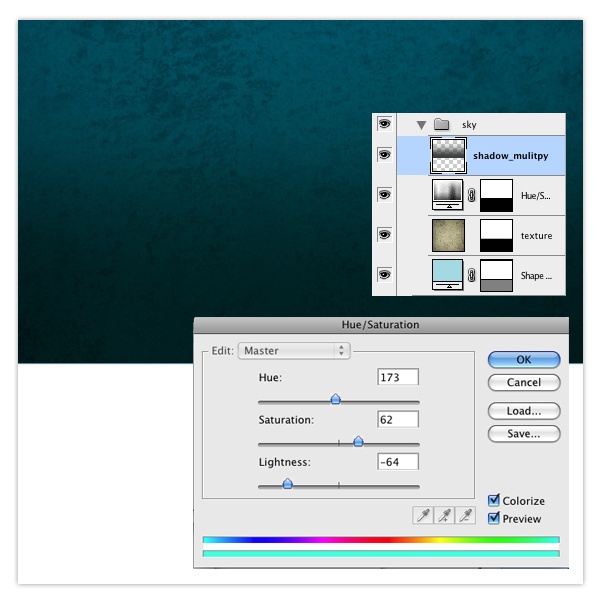
Here is where you will need to use the textures referenced in the resources listing of this tutorial. For the ground and sky, we will use the paper leather texture while laying it over with color, keeping the blending mode of the textured layer to Normal with 70% transparency and adjusting the hue in a new layer so we can edit and adjust the color as much as we want.
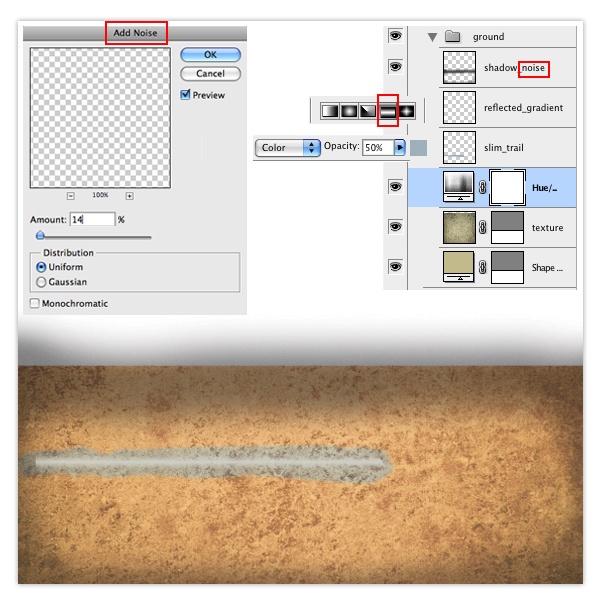
Make the shadow by using a brush and add some noise to it. Change blending mode of the “shadow” layer to Multiply and reduce the opacity to about 50%. The snail’s slime trail is a rough curved image with a light vertical bar gradient in the center and with blending changes.
Step 8: Add the trees in the background
For the trees, you will need the Marble texture. Create your outline of the trees using the Pen Tool. These don’t have to be perfect—in fact, the more rough they are, the better they are in terms of harmony in the composition.
Create a selection around the shapes that the layers make (Ctrl/Cmd + click on the layers). Add a layer with the texture and then create a mask layer on it. Change the blending mode of the new texture layer to Multiply and adjust transparency by tweaking the opacity of the layer.
Add a slight shadow with noise to the base of the tree. Repeat this step and reduce the size of the trees behind to create distance/depth. 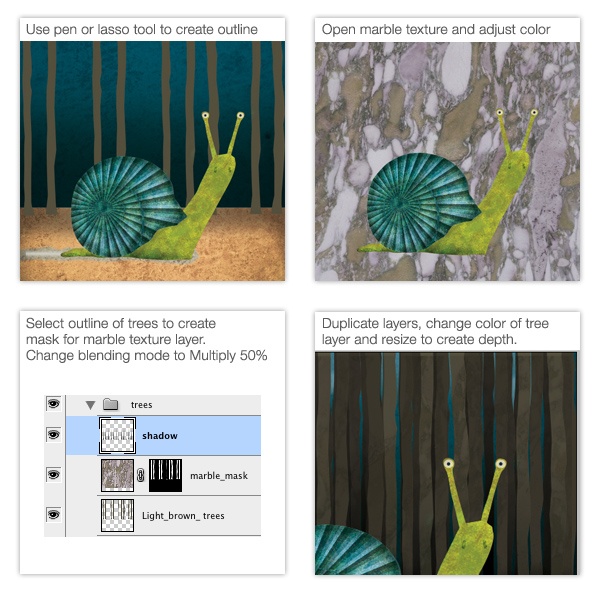
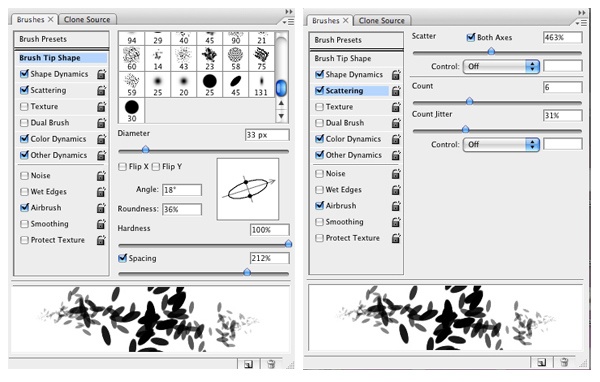
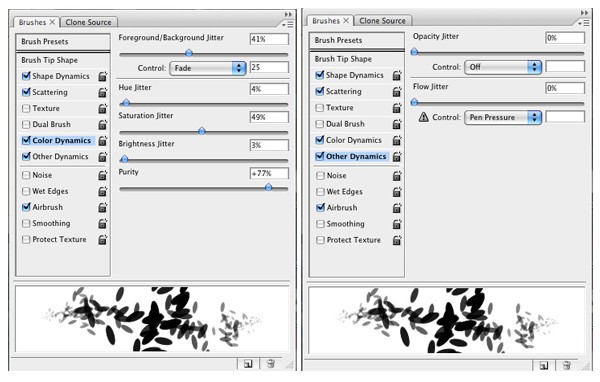
Step 9: Create a custom brush for leaves
For the leaves, we will create a brush and add layers of leaves to each group of trees.
 With the new brush, draw the leaves of the trees with the Brush Tool (B).
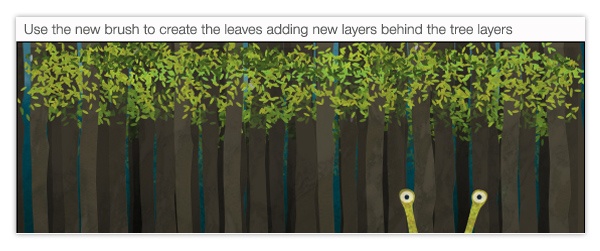
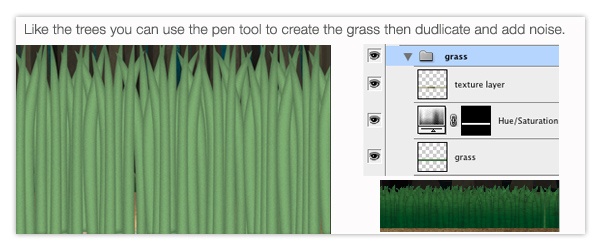
Step 10: Add the grass into the scene
Making grass is a little simpler than the other elements. Create outlines of several strands of grass, group and duplicate until you reach the desired size and width.
Try to transform the shapes of the grass strands manually so that they feel organic. Add a layer noise effect onto the grass shape by added an Inner Glow layer style and changing the Blend Mode to Multiply and tweaking the Noise value. Add a Hue adjustment layer if you want to adjust the color of your grass.
Afterwards, create a selection around the outline of the grass by Ctrl/Cmd + clicking on the layer. Paste the leather paper texture into the selection (Edit > Paste Into or Shift + Ctrl/Cmd + V). Change blending mode of texture on grass to Multiply to blend it into the grass layer.
Step 11: Finishing touches
Now that our scene is composed, let’s apply the final touches.
Shadows
Add shadows to the snail’s body to give it some more dimension. I like to use the Brush Tool (B) and to manually apply shadows and highlights and then remove any excess I don’t want with the Eraser Tool (E).
Add more noise
On a new layer, create a radial gradient from the center and add some noise for texture, and then switch the layer’s blending mode Multiply. To adjust the color of the entire background, I added a Hue adjustment layer until I got the saturation I wanted. 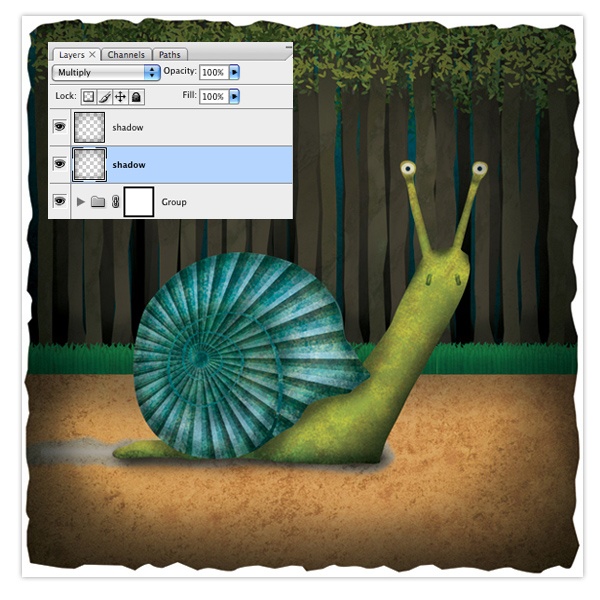
Tutorial Summary
In this tutorial, I went over a way to illustrate a snail scene in Photoshop that embodies a lot of textures.
Using textures in an illustration gives it a very organic and tactile look and feel. I hope that you were able to take away some tips and techniques by reading through this tutorial, as well as become inspired to explore the use of textures in your own illustration pieces.
Download Tutorial Source File
- textured_illustrations (ZIP, 150 MB)
-
 Trevin serves as the VP of Marketing at WebFX. He has worked on over 450 marketing campaigns and has been building websites for over 25 years. His work has been featured by Search Engine Land, USA Today, Fast Company and Inc.
 -

WebFX is a full-service marketing agency with 1,100+ client reviews and a 4.9-star rating on Clutch! Find out how our expert team and revenue-accelerating tech can drive results for you! Learn more
Make estimating web design costs easy
Website design costs can be tricky to nail down. Get an instant estimate for a custom web design with our free website design cost calculator!
Try Our Free Web Design Cost Calculator
Table of Contents
- Preview
- Resources
- Introduction
- Step 1: Rough Composition
- Step 2: Step Up Your Workspace
- Step 3: Draw the Base Shapes
- Step 4: Adding the Snail’s Features
- Step 5: Create the Radial Burst on the Snail’s Shell
- Step 6: Texturing the Illustration
- Step 7: Constructing the Background
- Step 8: Add the Trees in the Background
- Step 9: Create a Custom Brush for Leaves
- Step 10: Add the Grass into the Scene
- Step 11: Finishing Touches
- Tutorial Summary
- Download Tutorial Source File
Share this article


Web Design Calculator
Use our free tool to get a free, instant quote in under 60 seconds.
View Web Design CalculatorMake estimating web design costs easy
Website design costs can be tricky to nail down. Get an instant estimate for a custom web design with our free website design cost calculator!
Try Our Free Web Design Cost Calculator


