
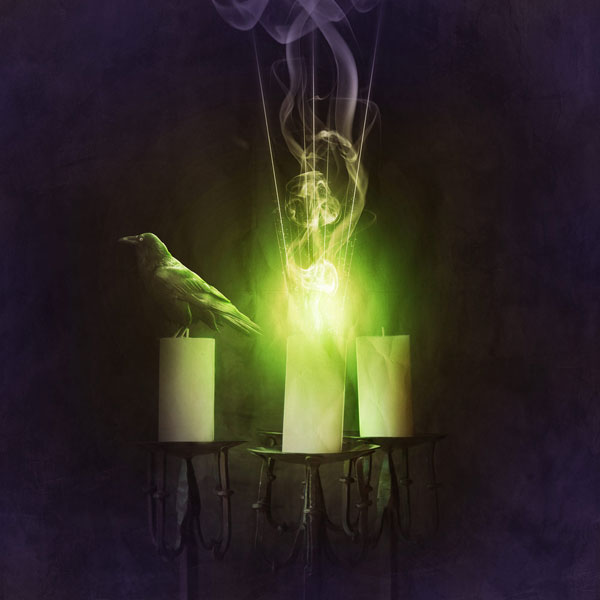
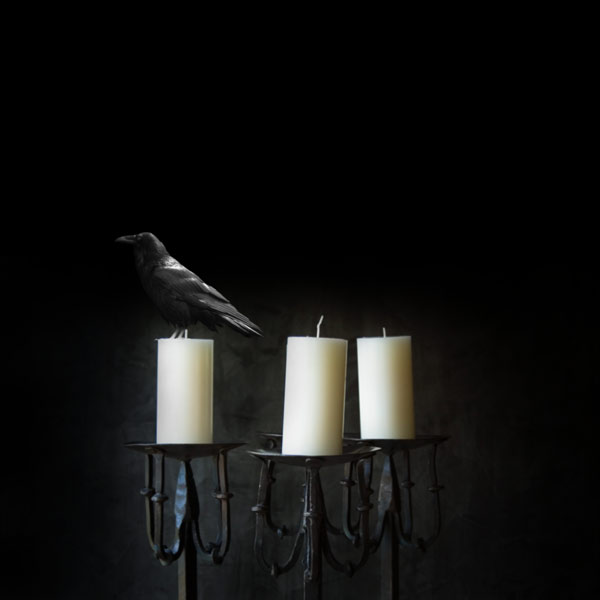
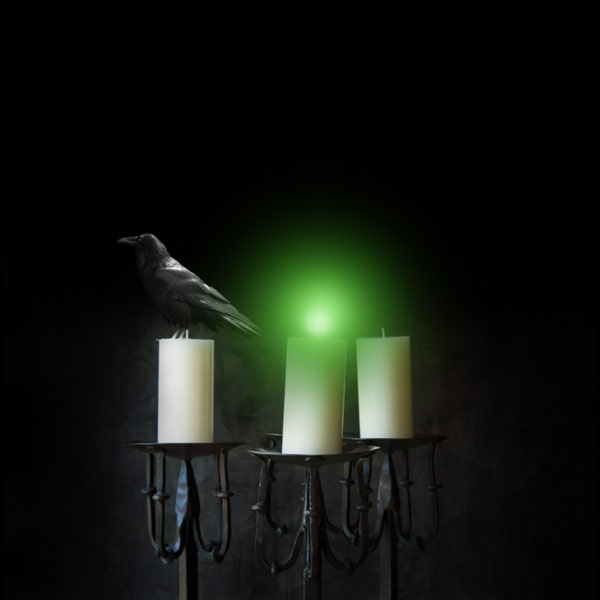
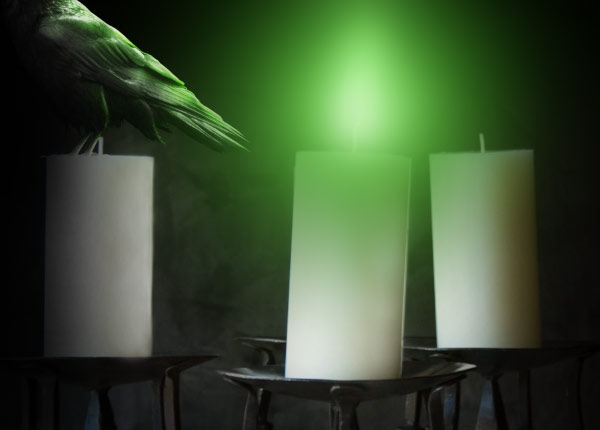
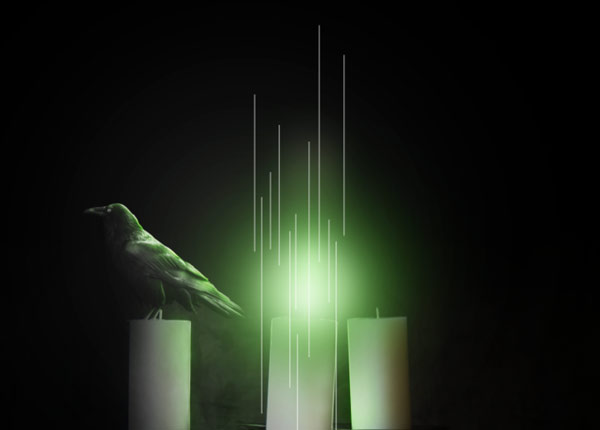
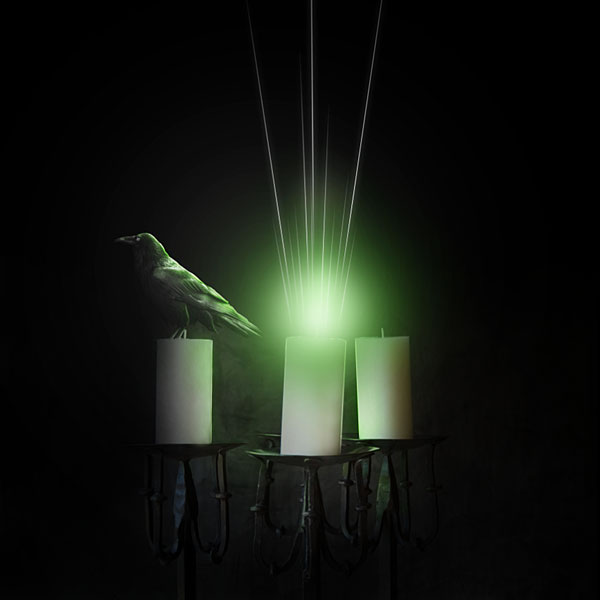
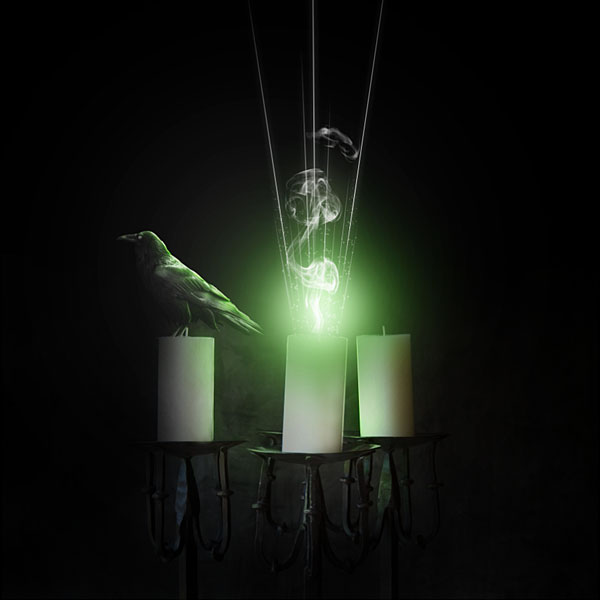
Preview
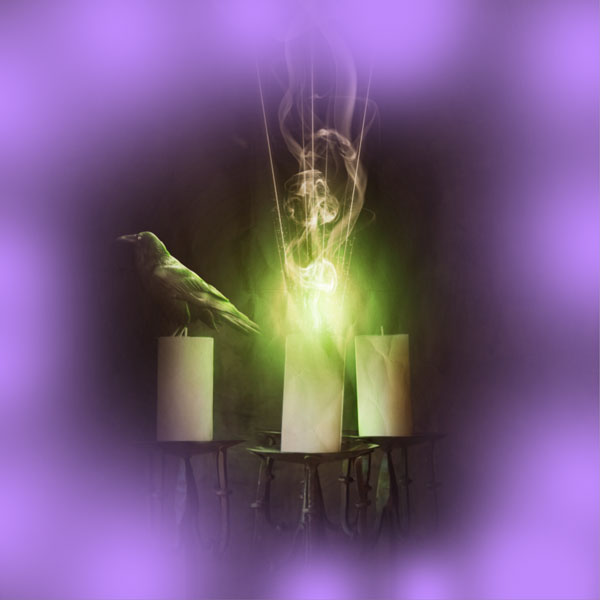
Here you can see the scene we will be making. You can see a bigger image by clicking on the image below.

Resources
- Candles against black wall by Asif Akbar (Royalty free)
- The Raven by salatrixx (Royalty free)
- Black Background, Gray, Smoking, Narcotic by photl.com
- mediterranean paint 1 by Peter Zelnik (Royalty free)
- brown paper texture 6 by Deb Tremper (Royalty free)
Step 1: Create the Photoshop document
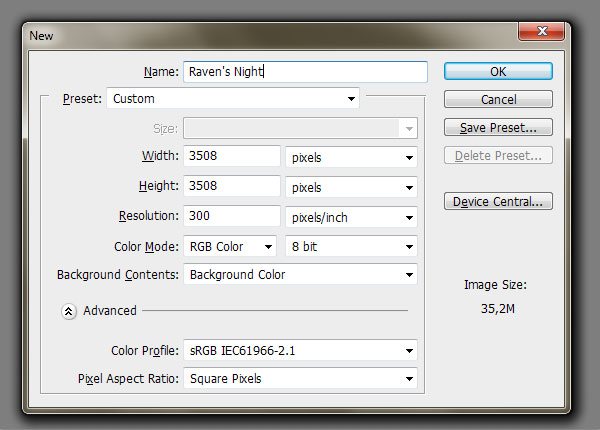
Okay, here we go! Open a new file (Ctrl/Cmd + N) in Photoshop. Name it as you wish, I named mine “Raven’s Night”. Set the width and height to 3508px. As Background Contents, choose Background Color if you have black as your background color (press D to reset your foreground and background color to white and black, respectively).
If you haven’t, you can color it to black (#000000) later with the Paint Bucket Tool (G).
Step 2: Put the candles in the canvas
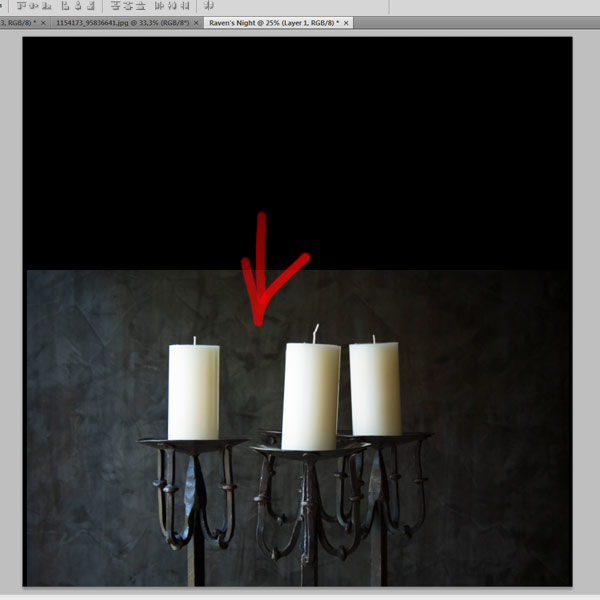
Open Candles against black wall in Photoshop.
In this stock image, press Ctrl/Cmd + A or go to Select > All to select the whole canvas.
Then press Ctrl/Cmd + C (or Edit > Copy). Go back to your main canvas (the one we named “Raven’s Night”) and press Ctrl/Cmd + V to paste the candles image into it. Name this layer “candles”.
Move this layer towards the bottom of the canvas using our Move Tool (V).
Step 3: Masking the “candles” layer
In the Layers Panel, press on the Add layer mask icon to add a layer mask to the candles layer.
On this mask, we will erase some parts of the background with the Brush Tool (B) to fade it better with the black background.
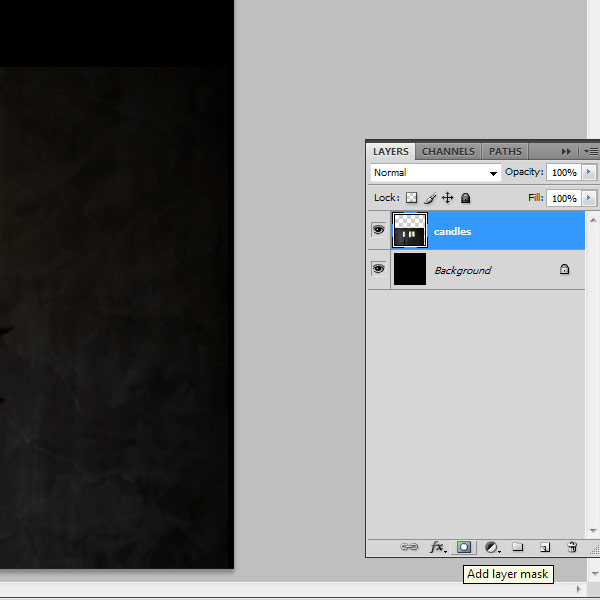
With the layer mask selected in the Layers Panel, use a soft brush tip with black (#000000) as your foreground to mask unnecessary parts. By this, I mean the edges of this image to make it more faded into our black background.
Here are brush settings that I have used:
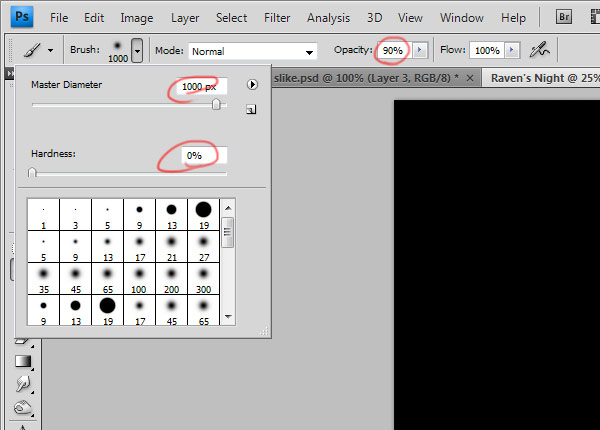
Tip: Later, you should reduce the brush Opacity and Master Diameter to make masking more precise. If you accidentally delete some parts accidentally, you can easily restore them using a white brush on the layer mask.
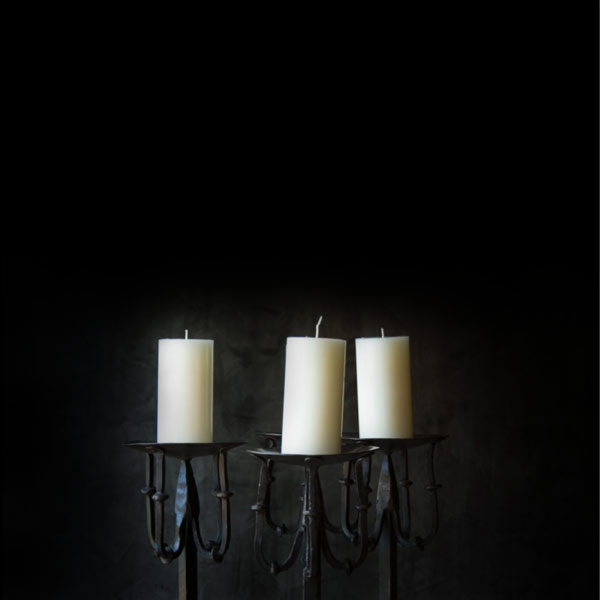
After masking, your image should look something like this:
The advantage of working with layer masks is that you can always tweak and improve the masking until you are satisfied with it, so you don’t need to be perfectly precise.
Step 4: Add the raven into the composition
Open The Raven stock photo in Photoshop.
Use the Pen Tool (P) to cut it out from its background by tracing around it. (See the tutorial source file download for an already-cut-out raven.)
After you are done with cutting out the raven, you need to place it in the “Raven’s Night” canvas. We will use the same technique as we did for placing the candles photo.
Press Ctrl/Cmd + A (Select > All) to select the whole canvas, press Ctrl/Cmd + C (Edit > Copy), switch to our main canvas, and then press Ctrl/Cmd + V to paste the raven into your working composition. Name this layer “raven”.
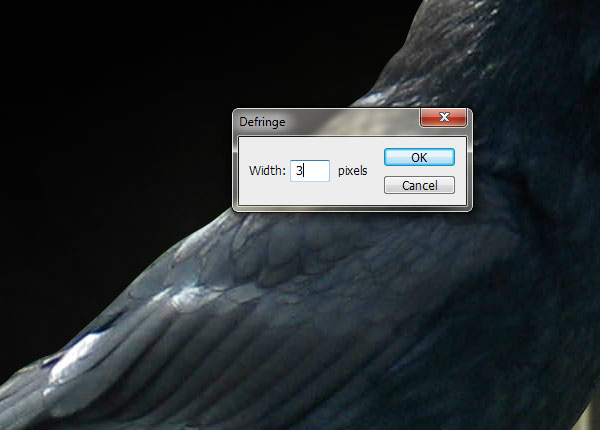
No matter how precise you cut out the object from the stock photo, there will always be some tiny flaws. In the “raven” layer, you will probably see a white edge in some places around the raven.
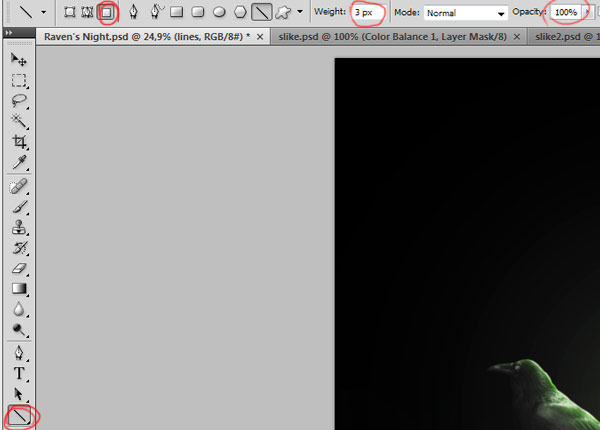
You can remove it by choosing Layer > Matting >Defringe. Set the Width to 3px.
Here you go, the raven’s edges look a bit better.
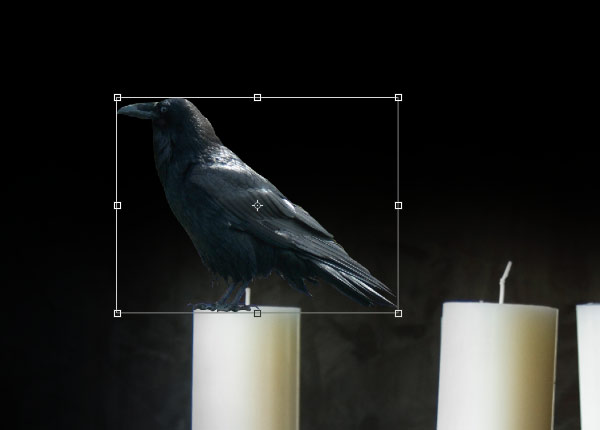
Now it is time to put the raven where it is supposed to be in the composition. Choose Edit > Free Transform or press Ctrl/Cmd + T which should create a transform box around the subject (if not, make sure that Show Transform Controls in the Options bar is checked).
We will place our raven on the leftmost candle. Right-click inside the transform box and choose Flip Horizontal from the list of transform commands to make the subject flip to the left.
Now scale the raven by holding Shift and selecting one of the corner transform controls of the transform box. Move this handle towards the center while holding Shift to scale the raven proportionally.
Then when you are done, move it to the place where it is supposed to be—on top of the left candle.
When you are satisfied by the size and position, press Enter to apply the transformation.
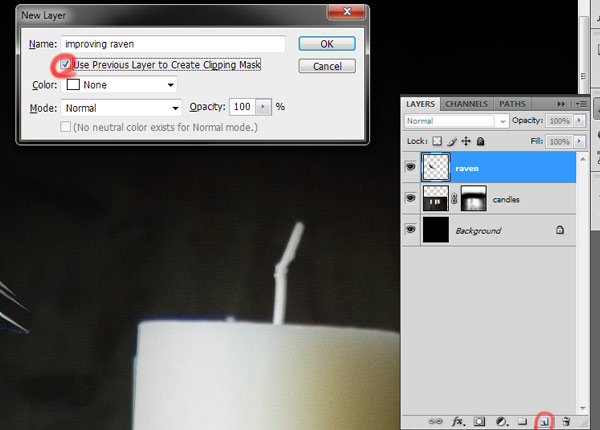
Step 5: Improving the raven with clipping mask layers
Your raven probably still has some light parts that shouldn’t be there—we can paint over them with black or a dark gray color to make them more obvious.
We will make this on a new layer.
While holding Alt, press on the Create a new layer icon in the Layers Panel. Name this layer “improving raven” and check the Use Previous Layer to Create Clipping Mask option.
Select the Brush Tool (B). Use a soft brush as you did before, but this time, lower the Opacity option in the Options bar to approximately 50%.
Use black color and paint all places that have rough edges or that don’t look blended into the scene.
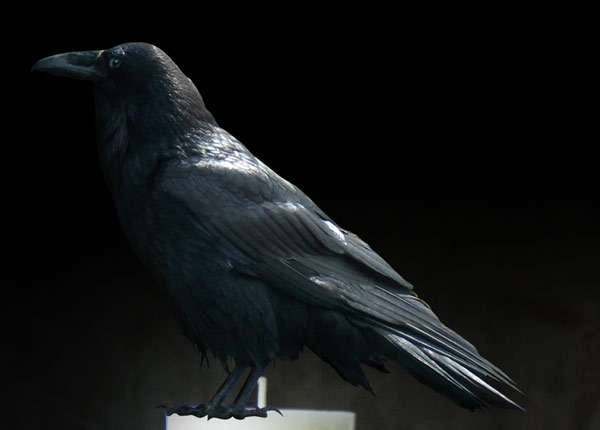
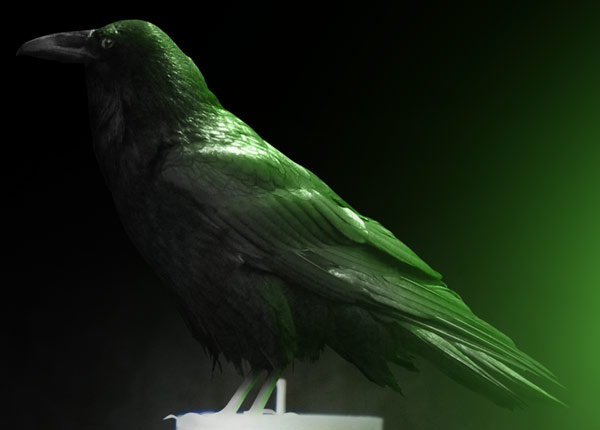
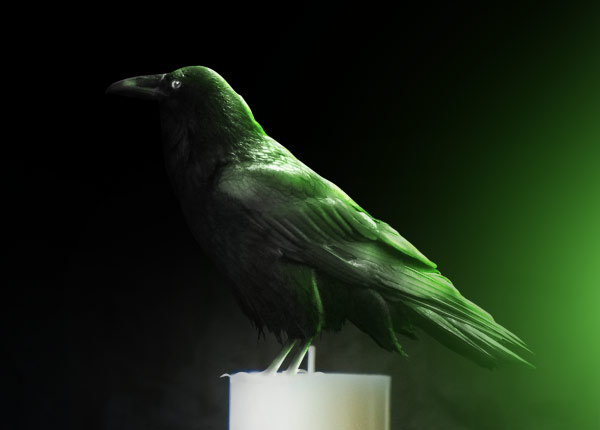
This depends on how precise you cut the raven out from its background earlier. Here is how my raven looks with and without the “improving raven” clipping mask so that you can see how well this technique does in blending in a superimposed item such as our raven.
With the “improving raven” layer
Without the “improving raven” layer
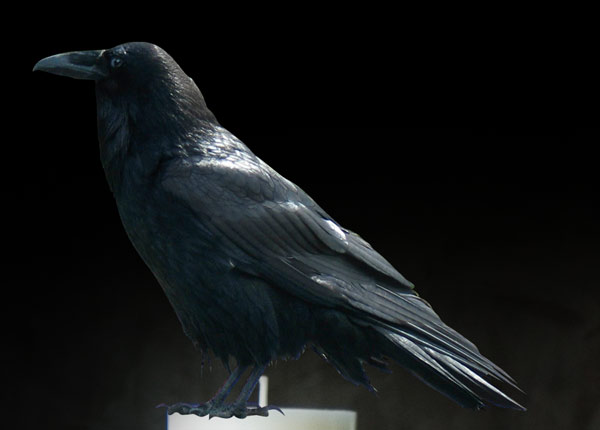
I suppose difference is more than obvious, don’t you think?
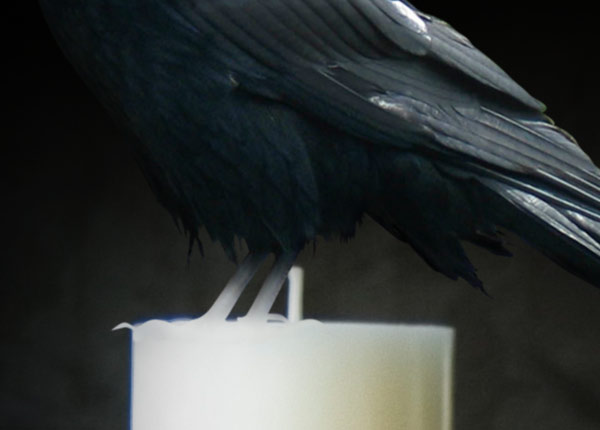
Step 6: Connecting the raven with the candle
Now we can connect the raven with the candle so that it looks like she is stuck in the wax. While holding Alt, press on Create a new layer icon in the Layers Panel.
Name this layer “wax”, making sure that you select the Use Previous Layer to Create Clipping Mask option. This layer should be above the “improving raven” layer.
Select the Brush Tool (B) and use a soft brush tip with the Master Diameter set approximately at 15px and Opacity to about 40%. Note that you can (and should) always change these values during the process depending on where you are painting—these options affect the accuracy and harshness of your brush, so change it based on the area you are painting, as needed.
With the Brush Tool still as your active tool, press Alt to temporarily switch to the Eyedropper Tool (very nice and handy trick for when you are painting).
Pick some color from the candle near the raven’s claws. Paint with this color on the “wax” layer.
You should pick up a few different colors during this process to achieve better results.
Step 7: Desaturating the raven
You can probably notice that the raven has some kind of blue cast. It would be better if it is black since ravens are usually black.
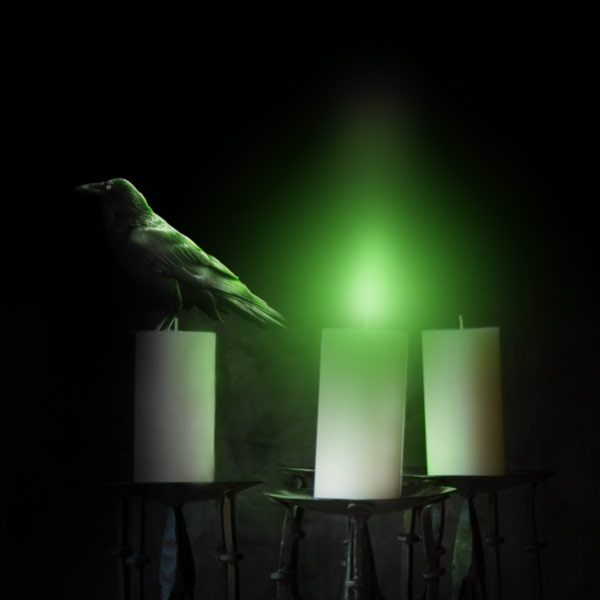
We can do this by desaturating the raven. To start, select the “raven” layer. Afterwards, choose Image > Adjustments > Desaturate or just use the keyboard shortcut for this action (Ctrl/Cmd + Shift + U).
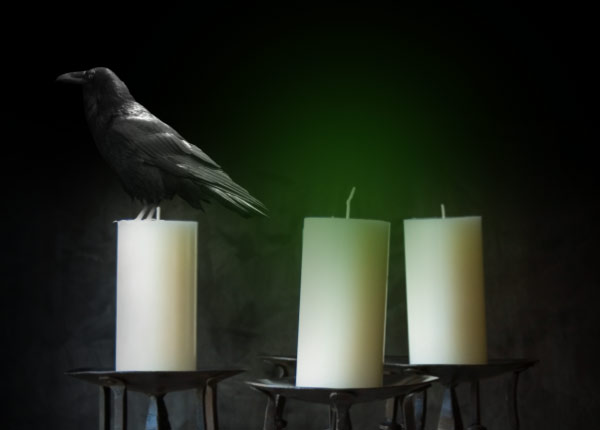
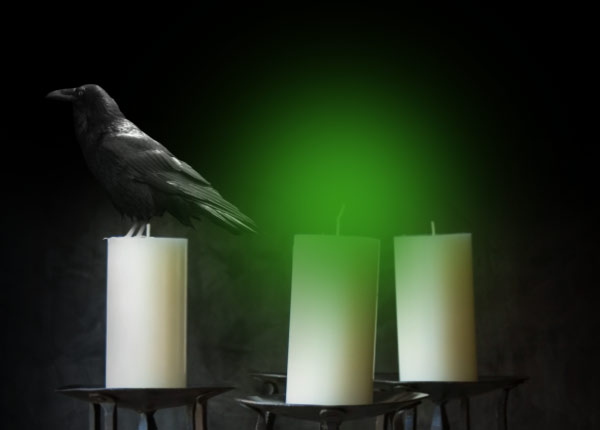
Here is our scene so far.
Step 8: Make the flame on the candle
We are done with the raven for now. Let’s bring some life to our scene by adding light to the candle. We will do that only with the center candle.
Make a new layer above the “raven” layer and its clipping mask layers.
Name this layer “Flame”.
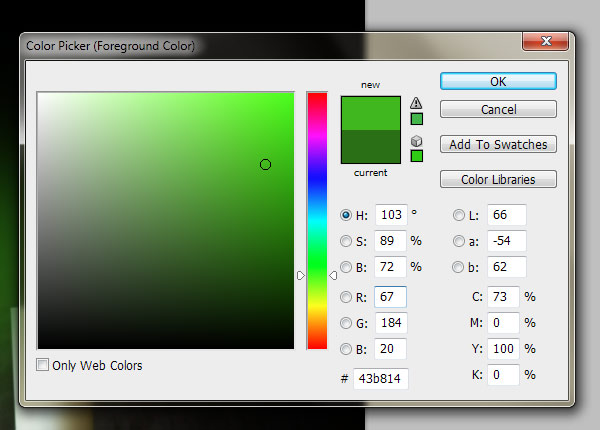
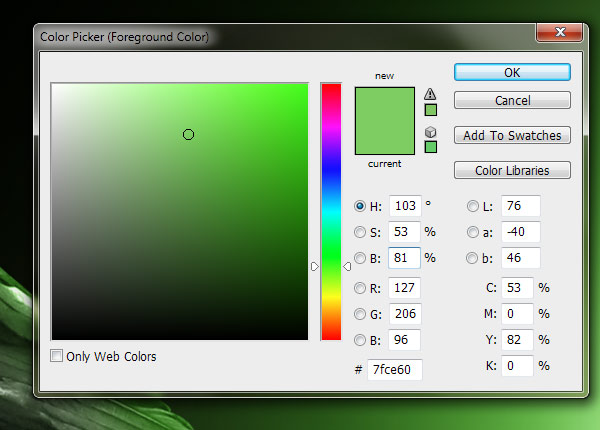
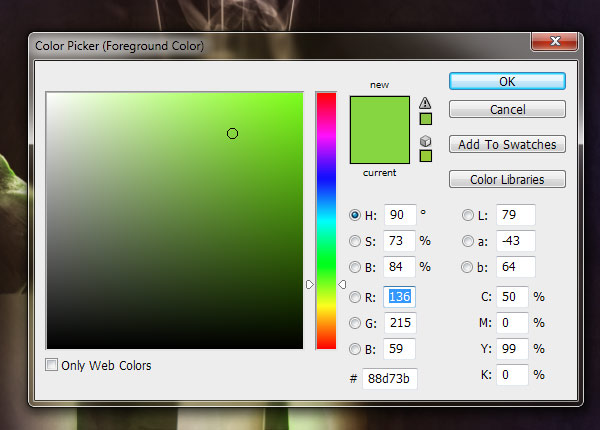
Set a green color as your Foreground color.
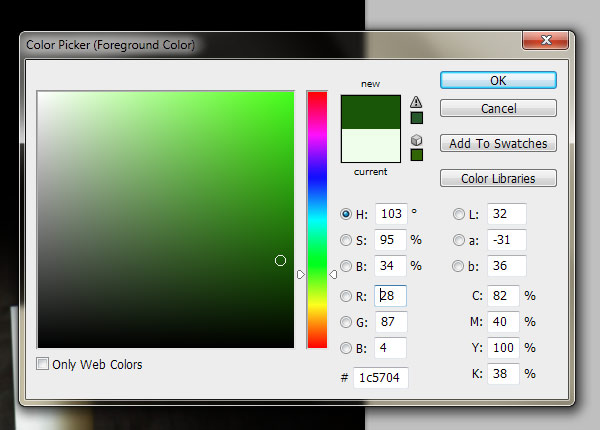
Select the Brush Tool (B). Set your Opacity to 60% and Master Diameter to something big like 1400px.
Click just once in the center of your scene, above the center candle.
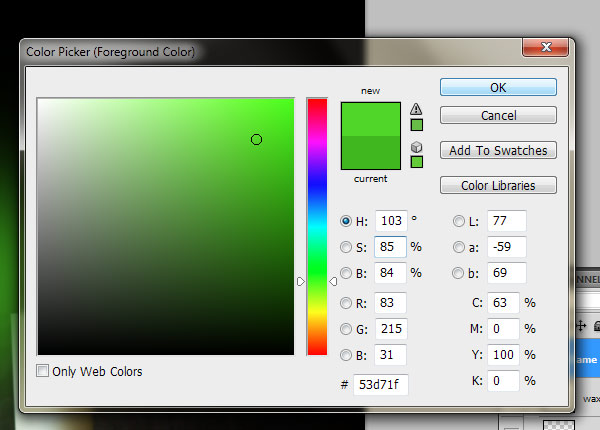
We are going to do this several times, reducing the brush size incrementally and changing the green color to a lighter shade.
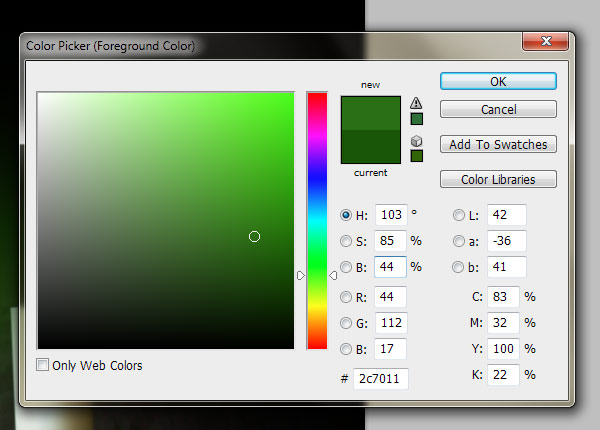
Reduce the Master Diameter of the brush to 1,200px while keeping the opacity the same. Also, change your green foreground to a slightly lighter green.
Again, click just once in the center of the color spot you previously made.
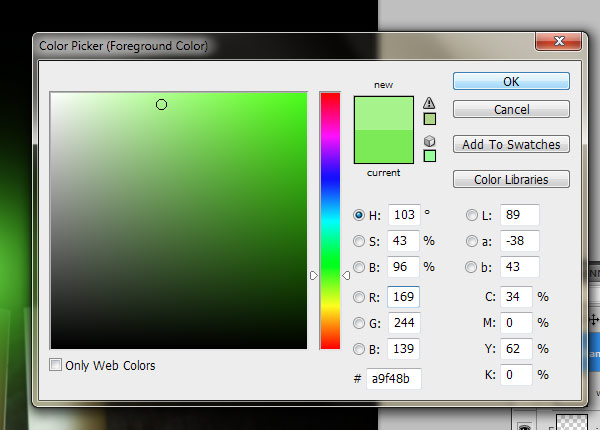
Next, reduce the brush size to 1000px and another slightly lighter green color.
Again, click on the spot you previously made.
Reduce the brush size to 800px and choose this color:
Click once in the center of color spot you previously made.
Reduce the brush size to 600px and choose a lighter green (you probably get the picture of what we’re doing now).
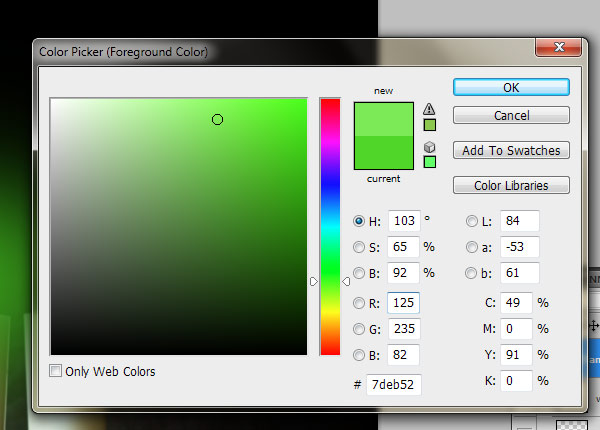
Press once in the center of color spot you previously made.
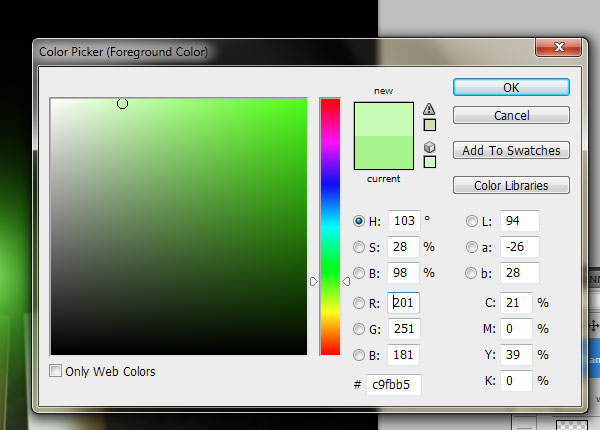
Reduce the brush size to 400px, choose a lighter green, and click on the center of our glow.
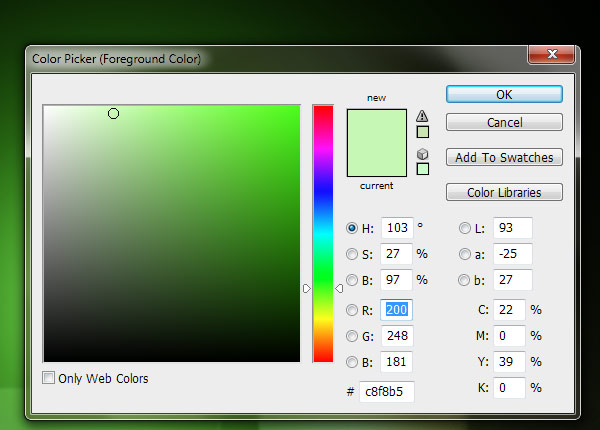
Reduce the brush size to 250px, choose a lighter green, and click on the center of our glow.
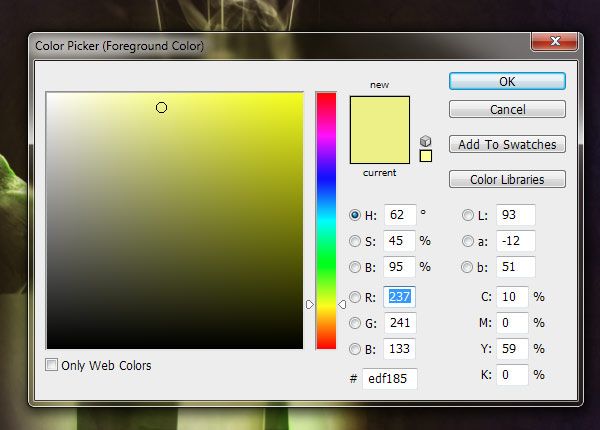
Reduce the brush size to 200px, and this time, also reduce Opacity to 30%. Choose another green color and click on the center to apply the paint stroke.
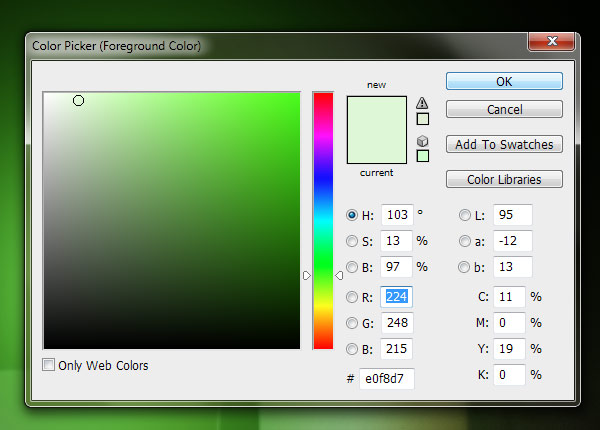
Reduce brush size to 150px and select a very faint green color and click on the center.
Change brush size to 1000px and press once in the center of color spot you previously made with same color to lighten up the whole flame.
Step 9: Smudge the green flame
We can make the flame look a bit less like a circle with the Smudge Tool, which is one of the best tools that can do what we want.
Select the Smudge Tool from the Tools Panel and set its Strength to 36%, Master Diameter to 250px, and Hardness at 0%.

First, we can smudge the bright center a bit towards the top with an upwards motion. Set your brush size to 250px and drag it from the center of flame upwards.
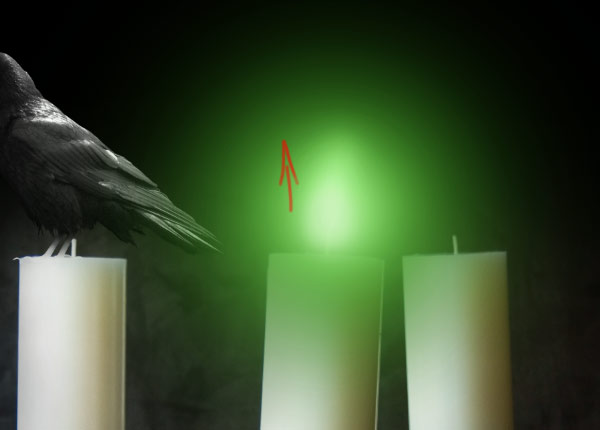
Now set the brush size to 600px and smudge upwards from an area above the flame highlight.
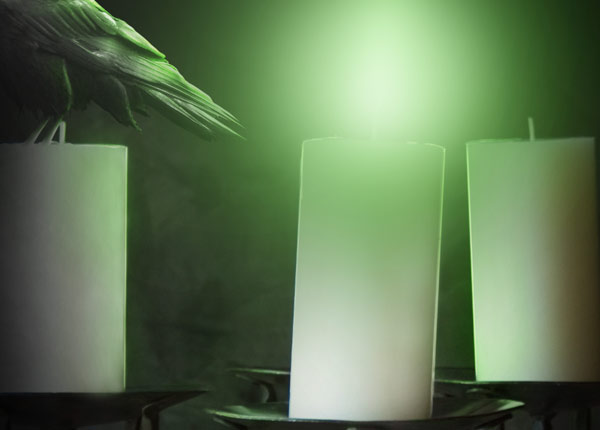
Now it is obvious that this flame is not so super smooth, so we should blur it using Filter > Blur > Gaussian Blur.
As you can notice, our flame is now much smoother after applying the filter.
Step 10: Work on the lighting on the raven
The green flame from the candle should cast its light to other objects around it.
We will start with adding some lights on the raven. First, get on the “wax” layer. While holding Alt, press on the Create a new layer icon in Layers Panel.
Name this layer “lighting” and check the Use Previous Layer to Create Clipping Mask option. Afterwards, set this new clipping mask layer’s blending mode to Color.
Pick the Brush Tool (B) and use a soft brush with approximately 20% Opacity. Select a green color as your foreground color.
Paint with this color on the raven on places that the candle’s green flame should cast a light onto it.
Now it would be nice to add some highlights to raven.
While holding Alt, click on the Create a new layer icon in the Layers Panel. Name this layer “raven highlights” and select the Use Previous Layer to Create Clipping Mask option. Set this layer’s blend mode to Overlay.
Select white as your foreground color and afterwards use a soft brush with Opacity set to 22% and Master Diameter to 15px.
Paint the lightened area, mostly on the right side of the raven.
Also, paint with a white color on the raven’s eye to lighten it up a bit and make it a bit more prominent.
After you are done with that, duplicate the layer to achieve even more lighting. You can also paint some areas on the left side with a black color to darken them a bit.
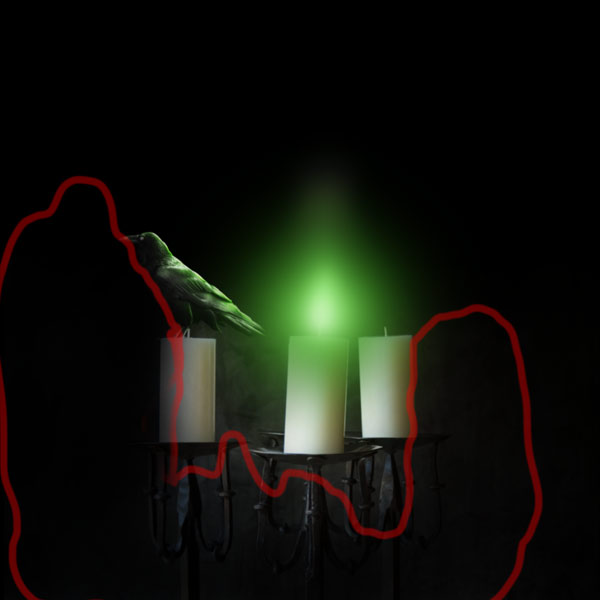
Step 11: Work on the overall shading of the scene
Now we should shade our image a bit to achieve a more dramatic effect. Make a new layer above the “flame” layer and name it “shading”.
Select the Brush Tool (B) and set black (#000000) as your foreground color.
Use a big value for the brush diameter; I used approximately 1000px, but you should change this a few times during the process depending on the area you are painting on.
Also, set the Opacity option to something low—around 20% is a good value.
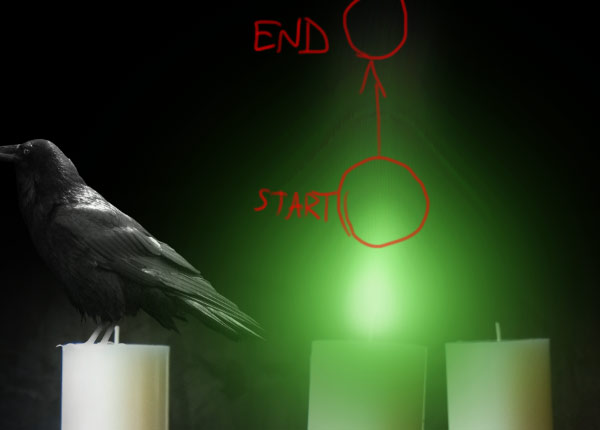
Paint around the flame area to fade it better to our dark background.
Below, you can see the areas where I painted with black (marked in red).
Step 12: Fix the light on the candles
Light from the middle candle should also be cast on the other two candles. The biggest problem here is that the light is coming from the left on our original candles stock photo.
It should be that way on the right candle, but the left candle should be lightened on its right side.
So let’s fix that!
In the previous step, we already darkened the candle on the left side, but now we should lighten it on the right side. To start, make a new layer under the “flame” layer and name it “candle lighting”. Use the Brush Tool with a soft brush and with the Opacity set to approximately 20%.
Pick some light color from the candle with the Eyedropper Tool to set your foreground color and paint with it on the right side of the candle.
Tip: I suggest turning off the visibility of the “flame” and “shading” layers while doing this step so that you can pick good colors.
I started with this off-white/light gray color, but I changed it a few times while painting.

Try to keep the right edge as sharp as possible. I suggest using small brush sizes.
If it will look too blurry, you can erase it a bit with the Eraser Tool (E), setting the hardness to approximately 50% or even more.
Using a light color, paint on the right side of the middle candle a bit to remove the hard shadow it has.
Step 13: Create more green flame reflections on the candles
Now it is time to add green light reflections to the candles. First, try to think of where that light from the candle should fall on the other objects. Make a new layer above the “candle light” layer and name it “reflected light”.
Switch its blending mode to Color. Select the Brush Tool and use the same green color as we used in Step 10.
We will also be using the same brush settings: set Hardness to 0% and approximately 20% Opacity. Use some smaller brush sizes: I used between 20px to 150px depending on the size of the area I needed to paint.
Step 14: Lightening the subject
Now it is time to bring more attention to the focus of our image.
We will do that by lightening it up a bit to achieve more contrast.
Make a new layer above the “shading” layer and name it “focus”. Select the Brush Tool with 30% opacity and size of 600px.
Use a white color and paint one spot in the highlighted area of the flame. Now change the brush size to 2500px and set the opacity to 10%.
Paint one spot and try to have its center between the raven and candle flame.
Duplicate this layer and set its blending mode to Overlay. Now you should have something like this:

Step 15: Lightening the candle borders
Now we should lighten the edges of the left and right candles a bit as we did with our raven.
Make a new layer above the “flame” layer and name it “light edges”. Set the mode to Overlay.
Use a soft brush with a size of 4px and Opacity to 20%.
Paint lines on the right edge of the left candle and on the left edge of right candle.
Tip: If you do not use a graphics tablet, it would be useful to hold Shift and click with the brush once on top of the candle and once again on bottom of the candle to make a straight line. You can also paint the middle candle a bit to give it more definition.
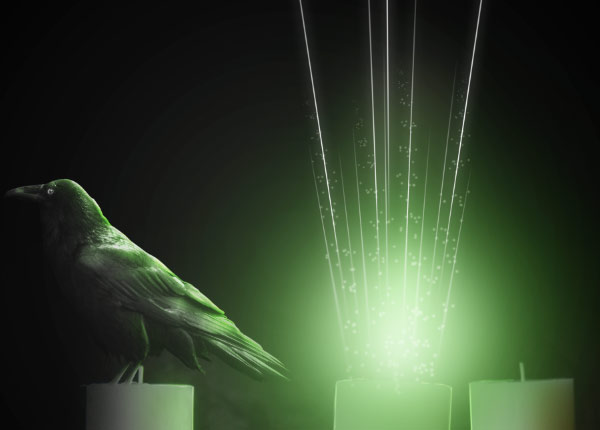
Step 16: Creating light streaks on the candle
Let’s spice up our cool photo manipulation scene. Light effects would give a new dimension to your work.
To start making more light effects, make a new layer above the “focus” layer and name it “lines”.
Set the foreground color to white (#ffffff) and pick the Line Tool (U) from the Tools Panel. I have used these settings:
Draw few vertical lines of different lengths while holding Shift to ensure that they are straight.
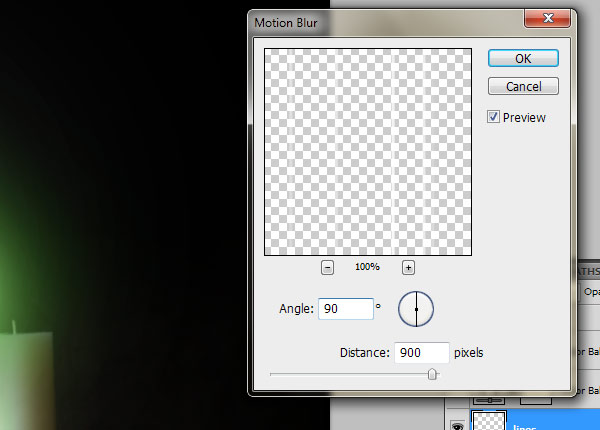
Choose Filter > Blur > Motion Blur and use these settings:
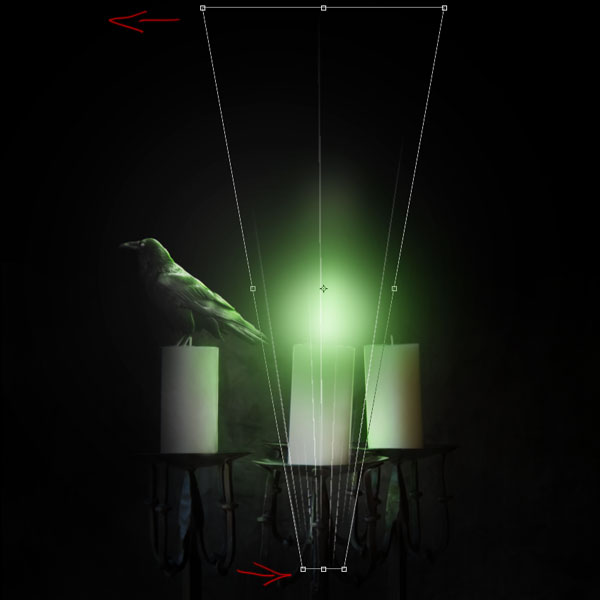
Now you need to transform your lines a bit. Press Ctrl/Cmd + T to activate the Free Transform command and start transforming the lines to make them varied.
Right-click on a line, and then pick Perspective from the list of transform commands.
While holding Shift, move the upper left transform control towards the left, and then move the lower left control towards the right.
We are changing their angle so that it looks like they are radiating from the center of the green flame.
Move the lines upward so they start from the candle’s flame. If needed, you can use the Eraser Tool (E) to erase some unnecessary lines that go under the candle flame.
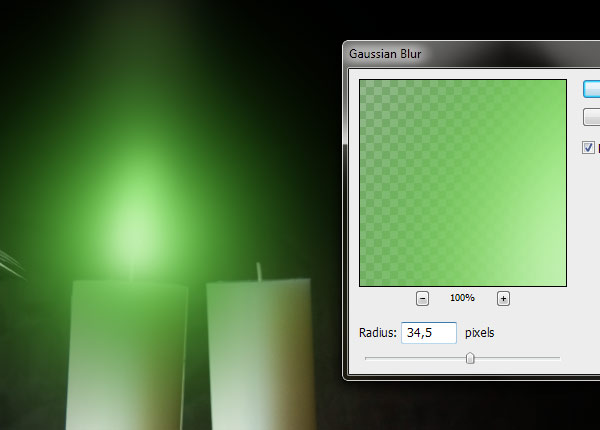
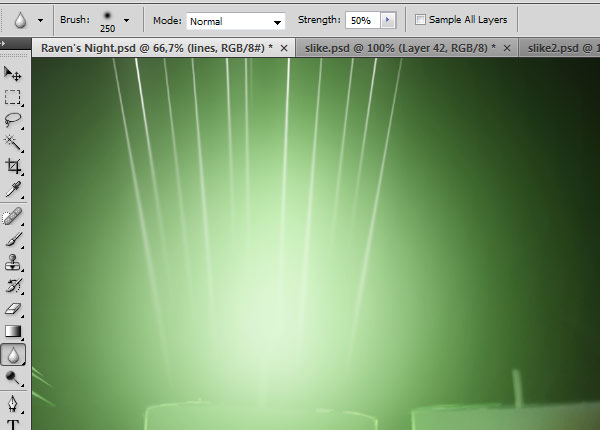
Now duplicate the layer with lines and go to Filter > Blur > Gaussian Blur with the Radius set to about 15.8px.
We should now blur the lines in some parts that are close to the candle flame to make the transition a bit softer and smoother. Select the Blur Tool from the Tools Panel and set its Hardness to 0% and Strength to 50%.
On the “lines” layer, blur parts closest to the candle with the Blur Tool.
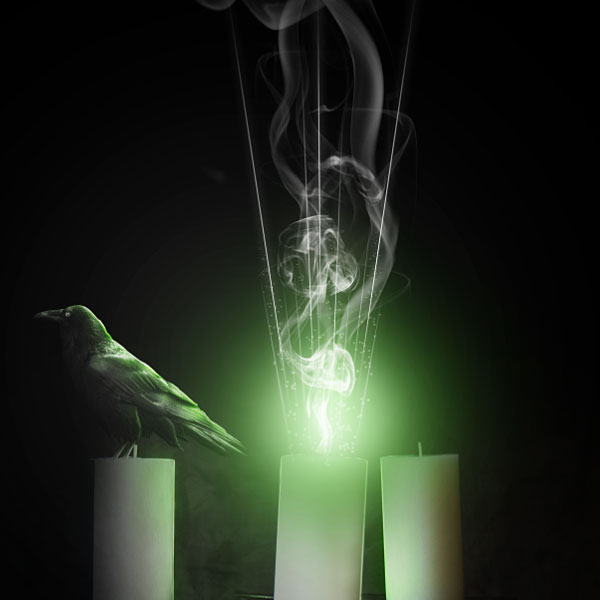
Let’s preview our work:
Step 17: Add sparkles on the candle
We can add some sparkles to the flame to give it another interesting component.
Make a new layer above the “lines copy” layer and name it something intuitive like “sparkles”.
Select the Brush Tool and in the Brushes Panel (Windows > Brushes or hit F5), set your options to:
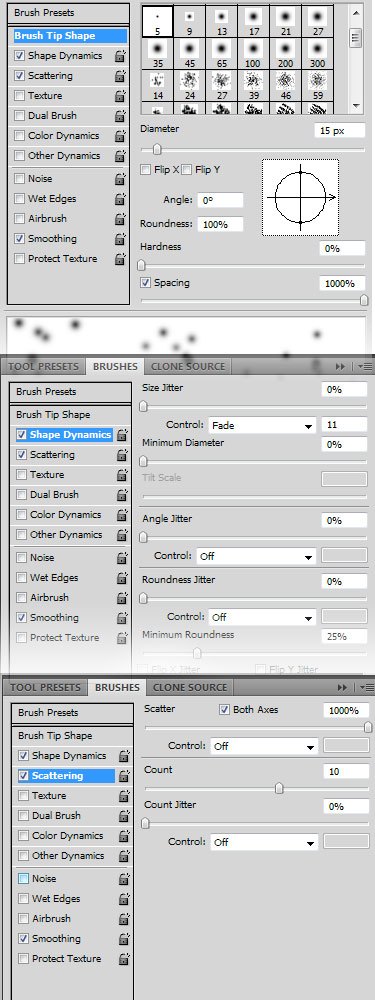
Paint with the brush a few times from the lightest area towards the top of the scene. Set this layer’s blending mode to Soft Light.
Now you should have something like this on the light area:
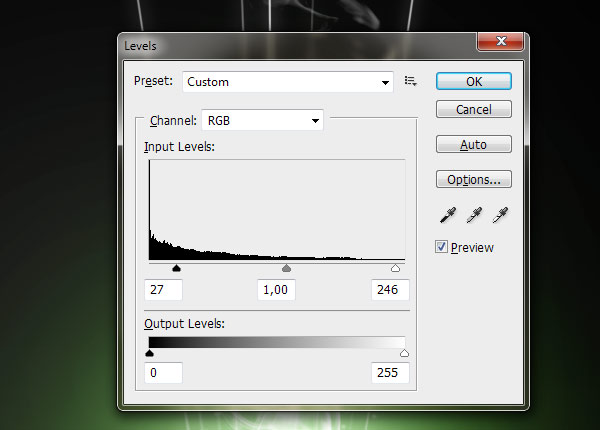
Now open the Black Background, Gray, Smoking, Narcotic stock photo of smoke from the Resources listing or find some other smoke photo that you find suitable.
Select the entire canvas (Ctrl/Cmd + A) and then copy and paste it into our working file. Name this layer “smoke” and put it above “sparkles” layer.
Desaturate the layer by pressing Ctrl/Cmd + Shift + U. Set its mode to Screen. Press Ctrl/Cmd + L or choose Image > Adjustments > Levels.
Use these settings to make the smoke a bit more contrasted:
Select the Eraser Tool (E) and erase hard edges on the bottom of the “smoke” layer.
Press Ctrl/Cmd + T to activate the Free Transform command. Drag one of the corner handles while holding Shift to downsize the smoke a bit so it fits better into the light flame.
Erase some parts of the smoke to make it more interesting and to fade it better into the background.
You can also copy this smoke layer and transform it a bit, or add some other smoke imagery to make the scene more smoky.
I added a few more smoke images, set their mode to Screen, desaturated them, fixed contrast with Levels adjustments (Image > Adjustments > Levels or Ctrl/Cmd + L), transformed them and erased some parts.
I encourage you to experiment and make your own smoke effects. Mine looks like this:
Step 18: Add a texture
Now that we have spiced up our candle a bit with lighting effects, let’s try to add a textured and aged look to our scene. Textures works nicely with dark images, they add an extra flavor to them.
I have listed suggested texture files in the Resources listing above, but I also encourage you to look around the Freebies section of Design Instruct.
We will start by adding textures on the edges of our work.
Open mediterranean paint 1 in Photoshop and copy and paste it into your working file.
Place this texture above all layers and name it “texture” and then press Ctrl/Cmd + Shift + U to desaturate it.
Change its mode to Screen and Opacity to approximately 25%.
Press Ctrl/Cmd + T and drag one of the corner transform controls to scale up this layer. Upsizing an image will cause it to lose quality, but since this is a texture that does not need to be extra sharp, it is fine, and in fact, desired.
Add a layer mask to this layer. With the layer mask selected, choose the Gradient Tool (G) from the Tools Panel and use these settings:
Make sure black is your foreground color and then drag on the canvas a few times to erase the texture from the middle of the scene.
You can also use the Eraser Tool (E) to improve your texture masking. Try to keep the texture only on the dark background and erase it from everything else.
Now we will add another texture. Open brown paper texture 6 in Photoshop.
Copy and paste it to working file. Name it “texture2” and set the blending mode to Overlay.
Put this layer above the “texture” layer.
Use the Move Tool (V) to place this texture right at the middle of canvas. Further transformations aren’t necessary.
Add a layer mask, and with the layer mask active in the Layers Panel, press Ctrl/Cmd + Shift + I to invert mask to black to mask the whole texture.
Afterwards, select the Gradient Tool (G), use white (#ffffff) as your foreground color and drag once from the center to make it visible in areas around the candle flame.

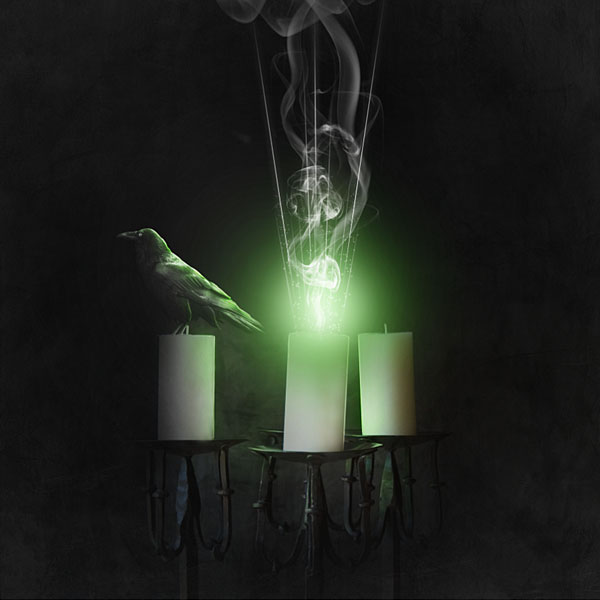
Isn’t that cool?
You can see how textures can bring life and an added interesting element to your work. Feel free to experiment with different textures and blending modes to achieve different results.
Step 19: Adding some colors to the scene
It seems like we are almost done (and we are). The only thing that is left to do is making some good colors for our dark scene.
I don’t want to make the scene too colorful of a piece since it is supposed to be dark and mysterious, but I will add a bit of color to it to give it another appealing element.
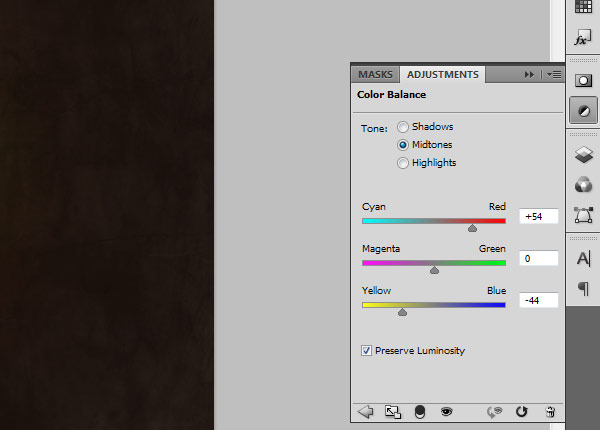
In the Layers Panel, press on the Create new fill or layer adjustment icon. Be sure to make this adjustment layer above all of our existing layers.
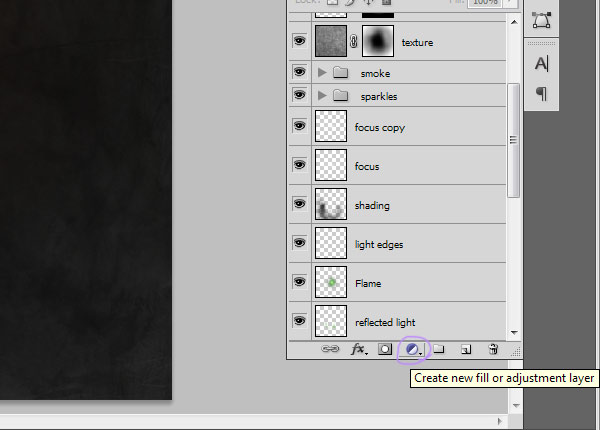
From the list of adjustment layers, select Color Balance and use the following settings:
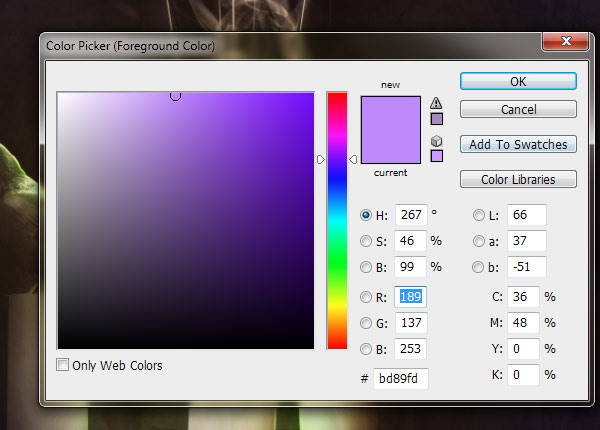
Now create a new layer above the Color Balance adjustment layer and name it “purple edges”. Select a purple color like this one:
Paint with this color using a large, soft brush tip around the edges of your canvas to achieve something like this:
Set the blending mode of this layer to Hue.
Duplicate this layer and set the blending mode to Overlay. Reduce the opacity to approximately 25%.
Now we should make the focus of our scene (the green flames) a bit more eye-catching. Make a new layer and name it “center glow”.
Set the mode to Overlay and its Opacity to 36%.
Then select a green color like this one:
Select the Brush Tool (B) with Opacity at 100%, Hardness 0% and brush size to something large like 2500px.
Click once in the middle of the canvas (above the flame) to apply the brush stroke.
Now change the foreground color to a yellow.
Use a brush size of about 1200px and click once above the flame to make it more yellow.
Voila! You are done, congratulations!
Tutorial Summary
Thank you for following along this tutorial, I hope you have learned some new techniques! To sum up, we used some pretty basic Photoshop tools such as the Brush Tool (B) to create interesting lighting effects, including a technique for creating a glowing, green flame using varying brush sizes and Gaussian Blur.
I also shared with you my method for creating light streaks using the Line Tool, and some sparkles to add some unique effects into a scene.
We covered in brief some best practices for cleaning up stock images so that they blend well with the scene. Additionally, you witnessed a method for applying a purple color tint to the entire piece simply by using a Color Balance adjustment layer and the use of the Brush Tool.
If this tutorial inspired you, please share it with us! Link to your work in the comments or put it in the Design Instruct Flickr group.
Download Tutorial Source Files
- eerie_looking_photomanipulation (ZIP, 26.00 MB)
-
 Trevin serves as the VP of Marketing at WebFX. He has worked on over 450 marketing campaigns and has been building websites for over 25 years. His work has been featured by Search Engine Land, USA Today, Fast Company and Inc.
 -

WebFX is a full-service marketing agency with 1,100+ client reviews and a 4.9-star rating on Clutch! Find out how our expert team and revenue-accelerating tech can drive results for you! Learn more
Make estimating web design costs easy
Website design costs can be tricky to nail down. Get an instant estimate for a custom web design with our free website design cost calculator!
Try Our Free Web Design Cost Calculator
Table of Contents
- Preview
- Resources
- Step 1: Create the Photoshop Document
- Step 2: Put the Candles in the Canvas
- Step 3: Masking the "candles" Layer
- Step 4: Add the Raven into the Composition
- Step 5: Improving the Raven with Clipping Mask Layers
- Step 6: Connecting the Raven with the Candle
- Step 7: Desaturating the Raven
- Step 8: Make the Flame on the Candle
- Step 9: Smudge the Green Flame
- Step 10: Work on the Lighting on the Raven
- Step 11: Work on the Overall Shading of the Scene
- Step 12: Fix the Light on the Candles
- Step 13: Create More Green Flame Reflections on the Candles
- Step 14: Lightening the Subject
- Step 15: Lightening the Candle Borders
- Step 16: Creating Light Streaks on the Candle
- Step 17: Add Sparkles on the Candle
- Step 18: Add a Texture
- Step 19: Adding Some Colors to the Scene
- Tutorial Summary
- Download Tutorial Source Files
Share this article


Web Design Calculator
Use our free tool to get a free, instant quote in under 60 seconds.
View Web Design CalculatorMake estimating web design costs easy
Website design costs can be tricky to nail down. Get an instant estimate for a custom web design with our free website design cost calculator!
Try Our Free Web Design Cost Calculator


