

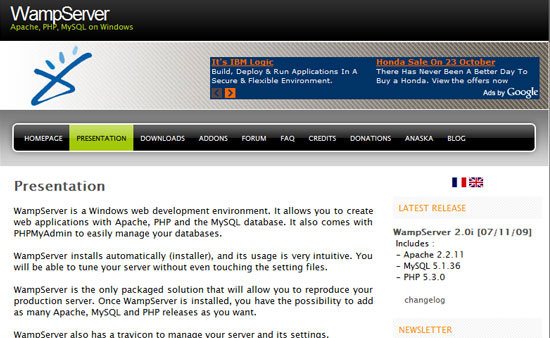
What is WampServer? WampServer is an easy to use web server package that allows you to configure Apache, MySQL and PHP in your local machine to match that of your live web server. It’s free to download, and since WampServer installs quickly and easily, it’s very user-friendly even for those who are not familiar with server administration and server management.
Why would you want to set up a web server on your computer?
Best practices dictate that you should never do on-the-fly updates on a website that is in production (i.e. websites that are already up online and are being used by your site visitors) without first testing it either offline or on another remote web server.
Having a web server in your computer means that you can test your work and perform web development tasks offline, not only making it convenient for times when you don’t have internet access, but also ensures that your site upgrades won’t unexpectedly cause major downtimes when you update your site.
Furthermore, you can develop new PHP/MySQL applications offline without having to spend any money on domain names and web hosting; you can just spend your hard-earned dough after you finish your app!
This guide covers the installation and configuration of WordPress on your personal computer using WampServer.
Objectives
In this guide, you will install and set up WampServer, set up a website, and manage your MySQL database.
As a working example, we will use WordPress, an open source publishing platform that uses PHP and MySQL. However, the steps for installing any PHP/MySQL project or creating your own PHP/MySQL apps will be very similar, so even if you’re working with Drupal, Magento, Joomla!, or a custom app, this guide will still be useful to you.
We will also cover how to sync our local website files with our live production server so that once we are done with our offline work, we can quickly and easily commit them to our live website.
Here is what we will cover and do in this WampServer guide:
- Download and install WampServer
- How to use your local (localhost) web server
- Set up WordPress
- Set up PHP configuration settings
- Manage the local website
- Managing the local MySQL database
- Syncing your local files with a live server using FTP
- Syncing your MySQL database with a live server using MySQL export/import
Let’s get started, shall we?
Download and Install WampServer
First, get yourself a copy of WampServer by visiting the WampServer download page found at the following URL:
At the time of writing this guide, WampServer 2.0i is the latest version and the one you will want to download. By downloading WampServer 2.0i, you will be installing the following:
- Apache 2.2.11 (the web server application)
- PHP 5.3.0
- MySQL 5.1.36
- phpMyAdmin (a convenient web interface for managing our database)
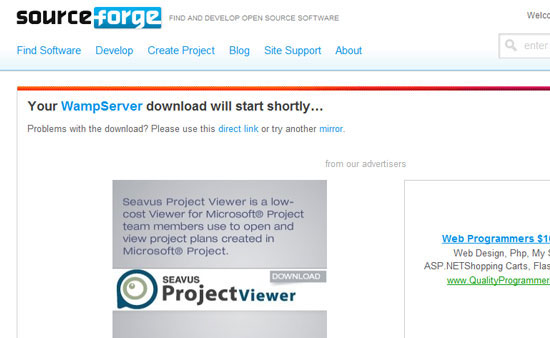
When you download WampServer from the URL provided above, you will be taken to SourceForge to download WampServer.
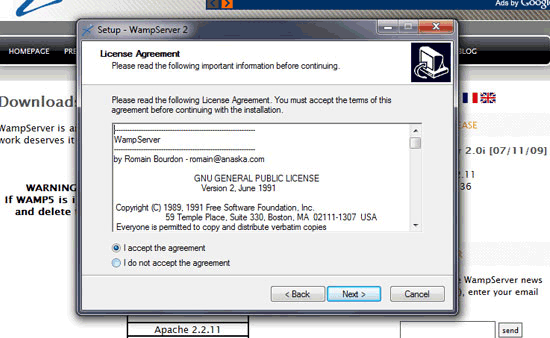
Once downloaded, run the installer.
Click Next past the first screen and agree to the license agreement.
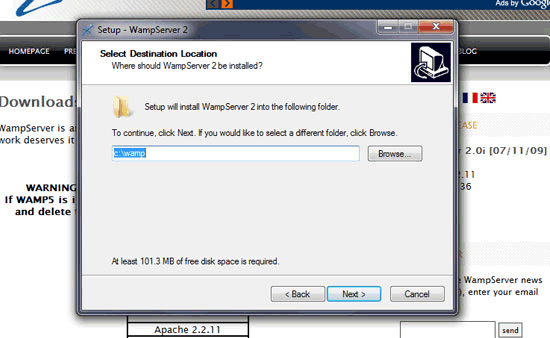
Choose your installation directory. The default is c:\wamp — I would recommend using the default location to avoid any potential issues.
In the Select Additional Tasks dialog, you can choose if you would like to have a Quick Launch icon and a Desktop icon so that you can quickly open WampServer once it has been installed.
![]()
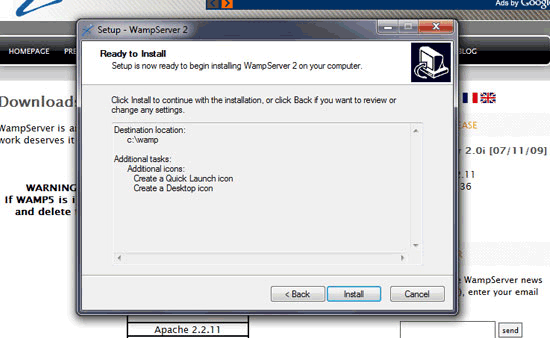
The final screen before the installation process is a recap of your installation options. If you’re happy with it, just click Install.
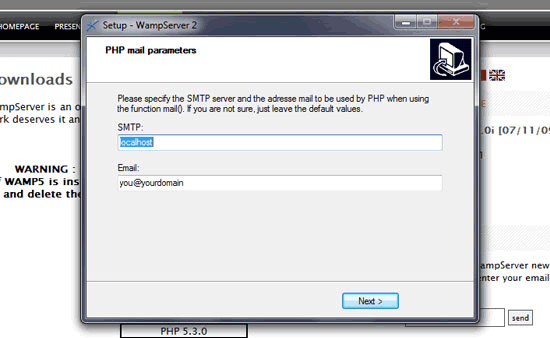
During the installation process, you will be asked to set your mail() settings, which is a PHP function that deals with sending emails from a PHP app.
I left mine at the default settings.
Note: Getting the mail() function to work correctly in a local environment is often tricky, so don’t get surprised if mailing functions don’t work!
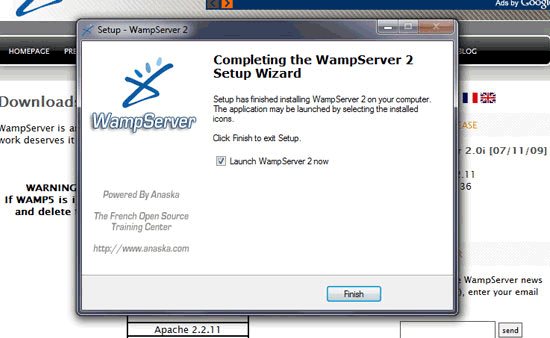
All done? You can click Finish to launch WampServer.
Upon successful installation, you will now notice a new icon in your taskbar that looks like this:
![]()
Using Your Localhost Web Server
The first thing we should do is check to see if WampServer is installed properly. Open up your web browser and navigate to http://localhost.
If WampServer is turned on and is working properly, you will be looking at the default Server Configuration page.
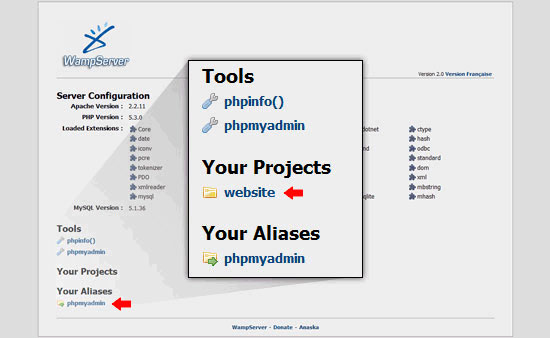
On the Server Configuration page, you will see what extensions are installed, some basic tools for managing your localhost web server, your existing projects, and the phpmyadmin link (which we will use later on).
Create a Directory for Your Website Files
I have already created a directory for my website files (which is called a project in WampServer).
All you have to do to create a project is simply make a folder inside C:\wamp\www.
I called my directory, website — and thus, the project is called website as well. Next time we go to http://localhost, that project will be listed under Your Projects.
To navigate to our project directly, we can use http://localhost/website, where website is the name of the folder we made. For example, if you create a folder called foo, then we go to that project by going to http://localhost/foo.
Setting Up WordPress
To get the ball rolling, we are going to quickly set up a WordPress site in our localhost web server.
First, download WordPress.
Once downloaded, extract the WordPress files to your newly created c:\wamp\www\website folder.
Creating the WordPress MySQL Database
First, you should create your WordPress database on your live production server as sometimes a webhost will give your database a prefix name automatically (e.g.
db01_wp_mydatabasename). If you have full control of the naming conventions of your MySQL databases in your live production server, then don’t worry about this.
If you already have a WordPress database in your live production server, name your localhost web server’s WordPress database the same name.
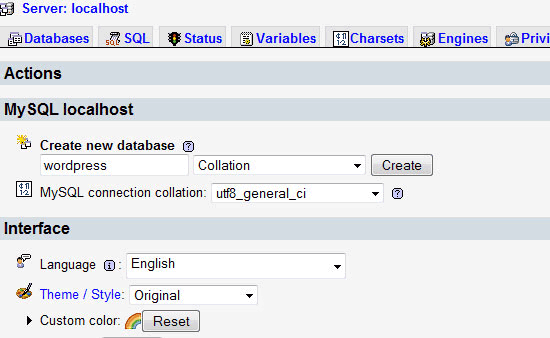
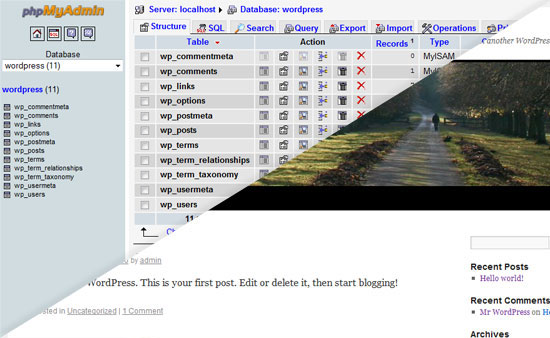
Instead of dealing with the command line, we will use phpMyAdmin, which is a GUI that runs in your web browser that will easily help you manage your MySQL databases.
We need to navigate back to http://localhost and then click on the phpmyadmin link towards the bottom of the Server Configuration screen, under Your Aliases.
Once phpMyAdmin launches, create a new database with the same name as your live setup. Here, I just called my database wordpress, but I advise you to name it something else so that you reduce the chances of a successful bruteforce MySQL attack.
Install WordPress
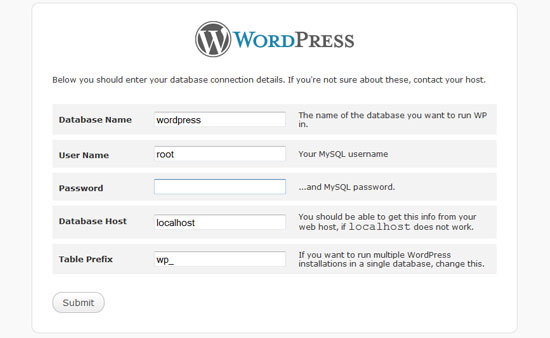
Now browse to http://localhost/website and follow the prompts to set up WordPress.
When you get to the database screen, we will be setting the MySQL username to root and we won’t set a password.
We are using these details because we have not set up any users in our localhost MySQL database yet.
If the database is created successfully, you will be prompted to continue the installation. Just click Run the install to install WordPress on your localhost web server.
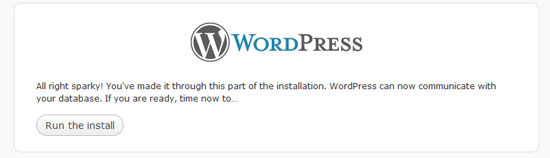
If everything goes according to plan, you’ll see the Success! screen. Excellent, everything is now set up for WordPress.
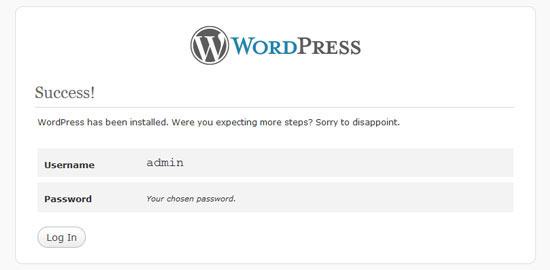
To confirm that WordPress has been installed successfully in your localhost web server, check that your WordPress database tables are present in your WordPress database by going back to phpMyAdmin.
Set Your PHP Configuration Settings
Because we are wanting to make our localhost web server 100% compatible with our live production web server, we should make sure our PHP config file (php.ini) is the same as our live server.
This is a best practice to ensure that what we are looking at when we are developing stuff on our computer is going to work exactly the same when we commit our files to the live production web server.
If you don’t have access to your php.ini file (which is typical in shared hosting), you can create a PHP file in your live production web server that has the following PHP function in it:
<?php
phpinfo();
?>
Once done, navigate to that file in your web browser, and you will be presented with information regarding PHP configuration settings in your web host.
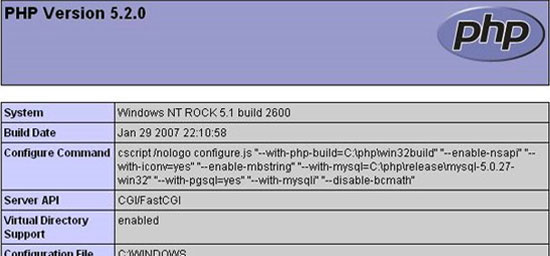
This can be a tedious task, but you want to make sure that the settings match. Not everything needs to match exactly and I have found that in most cases, it is only necessary to make sure safe_mode is set, magic_quotes_gpc is set and try to match the PHP version if you can.
Note: If you have a different PHP version on your live server, you could install that version on WampServer because, unless you run a VPS or a dedicated server, you won’t be able to update your web host’s PHP version. However, I should recommend that you should be using PHP 5 (the latest version); if your webhost is running PHP 4 (or lower) and doesn’t have the option for PHP 5 — it’s time to consider switching to another host.
Common WampServer Administration Tasks
There are a bunch of other things we can do to customize our localhost web server.
Here are a few common tasks that you might want to perform.
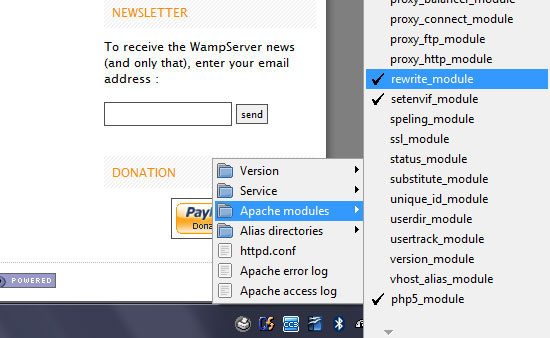
Enable Apache’s mod_rewrite
If you are wanting to use pretty URLs (i.e. http://localhost/website/blog-post instead of http://localhost/website/?p=132), you will need to enable the Apache mod_rewrite module.
To enable mod_rewrite, click on the WampServer icon in the taskbar, mouse over Apache and then Apache modules. Find rewrite_module in the list and click it.
You will need to then click Restart all services to start using mod_rewrite.
Creating New MySQL Users
To make everything easier, we will create a MySQL user with the same details as our live server’s WordPress MySQL user. Browse to http://localhost/phpmyadmin again and click on your WordPress database to select it (you only have one database so this should be easy).
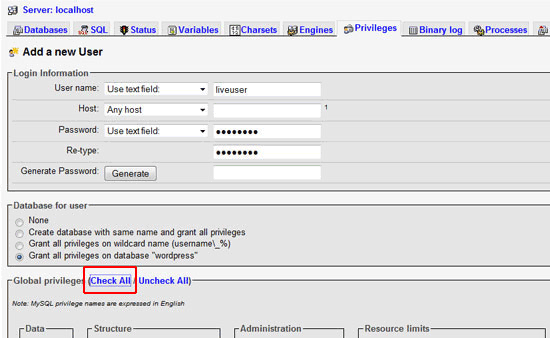
Next, click on the Privileges tab at the top of the screen, and then click Add a new User.
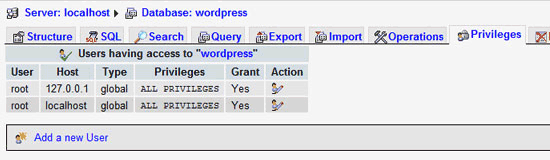
I gave my new user the same name and password as my live MySQL user. I also set my user for any host.
For my localhost database, I am safe to click the Check All option at the bottom, which grants my new MySQL user all privileges for my WordPress database. However, on a live production server, you should minimize the amount of privileges you give your MySQL users to improve security.
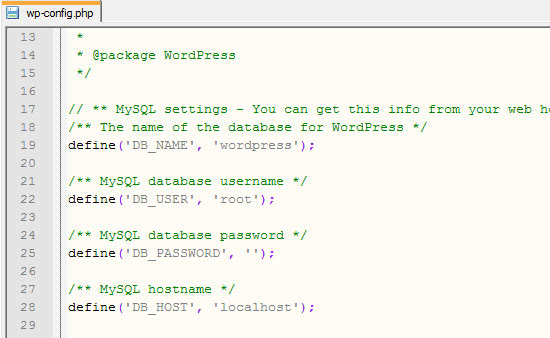
Configuring the WordPress Install to Match the Live Server
We will edit our WordPress config file (wp-config.php) to match the new database details. For other websites that are not running WordPress, the process will be much the same.
This has been a long setup process so far, but what you have now is a local website that has the same configuration as your live server.
Whenever you want to add another website, it is as simple as creating another folder in your c:\wamp\www folder.
Syncing Your Websites
Syncing your website files is quite easy.
With all the settings the same as your live website, FTP is the best option.
You might be thinking, what about direct file paths though? As long as you have used relative paths to set your document root where needed, then you will be all set.
Exporting MySQL Databases
When it comes to your database, you have a few options. The easiest option is to just use phpMyAdmin and export your database into a ZIP file or a SQL file, then import it into your live production server.
To do this, first browse to http://localhost/phpmyadmin and select your WordPress database.
In the top menu, click th Export tab.
On the Export screen, you have several options. At the top of the screen, you will see the Export section.
This is where you will select what tables you want to export. Beside this section is the Options section. I have found that phpMyAdmin has all the settings needed already set by default.
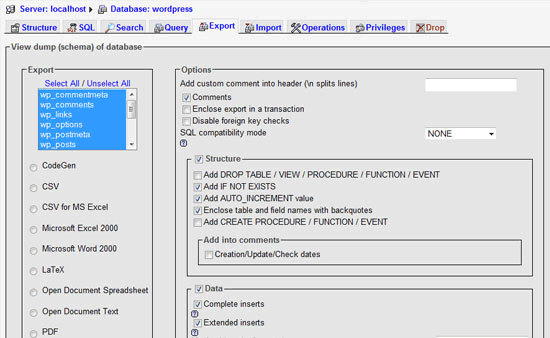
The main area to look at is the Data options.
If you require the data on your local database to be imported on the live server, then tick this box. If you don’t, only an empty table will be created.
While it is possible to export all the data and structure at once for the entire database, I recommend only updating what has changed in the database. This is especially important with active websites that allow users to write data (such as WordPress) as you don’t want their data overwritten or lost.
A good rule is to always replicate data from your live website to your local development website, but only send the changed structural data back.
Also, back up your live database before any changes.
Importing MySQL Databases
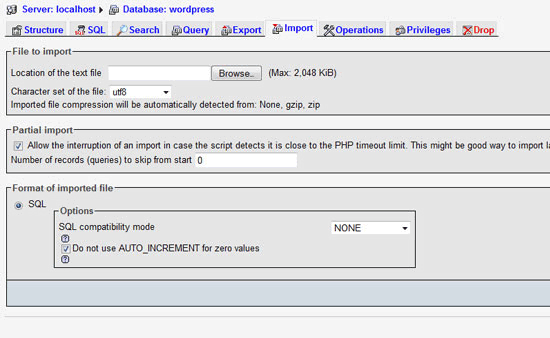
Most web hosts will have phpMyAdmin available to you. To import the data to the live site, access phpMyAdmin and select your database. In the top menu next to the Export link, there will be the Import tab.
Before you do anything, you should backup your database first!
Importing a MySQL database on a live site is very straightforward. Browse for your ZIP file or SQL file that you should have somewhere in your computer from the export process above. Make sure the option for Partial Import is selected, as this will cater to any timeout issues if you have a large database.
Then just click the Go button towards the bottom of the screen.
If all goes well, you will have updated your database. If anything is not right, simply restore you backup and determine what the issue was before retrying the import process.
Conclusion
No matter what your needs are, setting up a localhost web server is a useful and safe measure to take. I would also try to set up a live dev site when working with a client website before pushing any major updates so that you can be doubly sure that your changes are safe in the actual production environment.
Take the time to set up your development environments and make this part of your web development process.
If you do, you will never have that moment where tragically, live data is lost or a website is down for hours/days because of an erroneous development foul-up on a live website.
Related Content
-
 President of WebFX. Bill has over 25 years of experience in the Internet marketing industry specializing in SEO, UX, information architecture, marketing automation and more. William’s background in scientific computing and education from Shippensburg and MIT provided the foundation for MarketingCloudFX and other key research and development projects at WebFX.
 -

WebFX is a full-service marketing agency with 1,100+ client reviews and a 4.9-star rating on Clutch! Find out how our expert team and revenue-accelerating tech can drive results for you! Learn more
Make estimating web design costs easy
Website design costs can be tricky to nail down. Get an instant estimate for a custom web design with our free website design cost calculator!
Try Our Free Web Design Cost Calculator
Share this article


Web Design Calculator
Use our free tool to get a free, instant quote in under 60 seconds.
View Web Design CalculatorMake estimating web design costs easy
Website design costs can be tricky to nail down. Get an instant estimate for a custom web design with our free website design cost calculator!
Try Our Free Web Design Cost Calculator


