
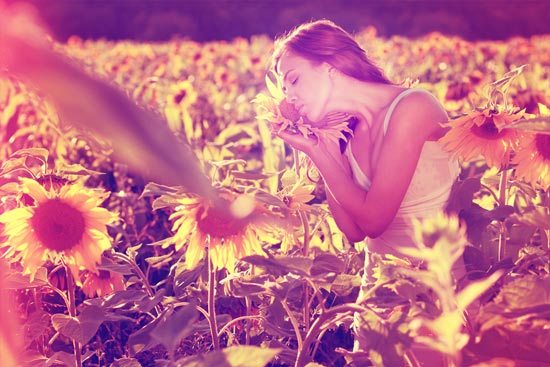
Tutorial Preview

Tutorial Resources
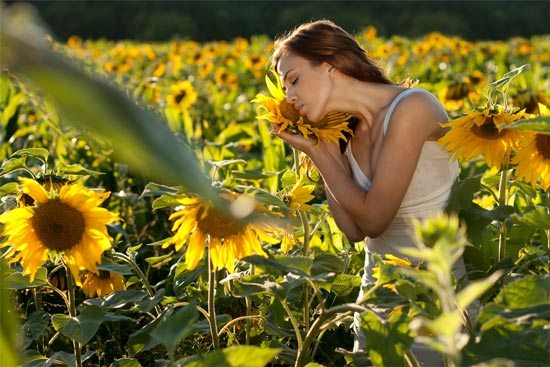
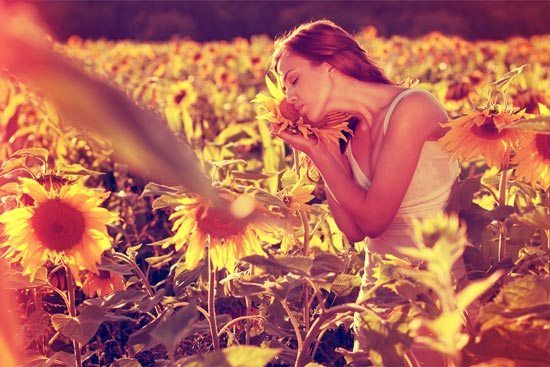
- Stock photo: beautiful woman between sunflowers (by Belovodchenko Anton)
Step 1: Open Your Photo in Photoshop
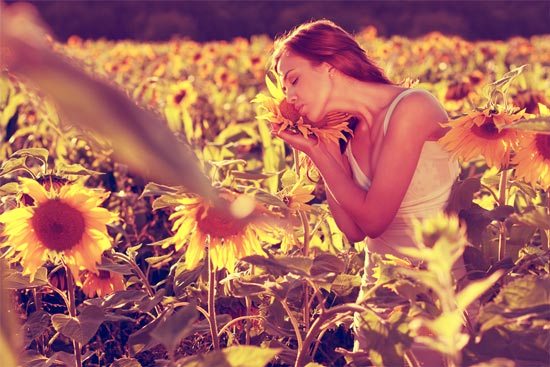
You can use any photo that you want to give the retro effect to. In this tutorial, I’ve used a stock photo from stock.xchng called beautiful woman between sunflowers.
Open the photo in Photoshop by choosing File > Open (Ctrl/Command + O) and then searching for the photo in your computer’s hard drive.
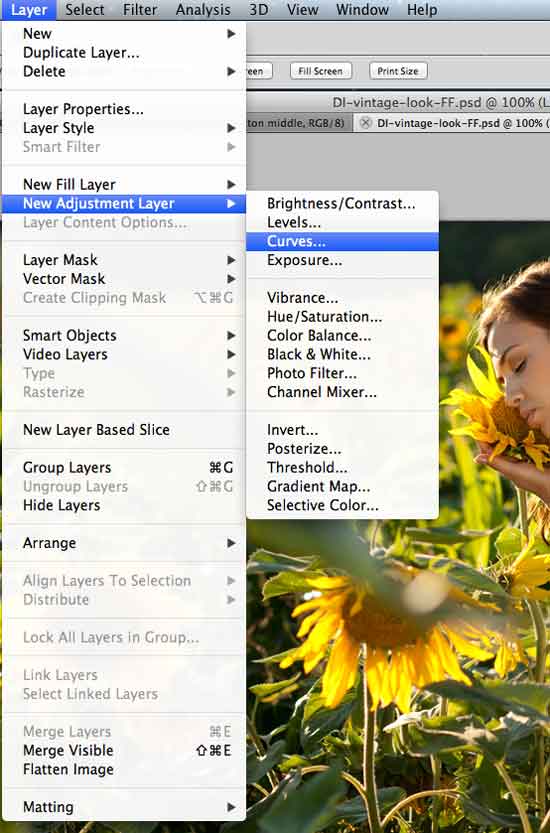
Step 2: Add a Curves Adjustment Layer
We’ll alter the tones of the image by using a Curves adjustment layer. At the bottom of the Layers panel, click on the Create a new fill or layer adjustment button (which looks like a circle that’s half filled with gray and half filled with white) and then choose Curves in the menu that appears.
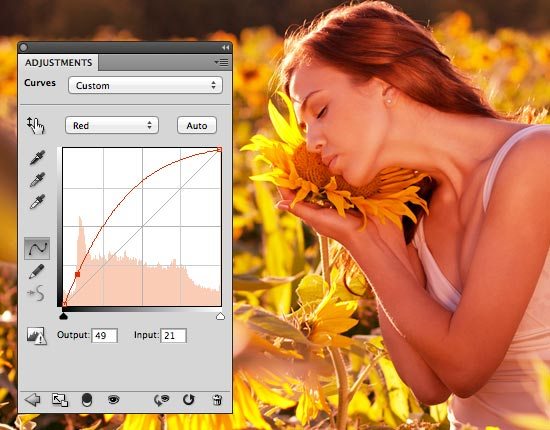
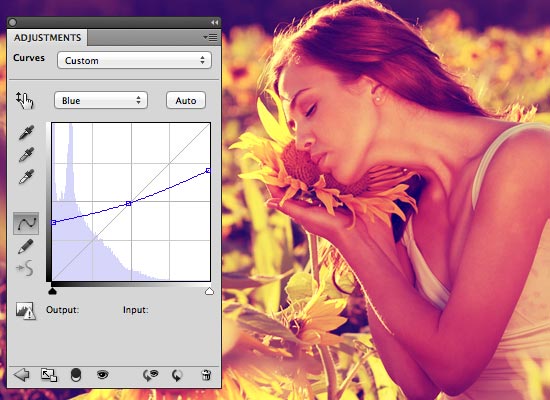
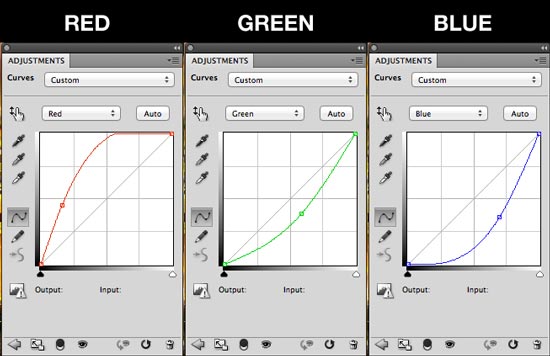
In the Adjustments panel, change the drop down menu to the Red channel and modify the curve by clicking-and-dragging it using the image below as a reference.
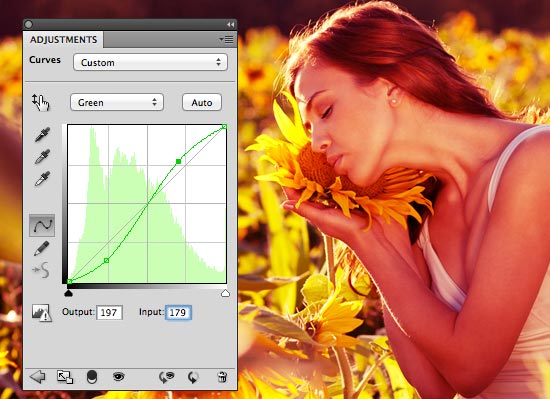
Switch to the Green channel and then adjust the curve like on the image below.
Finally switch to the Blue channel and change the curve again as shown on the image below.
Our work’s looking pretty good so far, and we’re only getting started.
Let’s keep going.
Step 3: Add a Gradient Map Adjustment Layer
Now we’ll add another adjustment layer: a Gradient Map adjustment layer.
Click on the Create a new fill or layer adjustment button at the bottom of the Layers panel again, but this time, choose Gradient Map.
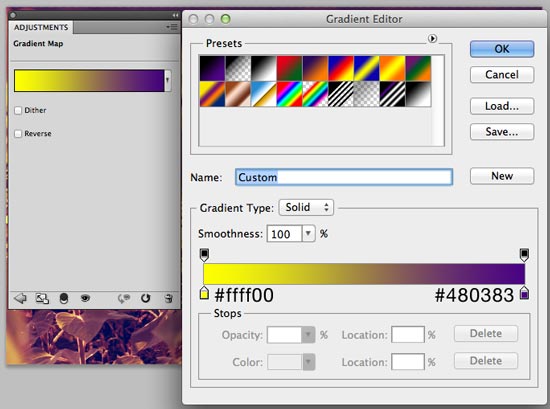
In the Adjustments panel, click on the gradient to open the Gradient Editor. In the Gradient Editor, change the color of the gradient as shown in the image below.
Afterwards, in the Layers panel, double-click on the Gradient Map adjustment layer to open the Layer Styles dialog window. In the Layer Styles dialog window, change the Blend Mode option to Soft Light and set the Opacity to 30%.
Step 4: Add a Light Leak
Now we’re going to add a light leak that happens when an old and worn camera gets a hole in its body, thereby letting light get into the camera and affecting the exposure of the photo.
It’s a nice detail to give to our retro photo.
In the Tools panel, set your Foreground Color to a red color (#fc2c2c). Click on the Gradient Tool (G) and, in the Options bar at the top of Photoshop’s interface, click on the gradient to open the Gradient Editor window. In the Gradient Editor window, choose the Foreground to Transparent Preset.
Now we need a new layer for the gradient we’re about to draw, so go ahead and create a new layer on top of the other layers.
With your Gradient Tool ready to go, draw a gradient on the new layer.
The gradient should start at the left edge of your photo and end a few pixels to its right (use the image below as a reference).
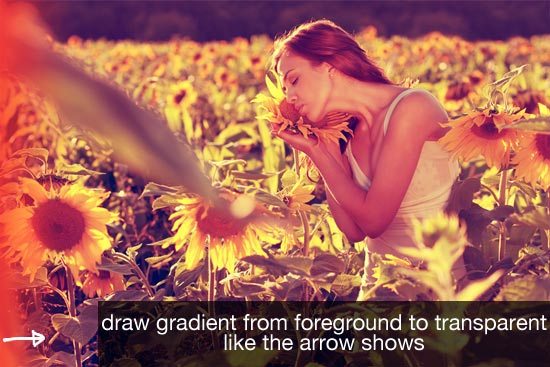
After that, change the Blend Mode of the layer to Screen.
Step 5: Add a Film Edge Burn
Let’s add a film edge burn effect which will give our photo a worn-out characteristic.
To make this easier, first turn off the visibility of Curves adjustment layer, Gradient Map Layer and the light leak layer (the one we just created from the previous step) by clicking on the Eye icon at the left of the layer. The only layer that should be visible is the layer with our original image in it. This will make it easier for use to see what we’re doing.
Next, click on the layer with the original image in it to make sure it’s the active layer (if it’s the active layer, it should be highlighted in blue in the Layers panel), and then enter Quick Mask mode by pressing Q on the keyboard.
Invert the Quick Mask by going to Image > Adjustments > Invert.
Set the Foreground Color to white (#ffffff). Switch to the Brush Tool (B). In the Options bar, use a big, soft brush, set the Hardness to 0%, and set the Flow to around 50-60%.
Paint over the places where you want your film edge burns to show up. For me, I wanted them in the lower and upper right corners of the photo.
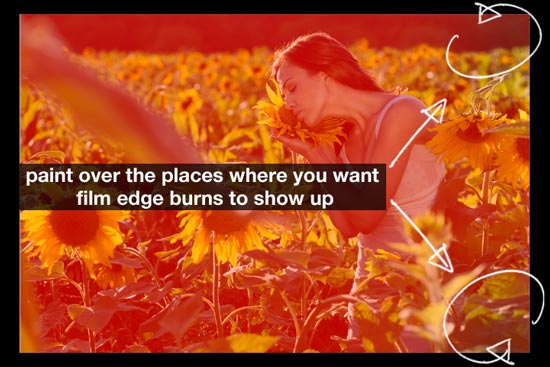
When you’re done, press Q again to exit out of Quick Mask mode. You should have marquee selections around the places where you want the edge burns to appear.

Be careful not to deselect the marquee selections.
If you accidentally deselect your marquee selections, go to Select > Reselect.
Add a new Curves adjustment layer and alter the curves of the Red, Green and Blue channels using the image below as a reference.
Turn on the visibility of all the other layers to see our current progress. As you can see, the Curves adjustment only affects the areas we selected.
Step 6: Add Imperfections
What’s neat about retro photos are the unexpected imperfections they have because of light leaks, overexposure, and age. Currently, our work still looks too perfect, so we need to introduce some artificial imperfections to it.
Create a new layer on top of all the layers.
We need to fill the new layer with a purple color.
To do that, change your Foreground Color to purple (#510487) and go to Edit > Fill.
Afterwards, change the Blend Mode of the layer to Screen and set the Opacity to about 50% to tone down the vibrant colors of our photo just a tad bit, giving it a more faded look.
Create a new layer on top of all the other layers.
In the new layer, use the Brush Tool (B) to dab a white spot on the subject’s face using a soft brush.
Change Blend Mode of the layer to Soft Light.
The effect not only highlights the photo subject’s face, but also mimics an overexposure often made by old analog cameras.
Step 7: Add a Grainy Effect
We’re almost there. This is the final step.
To reinforce the age of the photo, we’ll give it a slight grainy effect.
Create a new layer on top of all the other layers, fill it with black (#000000), and then give the layer a Noise filter effect by going to Filter > Noise > Add Noise.
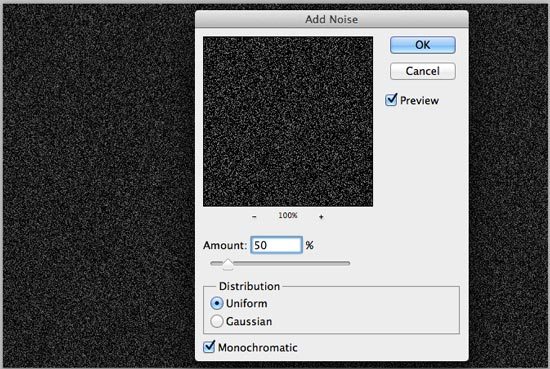
We need to soften the noise a bit, so go to Filter > Blur > Gaussian Blur, set the Radius to 1px and then apply the filter.
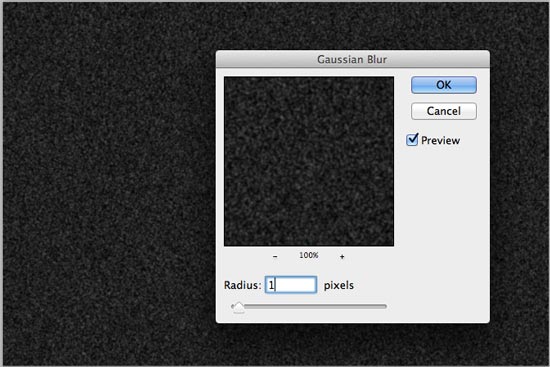
Set the Blend Mode of the noise layer to Screen and Opacity to about 40%.
Tutorial Summary
In this Photoshop tutorial, I showed you how to turn your perfect digital photo into an imperfect analog retro photo. We used adjustment layers to adjust the colors and soft brushes and gradients to create light leaks, overexposure and edge burns.
We also used the Noise and Gaussian Blur filter to add a grainy effect at the end.
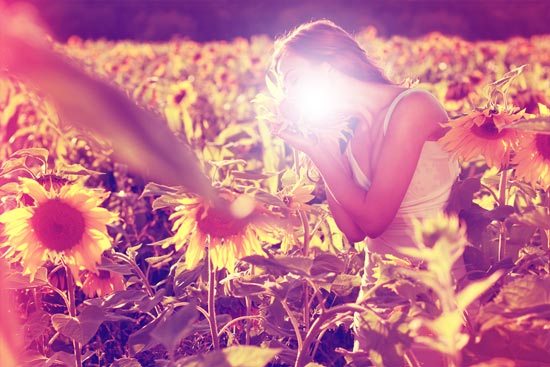
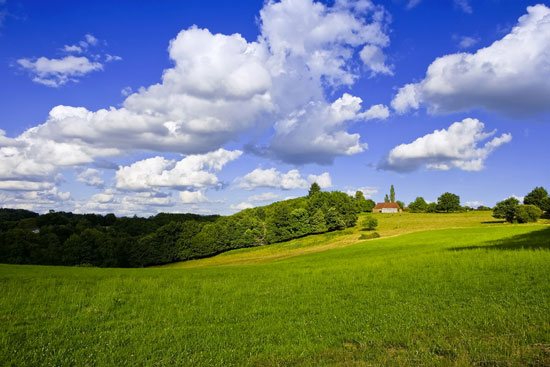
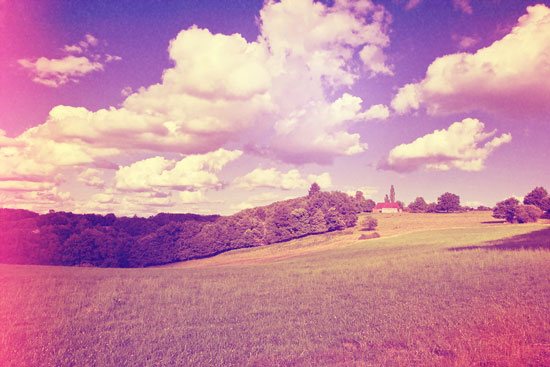
Here’s an example of this effect on a different image.
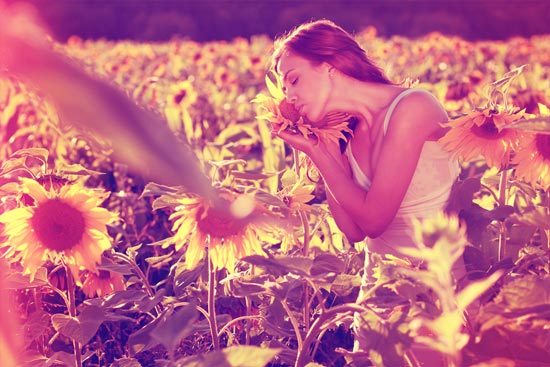
Original
Retro Photo Effect
Download Source Files
- photo_retro_effect (ZIP, 4.39 MB)
Feel free to post a link to your own results in the comments!
-
 Trevin serves as the VP of Marketing at WebFX. He has worked on over 450 marketing campaigns and has been building websites for over 25 years. His work has been featured by Search Engine Land, USA Today, Fast Company and Inc.
 -

WebFX is a full-service marketing agency with 1,100+ client reviews and a 4.9-star rating on Clutch! Find out how our expert team and revenue-accelerating tech can drive results for you! Learn more
Make estimating web design costs easy
Website design costs can be tricky to nail down. Get an instant estimate for a custom web design with our free website design cost calculator!
Try Our Free Web Design Cost Calculator
Table of Contents
- Tutorial Preview
- Tutorial Resources
- Step 1: Open Your Photo in Photoshop
- Step 2: Add a Curves Adjustment Layer
- Step 3: Add a Gradient Map Adjustment Layer
- Step 4: Add a Light Leak
- Step 5: Add a Film Edge Burn
- Step 6: Add Imperfections
- Step 7: Add a Grainy Effect
- Tutorial Summary
- Download Source Files
Share this article


Web Design Calculator
Use our free tool to get a free, instant quote in under 60 seconds.
View Web Design CalculatorMake estimating web design costs easy
Website design costs can be tricky to nail down. Get an instant estimate for a custom web design with our free website design cost calculator!
Try Our Free Web Design Cost Calculator


