- Home
- Blog
- Web Design Enhancing WordPress Custom Fields with Search Filtering
Enhancing WordPress Custom Fields with Search Filtering
-
 10 min. read
-
 William Craig
 CEO & Co-Founder
- President of WebFX. Bill has over 25 years of experience in the Internet marketing industry specializing in SEO, UX, information architecture, marketing automation and more. William’s background in scientific computing and education from Shippensburg and MIT provided the foundation for MarketingCloudFX and other key research and development projects at WebFX.
Custom fields are an excellent feature in WordPress. They allow you to store any extra information (meta-data) about a post that you may want.
When I first started using WordPress as a content management system, I shied away from them, as I thought they would be difficult to use for end-users (i.e. the client), but as I learned more about customizing the administration panels of WordPress, I began to realize what a powerful addition to a WordPress site they could be.
However, adding the ability to search your posts by custom field is a little tricky; the native search feature of WordPress doesn’t search custom field values.
In this guide, I’ll show you how to work with custom fields and how to make them even more powerful by adding the ability to display and filter them.
What we are going to do is create a very simple events listing page for a company that organizes Jelly co-working events, located in the UK.
We will make the events listing page sortable by county. Each post will be an event with a title, description and a custom field for the area the event based in. (Alternatively, instead of using WordPress’s native Post post type, you can create a custom post type for events).
This guide assumes that you have ready-access to WordPress.
If you would like to follow along step-by-step, you are encouraged to install WordPress on your computer instead of working with a live/production WordPress instance.
Setting Up the Custom Field in WordPress Admin
The first thing to do is set up the meta-data for each event. There is a strong argument to be made here for using the new custom post types feature that was introduced in WordPress 3.0, but to keep it simple, we will use the native Post post type in WordPress, and to indicate that they are events instead of regular posts, we will place them within a category called “Find a Jelly”.
Start by adding each event as a post. Depending on your WordPress theme, you could also add custom thumbnails and a variety of additional information.
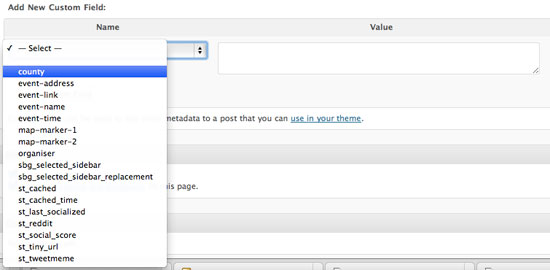
Once you have added the standard data and selected the correct category, scroll down to the Add New Custom Field section near the bottom of the Add New Post panel.

Click on Enter New, give your custom field a relevant name (Being in the UK, this example will use counties as the custom field key, although it could easily use states or regions).
This will form the meta key in the database, so make sure its something simple (preferably one word) so that code-authoring isn’t cumbersome.
Next, add a custom field value for the counties custom field (the name of the county where the Jelly is located). In my case, the values could be Shropshire, Bedfordshire, Northamptonshire, and so on.
Click the Add Custom Field button to add the county meta-data, and then update your post.
From here on out, for each additional event you add, you will see the counties custom fields appear in the dropdown menu for custom fields; you don’t have to keep adding it in.

Once you have set up all of your events listings with their country custom field values, it’s time to start on the search filtering function.
Creating the Events Listing Page Template
Open page.php in your theme folder and save it as a new file. In this case, I’ve called the new page template as find-jelly.php.
Give the file a template name by adding this line to the top of the page:
Template Name: Find a Jelly
Now, when you create a new page for your directory, this page will appear in the list of available templates.

Creating the County Filtering Dropdown Menu
To create the web form that will allow users to filter the results, add this code to the find-jelly.php page template we created earlier, wherever you would like the dropdown input field to be displayed in the events listing page:
<form name="search" action="" method="get">
 <select name="county">
 <?php
 $metakey = 'county';
 $counties = $wpdb->get_col($wpdb->prepare("SELECT DISTINCT meta_value FROM $wpdb->postmeta WHERE meta_key = %s ORDER BY meta_value ASC", $metakey) );
 if ($counties) {
 foreach ($counties as $county) {
 echo "<option value=\"" . $county . "\">" . $county . "</option>";
 }
 }
 ?>
 </select>
 <input type="submit" value="search" />
</form>
Let me explain what’s going on in the code block above.
The Markup
First of all, we have a basic HTML form with the action attribute left blank as we want the form to return to the same page when submitted. We set the method to get so that we can see the search criteria in the URL in the same way as the standard WordPress search. Using get is a nice touch that allows the user to share the search results link, as well as allowing us to use our analytics software (such as Google Analytics) to study popular event searches.
The <form> element contains a dropdown menu (<select>), with the <option> elements being the counties.
The submit button (<input type="submit">) allows for form submission; though, with a bit of JavaScript, you can submit the form when the user picks the option, saving them the user action of having to click on a submit button.
Populating the Dropdown Menu
The next part of our code is the tricky bit; we need to populate the <select> element with <option> elements of all the custom field values.
To do so, we loop through all of the values in the database for the county custom field key; but we only want display unique values rather than every instance that they are attached to a post.
To do all of that, we use $wpdb->get_col(). $wpdb is a WordPress PHP class that allows us to construct our own SQL queries and do other database-related tasks. The get_col() method in $wpdb is used to select a specific column within our WordPress database.
First, we create a variable called string variable called $metakey that is assigned the name of our custom field (which is named county); this is optional, and just makes our code a little bit more readable.
Then using $wpdb->get_col(), we feed our SQL query as a prepared statement using WordPress’s handy $wpdb->prepare() method.
This is the SQL query from above (which has been rewritten and formatted slightly for discussion):
SELECT DISTINCT meta_value
FROM $wpdb->postmeta
WHERE meta_key = $metakey
ORDER BY meta_value ASC
This SQL query selects all unique records in the meta_value column of the WordPress postmeta, wherever meta_key is equal to "county"; it returns the results alphabetically.
Each result is then printed as the value attribute of each <option> element.
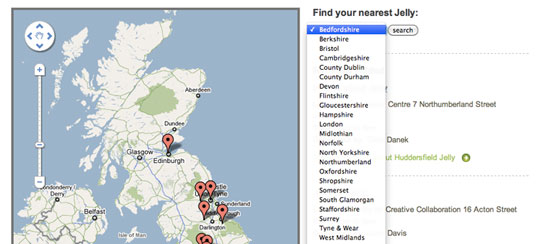
Once you have added the form, you should see something like the following image on your page; I have styled this page, as well as added a Google Maps widget — we won’t cover that here.

Displaying the Search Results
OK, so that’s the actual search filter set up; now we need some results.
To do this, we are going to add the following code to the find-jelly.php template after the code for the web form:
<?php
$counties = $_GET['county'];
if ($counties) {
 $paged = (get_query_var('paged')) ? get_query_var('paged') : 1;

 $args=array(
 'cat'=>19,
 'meta_value' => $counties,
 'paged'=>$paged,
 );

 query_posts($args);
} else {
 query_posts('cat=19&posts_per_page=4');
}

if ($counties) { ?>
 <h3>Your Search For <?php echo $counties; ?></h3>
 <?php } else { ?>
 <h3>Recently Added</h3>
 <?php }

if (have_posts()) :  while (have_posts()) : the_post();

$event_county = get_post_meta($post->ID, 'county', true); ?>
<div class="entry">
 <h2><a href=”</php the_permalink(); ?>” title=”<?php the_title_attribute(); ?>”>
 <?php the_title(); ?></a></h2>
 <?php the_excerpt(); ?>
 <?php echo $event_county; ?>
 <a href=”</php the_permalink(); ?>” title=”<?php the_title_attribute(); ?>”>  Read More</a>
</div>
<?php endwhile;  ?>
<?php else : ?>
<p>Sorry no results were found</p>
<?php endif; ?>

<?php wp_reset_query(); ?>
It looks like there is a lot going on there, simply because of the shear volume of code versus the first code block, but there isn’t, really; if you have worked with WordPress theme development before, the above will look pretty straightforward to you. Let’s break it down into its major components.
To start, we set up a variable to collect any form data that has been added to the page URL by looking into the $_GET[] array.
$counties = $_GET['county'];
Then we check to see if any data has been passed; if it has, we run a simple WordPress query:
if ($counties) {
 $paged = (get_query_var('paged')) ? get_query_var('paged') : 1;

 $args=array(
 'cat'=>19,
 'meta_value' => $counties,
 'paged'=>$paged,
 );

 query_posts($args);
}
The $paged variable is included so that the standard WordPress pagination can be used if there are a lot of results. I have included the 'cat' parameter (19 is the category ID of my category, but yours may differ) to make sure only posts from the Find a Jelly category are displayed; this isn’t necessary, but is an extra measure for fault-tolerance in case your client mistakenly adds the custom field to other posts outside of the Find a Jelly category. The meta_value needs to match our search query.
If the search function hasn’t been used, we need the page to display something, so I’ve set it to add the four most recent entries.
else {
 query_posts('cat=19&posts_per_page=4');
}
Next, we display a title depending on whether a search has been used:
if ($counties) { ?>
 <h3>Your Search For <?php echo $counties; ?></h3>
 <?php } else { ?>
 <h3>Recently Added</h3>
<?php }
And finally, we add the standard WordPress loop to loop through all of the results depending on the query used above.
The only additional functionality is that I’ve added in the following:
$event_county = get_post_meta($post->ID, 'county', true); ?>
The above line of code gets the custom field information inside the loop and displays the county as part of each listing.
Save your file and upload it to your server, and you should now be able to sort all of your posts within the correct category by the custom field ‘county’.
For a live example of this, check out the Find a Jelly page on the UK Jelly website. You will see that I’ve taken the custom fields quite a lot further by integrating Google Maps with clickable markers listing all locations, as well as quite a lot of additional information about each Jelly.
Related Content
-
 President of WebFX. Bill has over 25 years of experience in the Internet marketing industry specializing in SEO, UX, information architecture, marketing automation and more. William’s background in scientific computing and education from Shippensburg and MIT provided the foundation for MarketingCloudFX and other key research and development projects at WebFX.
 -

WebFX is a full-service marketing agency with 1,100+ client reviews and a 4.9-star rating on Clutch! Find out how our expert team and revenue-accelerating tech can drive results for you! Learn more
Make estimating web design costs easy
Website design costs can be tricky to nail down. Get an instant estimate for a custom web design with our free website design cost calculator!
Try Our Free Web Design Cost Calculator


Web Design Calculator
Use our free tool to get a free, instant quote in under 60 seconds.
View Web Design CalculatorMake estimating web design costs easy
Website design costs can be tricky to nail down. Get an instant estimate for a custom web design with our free website design cost calculator!
Try Our Free Web Design Cost Calculator


