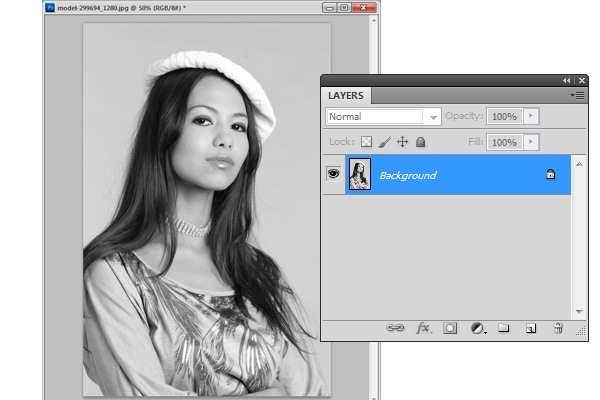
Step 1
Open your photo in Photoshop. I used a stock photo from Pixabay (this one) but this process will work on any photo, so go ahead and use one from your personal collection.

Step 2
Old photos are in black and white, so we’ll take out the colors by pressing Shift+Ctrl+U (Image > Adjustments > Desaturate).
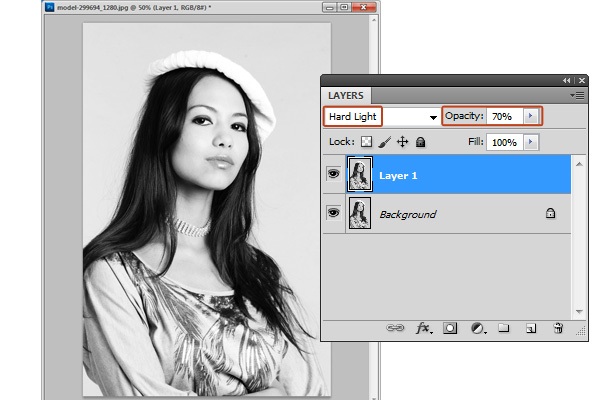
Step 3
Back in the day, cameras couldn’t take sharp, high-res images so we need to remove some of the fine details in our photo if we want to make it look old. Here’s a trick to do that: Press Ctrl+J to duplicate the layer, then set the new layer’s blend mode to Hard Light and lower the layer opacity to about 70%, or until it looks good to you.
Step 4
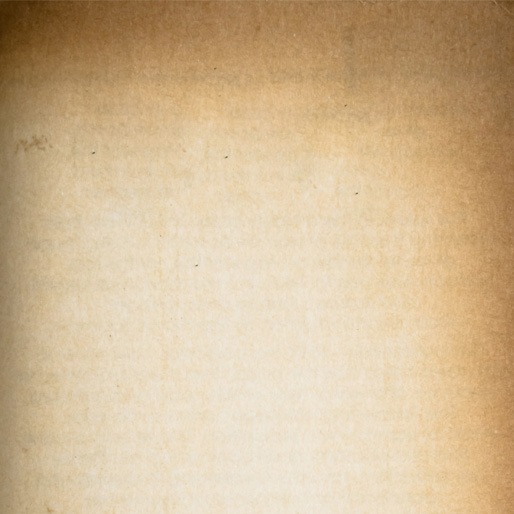
Let’s add texturing and a vignette to mimic the graininess of old photos and the fading that results from their natural aging.
Find a paper texture that you like. Or you can use the one I’m using, which I got off from one of our freebies: Free Old Paper Stock Photos. I used the first stock photo.
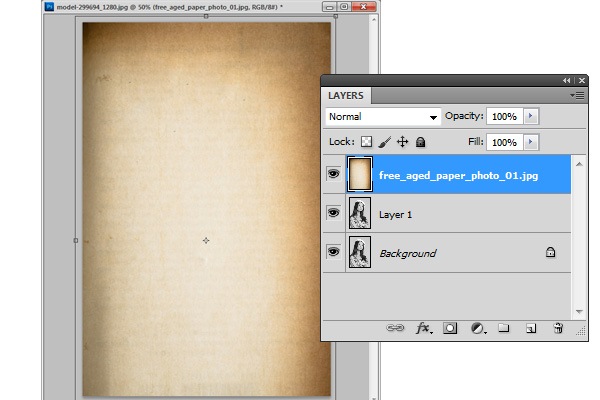
Open up your paper texture in Photoshop and move it into our PSD.
The texture should be on its own layer. If you’re working with a landscape-oriented image, you should also rotate the texture by going to Edit > Transform > Rotate 90o CW.
Step 5
We need to resize the paper texture so that it fits our canvas. Press Ctrl+T (Edit > Free Transform) to reveal the transform controls at the corners of the texture.
Hold down Shift to preserve the proportions of the texture, and then click-and-drag one of the transform controls to resize the texture until its edges sort of line up with the edges of our canvas.
Note: If your photo is bigger than the texture and you need to increase the size of texture, that’s OK because we don’t need the texture to be high-res. But typically, you want to avoid scaling up your images because you’ll lose image quality.
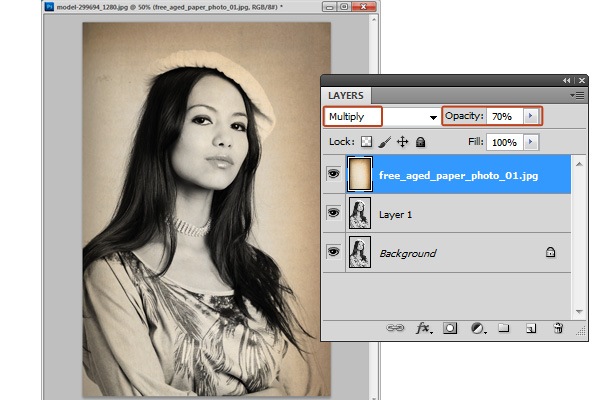
Step 6
Now we’ll blend the texture layer with our photo by changing the texture layer’s blend mode to Multiply and lowering the layer’s opacity to about roughly 70% (give or take). Play around with the layer opacity value until you get something you like.
Step 7
Old photos generally have creases and scratches because they’re often folded up and stored inside wallets and passed around, so they get real beat up.
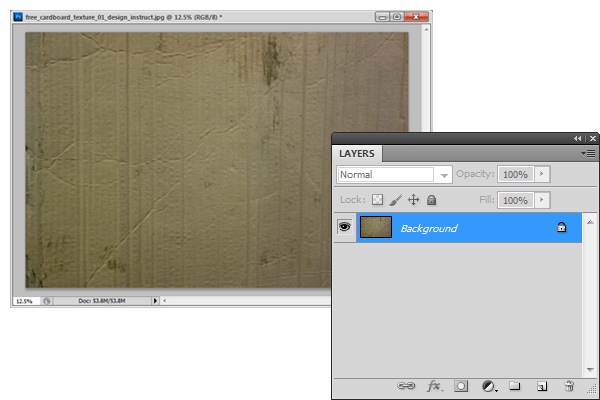
We’ll mimic this effect using another texture. Find a texture that has creases and folds. I’m using one of the free cardboard textures from this set.
Specifically, I used the first one because, in my eyes, it just has the right amount of creasing and texturing without being too overpowering and distracting.
Open up the cardboard texture in Photoshop.
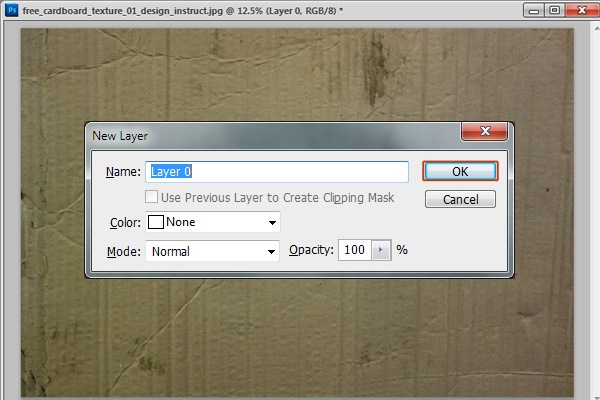
We want to be able to edit the texture’s layer, so in the Layers panel, double-click the only layer there (the layer is labeled as Background by default) and then just click OK in the dialog window that pops up, which will just unlock the layer and automatically re-label it to Layer 0.
I also need to rotate the texture by choosing Image > Image Rotation > 90o CW so that it’s oriented in portrait; you don’t have to do this if the photo you’re working on has a landscape orientation.

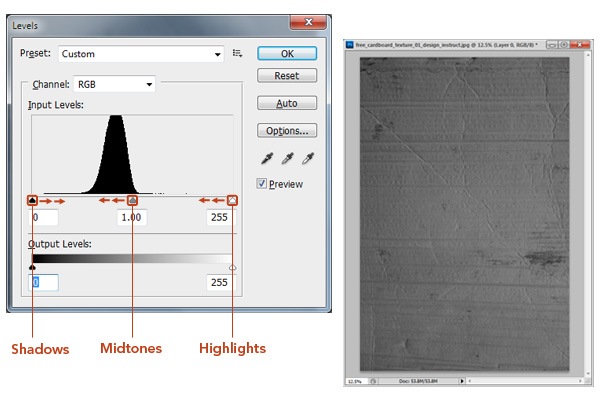
Step 8
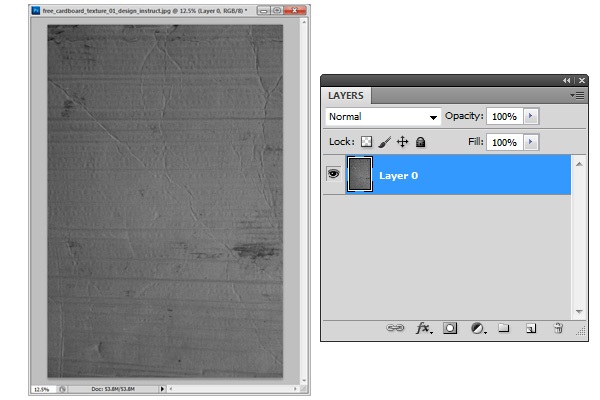
Let’s think about what we want to do here. I’m only interested in the creases, scratches and stains on the cardboard texture, and I don’t want the subtle texturing and the color because we’ve already got those from the first texture.
Let’s remove the color from the cardboard by pressing Shift+Ctrl+U (Image > Adjustments > Desaturate).
Press Ctrl+L (Image > Adjustments > Levels) to open the Levels dialog window. Let’s adjust the texture’s tonal range to isolate the creases, scratches and stains.
In order to achieve the effect we’re going for, we need to move the midtones slider and highlights slider to the left, and the shadows slider to the right.
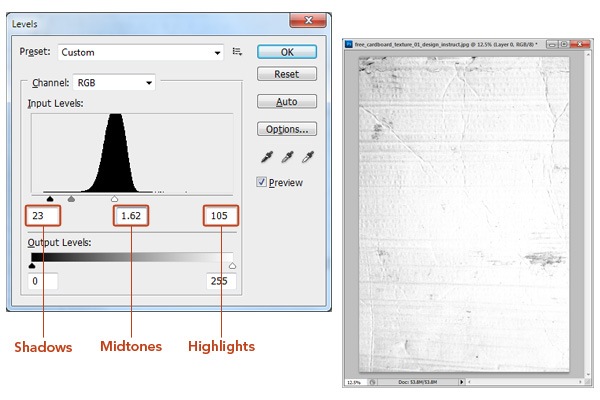
OK, we’re set.
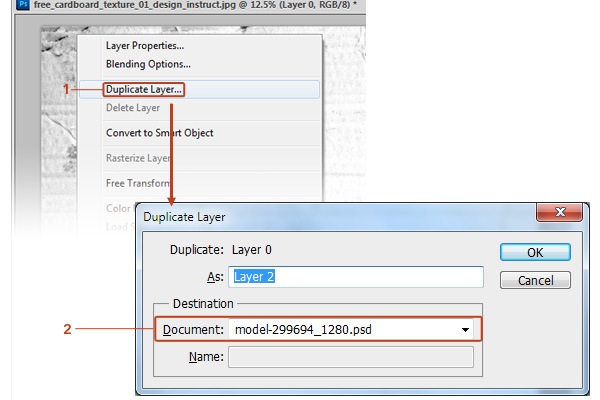
Let’s copy this texture to our main Photoshop document now.
Right-click on the canvas and choose Duplicate layer in the menu that appears. The Duplicate Layer window will open. In Document dropdown menu, look for and then select your main PSD file.
Press OK.
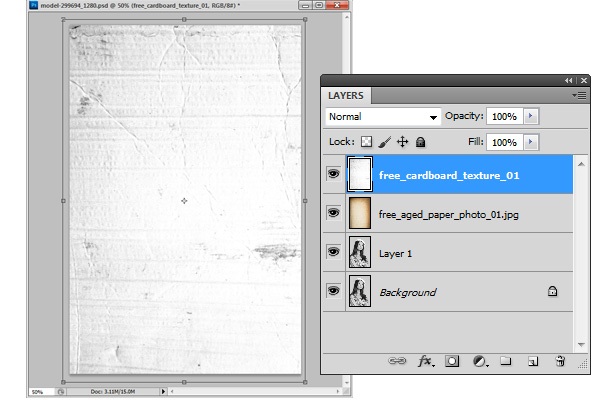
Double-check to make sure the layer was successfully copied into our primary PSD, and then you can save and close the cardboard texture PSD now.
Step 9
Chances are you’ll need to scale the cardboard texture to fit the canvas. Just like before, hit Ctrl+T (Edit > Free Transform) and adjust the size of the texture layer by click-dragging one of the transform controls.
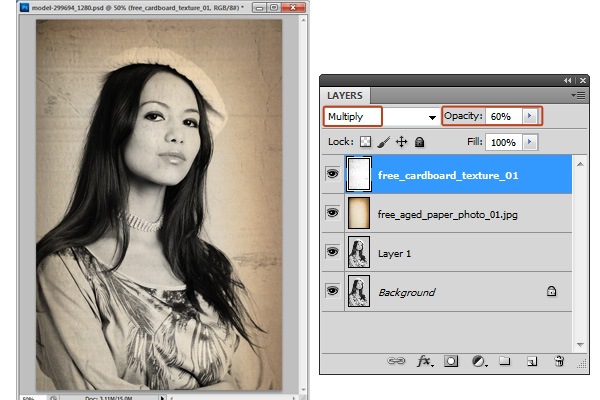
Step 10
Change the blend mode of the cardboard texture layer to Multiply and lower the layer opacity to about 60%.
Step 11
Old photos become yellowish because the paper it’s printed on contains lignin and cellulose. When these are oxidized as a result of being exposed to air and sunlight, what happens is the paper turns brownish-yellow.
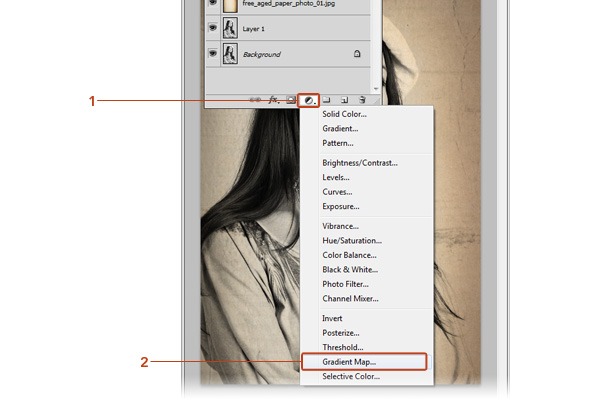
We’ll recreate this paper oxidation effect using the Gradient Map adjustment layer.
In the Layers panel, click on the Create new fill or layer adjustment button, which is at the bottom of the panel, then choose Gradient Map in the menu that appears.
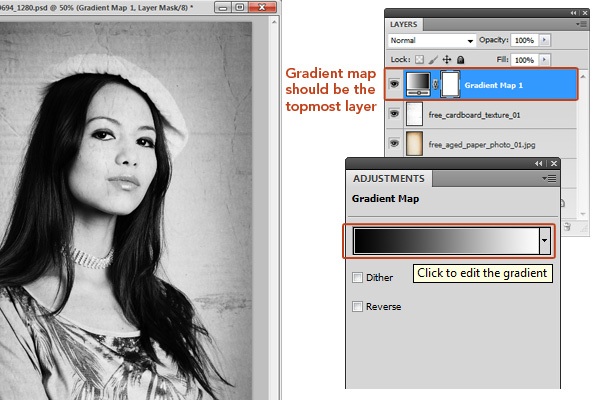
You should now have a new gradient map adjustment layer (make sure it’s the topmost layer) and the Adjustments panel should have opened automatically.
In the Adjustments panel, click on the gradient preview, which will then open the Gradient Editor window.
Click on the left Color Stop and then select a dark chocolate color (I used #593010) for the stop color. Click on the right Color Stop and select a light tan color (I used #f7dca4).
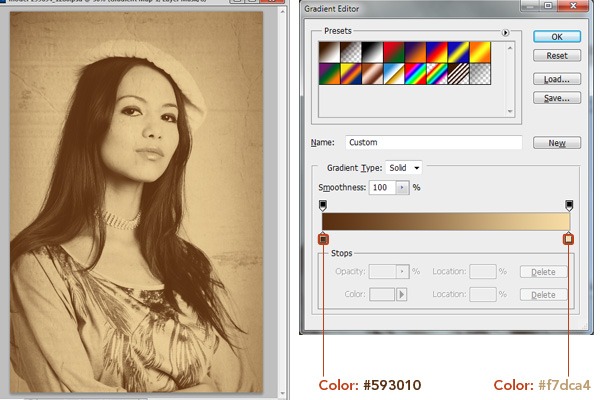
Click OK once you’re happy with the outcome.
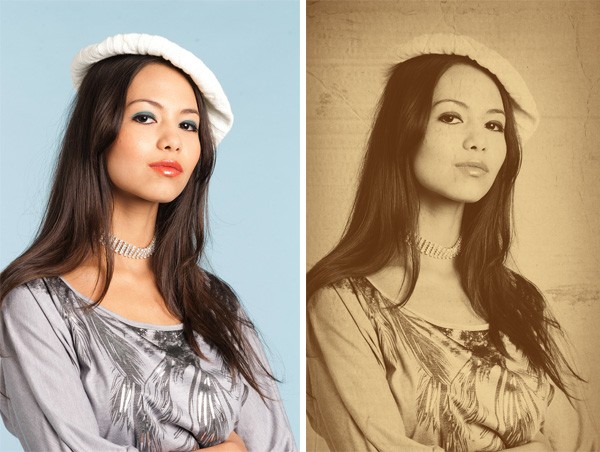
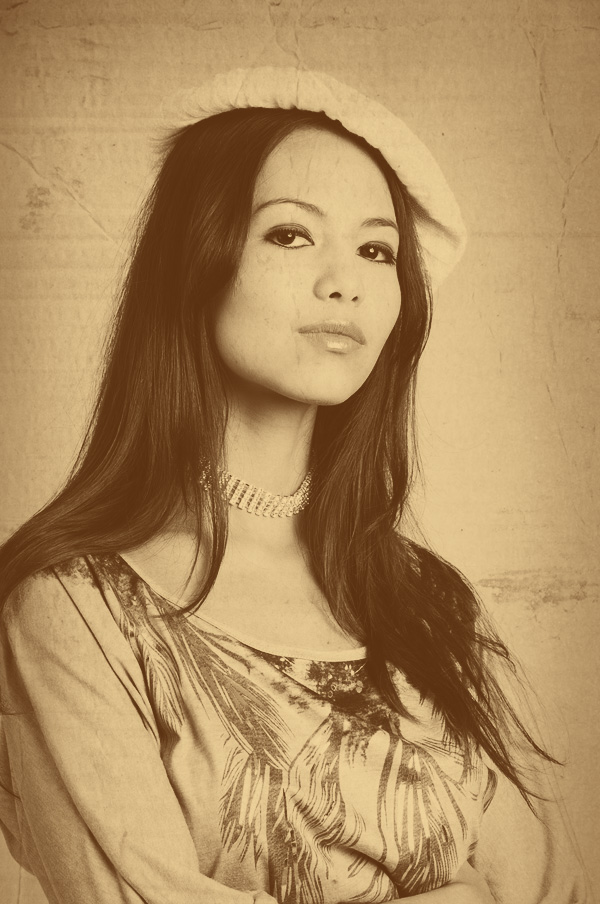
Final
We’re done!
This is what I ended up with as the final result:
I hope you had fun following along with my tutorial. Feel free to share your own results in the comments below!
Related Content
-
 Trevin serves as the VP of Marketing at WebFX. He has worked on over 450 marketing campaigns and has been building websites for over 25 years. His work has been featured by Search Engine Land, USA Today, Fast Company and Inc.
 -

WebFX is a full-service marketing agency with 1,100+ client reviews and a 4.9-star rating on Clutch! Find out how our expert team and revenue-accelerating tech can drive results for you! Learn more
Make estimating web design costs easy
Website design costs can be tricky to nail down. Get an instant estimate for a custom web design with our free website design cost calculator!
Try Our Free Web Design Cost Calculator
Share this article


Web Design Calculator
Use our free tool to get a free, instant quote in under 60 seconds.
View Web Design Calculator
Make estimating web design costs easy
Website design costs can be tricky to nail down. Get an instant estimate for a custom web design with our free website design cost calculator!
Try Our Free Web Design Cost Calculator
What to read next