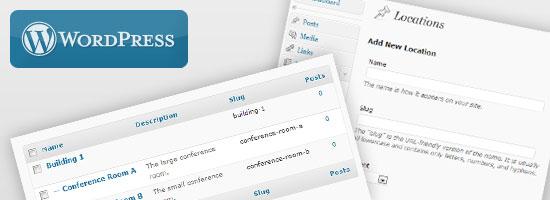
 In this guide, we will cover an incredibly great feature of WordPress: Custom taxonomy. Custom WordPress taxonomies give you unprecedented power in the way you can categorize and relate your WordPress content with each other. Though WordPress taxonomies were introduced in WordPress 2.3, it has been revamped in WordPress 3.0 for WordPress developers. Recently, we had looked at creating custom WordPress post types in the WordPress custom posts guide, and to further our command of WordPress 3.0 site and theme development, we’re going to now discuss custom taxonomies.
What is Taxonomy in WordPress?
Taxonomy is simply a way of organizing data and, in the WordPress world, a taxonomy is a way of organizing and tying your site content together. Even though you don’t realize it, you’re probably already very familiar with at least one of the built-in WordPress taxonomies: WordPress tags. Tags are a taxonomy because posts can be linked to tags, viewed by tag, and organized by tags. Another WordPress taxonomy are post categories. Taxonomies add a lot of power to WordPress because they allow users to filter the information they want to see on your site. A custom taxonomy is exactly what it sounds like — a custom way to relate disparate content together. Custom taxonomies can be applied to custom post types or to regular pages and posts. Here are some things you might use custom taxonomies for:
- Release Year for movies
- Urgency like High Priority, Low Priority for service bulletins
- Location like room name, zip code or state for events
Each of these SEO taxonomies could help to organize information stored in a WordPress site. If you read the custom post types guide, than the last example (events) on that list will be familiar.
The Game Plan
We’re going to build on the Event custom post type we produced in the WordPress custom post types guide by creating a custom taxonomy for it called Location. The Location taxonomy will allow us to organize our events by their location. Before we begin, a couple of caveats. First, for the purposes of this guide, we’ll be using the default TwentyTen theme that comes with WordPress 3 so that we all have the same base theme. However, these instructions can be adapted quite easily for using your own theme. We’ll also be assuming that you followed along the custom post types guide and that you already have the custom Event post type created. OK, with that said, let’s get started!
Creating a Custom Taxonomy
As with custom post types, WordPress makes it pretty simple to create your own custom taxonomy. Let’s take a look at the code required to create the Location custom taxonomy:
add_action( 'init', 'create_locations' ); function create_locations() { $labels = array( 'name' => _x( 'Locations', 'taxonomy general name' ), 'singular_name' => _x( 'Location', 'taxonomy singular name' ), 'search_items' => __( 'Search Locations' ), 'all_items' => __( 'All Locations' ), 'parent_item' => __( 'Parent Location' ), 'parent_item_colon' => __( 'Parent Location:' ), 'edit_item' => __( 'Edit Location' ), 'update_item' => __( 'Update Location' ), 'add_new_item' => __( 'Add New Location' ), 'new_item_name' => __( 'New Location Name' ), ); register_taxonomy('location','event',array( 'hierarchical' => true, 'labels' => $labels )); }The above code should go in the functions.php file inside your theme’s directory. The register_taxonomy WordPress function is what actually creates the taxonomy, so let’s start by looking at a couple of the arguments that we passed to it. 'location' is the internal name of our taxonomy. 'event' tells WordPress what post types will use this taxonomy. In our case, we’re tying it to our custom Event post type. You could replace this with 'post' or 'page' if you wanted to use your taxonomy on your posts and pages. You could also pass in multiple post types (via an array) so that multiple types of content can use the taxonomy. array(...) is the last argument to register_taxonomy. It’s a PHP array of options that tells WordPress how this taxonomy will work. Let’s go over the keys inside the array argument. 'hierarchical' is a boolean key that states whether or not the taxonomy has a hierarchy, i.e., whether the taxonomy has child categories or not. For our Location taxonomy, we are going to have a hierarchy. For example, think: Building 1, Conference Room A. There may be several Conference Room A’s, but since its parent is Building 1, then we are able to give our location greater specificity. 'labels' is simply information about the way the taxonomy information is going to be printed (as specified by the $labels array inside the create_locations function). Also notice that the register_taxonomy call is inside a function called create_locations. This is a custom function of ours (it can be named anything you want) that is called when WordPress initializes add_action( 'init', 'create_locations' ). Still with me? I know it’s a lot, but let’s keep moving forward and soon it will all come together.
Adding Your Custom Taxonomy to Posts
OK, now that we’ve created the Location taxonomy, let’s log into WordPress and create some locations that we can use with our events. If you look under the Events menu (on the left-hand side of the administration screen), you can see there is a new link called “Locations”. Clicking on it will bring you to a screen where you can add, edit, and remove locations from the system. 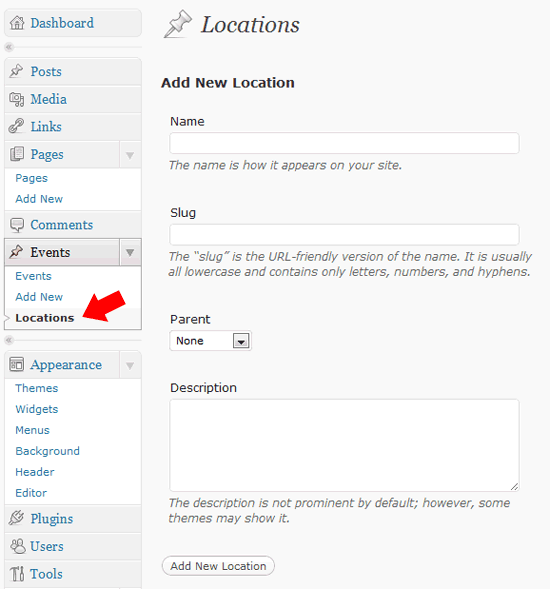 Create the following locations:
- Building 1
- Conference Room A
- Conference Room B
Once you do, you should see your new locations in the Location table (right next to the Add Location interface). 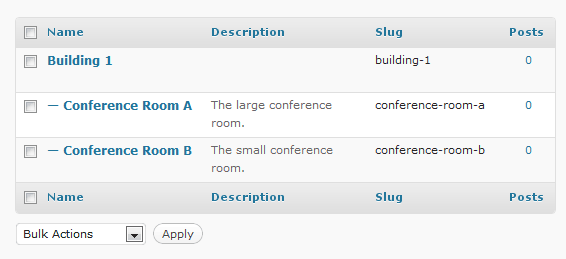 Now that we have some locations, let’s add them to an Event post! Head over the Add New Event screen (or edit an existing event), and you should see a new Locations widget on the right-hand side. This widget appears because when we created the taxonomy, we told WordPress to associate it with the Event custom post type.
 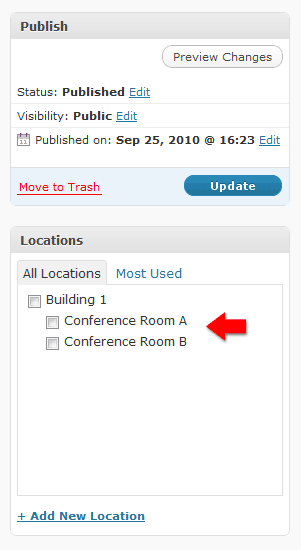 Check off Conference Room A and then publish or save the event. Notice that you can add new locations right from this screen if you find that there’s one missing. This whole display should be familiar to you as it works exactly like WordPress post categories. If you make a non-hierarchical taxonomy, then it will behave exactly like post tags. Now that we’ve created some locations and used one of them to an Event post, we want to display each event’s location on the front-end of the site so that our readers can see them. Let’s do that next.
Displaying Your Taxonomy Information
The first place we want to show the location is when we are displaying a single event. If you remember back in the previous custom post types guide, we created a file called single-event.php in our theme directory that was used to display an individual event. If you were doing a custom taxonomy on a default content type (i.e. posts or pages), then you can do the same thing, but only you’d need to do it in single.php. When we visited an event, it looked like this:  We can add the location (or locations) to the post using WordPress’s
 get_the_term_list function, which looks like this:
get_the_term_list( $id, $taxonomy, $before, $sep, $after )
Here are brief descriptions of each get_the_term_list argument:
$id– the ID of the event to get the taxonomy for$taxonomy– what taxonomy to get ('tag','location', etc.)$before– The HTML to print before the list$sep– what should separate the various items in the list$after– The HTML to print after the list
We can use the get_the_term_list function to display all locations assigned to an event using the following code block:
<?php echo get_the_term_list( get_the_ID(), 'location', "Location: " ) ?>
This tells WordPress to print the current Event’s ID (get_the_ID()), use our Location taxonomy, and prepend the list with the text, “Location: “. We won’t worry about specifying a separator since the default (which is a comma) will work just fine. You could use another separator if you want, like – or |. One other thing to note is that each displayed location will automatically be a link to a page that shows all posts that have the same location. (We’ll talk about how to customize that page in a bit). To add the location’s list to our single-event.php file, replace the following section:
<div class="entry-meta"> <?php twentyten_posted_on(); ?> </div><!-- .entry-meta --> </pre>
With:
<div class="entry-meta"> <?php twentyten_posted_on(); ?> </div><!-- .entry-meta --> <div class="entry-meta"> <?php echo get_the_term_list( get_the_ID(), 'location', "Location: " ) ?> </div><!-- .entry-meta -->
Now if we refresh the event’s page in our browser, we can now see the location assigned to it: 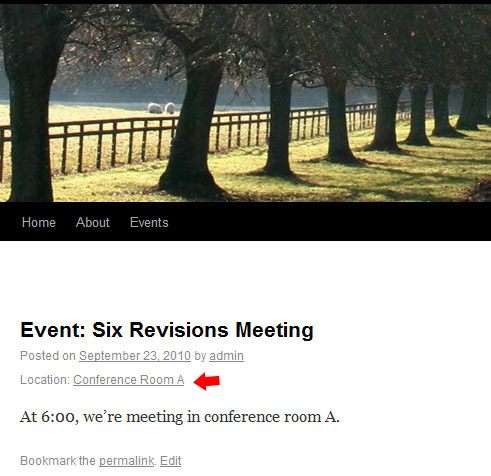
Filtering Posts by Custom Taxonomy
Now that we’re displaying our Location taxonomy in our events pages, we need to configure a page template to show all the events for a given location. As noted previously, the “Conference Room A” link will automatically take you to a page that displays all the posts with the given location (which is pretty useful for when you want to know what other events will be happening in “Conference Room A”). But since we’re tying our taxonomy to a custom event type, we’ll need to get our hands a little dirty and make some modifications. If we follow the link as-is, we’ll see the following:  To understand what’s going on, we need to know a little about WordPress’s template hierarchy. Whenever a page is loaded in WordPress, it looks in your theme for the correct template to load based on a specified naming convention. When a taxonomy page is encountered by the user, the sequence in which WordPress checks what WordPress theme page template to use is this:
 taxonomy-[your_taxonomy_term].php > taxonomy-taxonomy.php > taxonomy.php > archive.php > index.php. What this means is that, going left to right, WordPress will use the first file it encounters that matches the naming convention. In the TwentyTen WordPress theme, the first file that is a match is archive.php since the first three files are non-existent. That explains why we saw the “Blog Archives” heading in the page. To display our locations, we’re going to add a file called taxonomy-location.php. Since this is higher in the page template hierarchy (i.e., it’s taxonomy-[taxonomy-term].php from above), WordPress will load this file instead of archive.php when a user hits the location taxonomy page. So to get started, create taxonomy-location.php in your theme’s directory and copy the contents of tag.php into it so that we have a starting point. The first thing we need to do is get the location that we are currently viewing (like “Conference Room A”). WordPress terminology calls this the term of the current custom taxonomy. To get the terms of an event post, add the following line right below the get_header() line.
<?php $term = get_term_by( 'slug', get_query_var( 'term' ), get_query_var( 'taxonomy' ) ); ?>
All of the term information (ID, name, etc.) is stored in the $term variable, so we can now output it wherever we want. We are going to display the term at the top of the page, so let’s replace the tag heading with our own heading for location. So go ahead and change this code block:
<h1 class="page-title"><?php printf( __( 'Tag Archives: %s', 'twentyten' ), '<span>' . single_tag_title( '', false ) . '</span>' ); ?></h1>
To:
<h1 class="page-title"><?php printf( __( 'Events in Location: %s', 'twentyten' ), '<span>' . $term->name . '</span>' ); ?></h1>
Now if we click on the “Conference Room A” link from our event, we can now see what location we are looking at. But there are still no events showing. 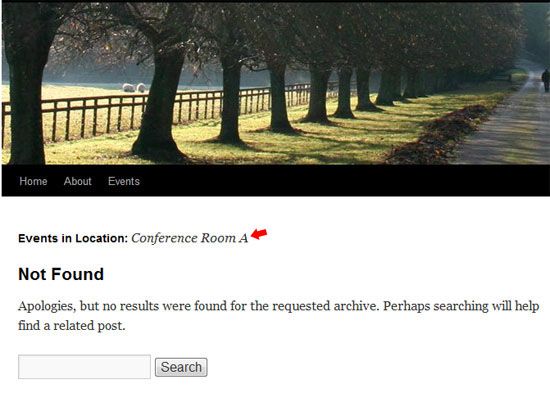 To fix that, we need to modify the default WordPress loop to manually find Events, and not just Posts. Right below the line you added, add the following line so that we can make a custom WordPress query:
<?php query_posts(array( 'post_type'=>'event', 'location'=>$term->slug)); ?>
query_posts will override the default WordPress loop and replace it with a custom one that finds all Events with the current location. Due to a bug in WordPress (at the moment), any other post types that are at the current location will also be returned. This is not a problem for us right now, but is something to keep in mind in the future as you work with custom taxonomies. Once we’ve added the query_post call, here’s what we see: 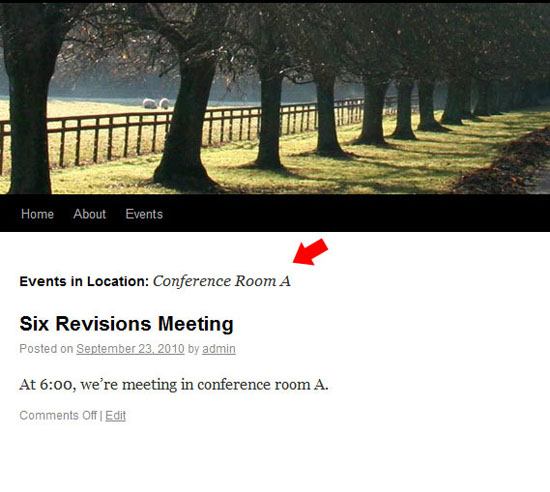 As you can see, we’re now showing all of our “Conference Room A” events (we only have one), awesome! If you noticed, when originally creating the locations, you can optionally specify a location description. How would we add that to our template? That’s pretty easy. Just add the following line right under the closing
 h1 tag in taxonomy-location.php.
<strong>Description:</strong><?php echo term_description( '', get_query_var( 'taxonomy' ) ); ?>
Now our page will look like this: 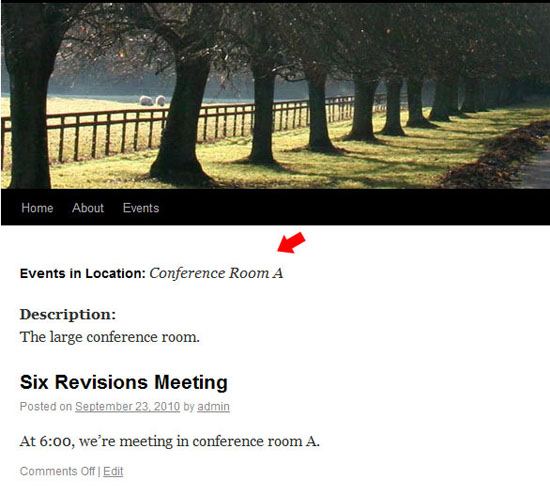 And that’s it! We are now showing our custom taxonomy on individual Event pages and we can also list all events in a given location.
Summary
I hope that after reading this guide, you now have a good idea on how to set up your own custom WordPress taxonomies. This is what we did:
- Create a custom taxonomy (the Location taxonomy)
- Add the Location taxonomy to posts (in this case, in the Event custom post type)
- Display the custom taxonomy in posts
- Filter and display posts by their custom taxonomy
- Create a page template for our custom taxonomy
With the inclusion of custom post types and the improvement of custom taxonomies in WordPress 3, the sky is really the limit in content creation. How are you going to use this new functionality?
Related Content
-
 President of WebFX. Bill has over 25 years of experience in the Internet marketing industry specializing in SEO, UX, information architecture, marketing automation and more. William’s background in scientific computing and education from Shippensburg and MIT provided the foundation for RevenueCloudFX and other key research and development projects at WebFX.
 -

WebFX is a full-service digital marketing agency delivering revenue-driving strategies across online advertising, SEO and AI search optimization, and digital marketing. Backed by 1,100+ client reviews, a 4.9-star rating on Clutch, and proprietary revenue-tracking technology, our team helps businesses grow visibility and revenue across platforms, from Google to ChatGPT to LinkedIn. Discover how our expert team and revenue-accelerating tech can drive results for you. Learn more
Make estimating web design costs easy
Website design costs can be tricky to nail down. Get an instant estimate for a custom web design with our free website design cost calculator!
Try Our Free Web Design Cost Calculator
Share this article


Web Design Calculator
Use our free tool to get a free, instant quote in under 60 seconds.
View Web Design Calculator
Make estimating web design costs easy
Website design costs can be tricky to nail down. Get an instant estimate for a custom web design with our free website design cost calculator!
Try Our Free Web Design Cost Calculator