- Home
- Blog
- Web Design Bower Beginner’s Guide
Bower Beginner’s Guide
-
 12 min. read
-
 William Craig
 CEO & Co-Founder
- President of WebFX. Bill has over 25 years of experience in the Internet marketing industry specializing in SEO, UX, information architecture, marketing automation and more. William’s background in scientific computing and education from Shippensburg and MIT provided the foundation for MarketingCloudFX and other key research and development projects at WebFX.
Modern web development generally involves using third-party dependencies: CSS libraries and preprocessors like Bootstrap and Sass, JavaScript libraries like jQuery and Angular, and everything else in between. I bet if you listed down all of the tools you currently use/have used to develop sites with, you’d be shocked at just how many of them you’ve been relying on. How do you effectively keep track of them all, across all of your various development projects?
How do you keep your project dependencies updated? How do you update them in such a way that your older projects, which might not be compatible with the latest releases, aren’t affected? Managing all of your project dependencies manually is a full time job all on its own.
Without the proper tool. If you work on a lot of dev projects and you use third-party dependencies, using a package manager such as Bower is a must.  This tutorial covers the basics of Bower.
This tutorial is geared towards front-end developers who are new to Bower, but are not new to command-line interfaces (CLIs). If you’re not comfortable with CLIs, Bower is an excellent and gentle introduction to them (compared to, say, jumping directly into managing your own web server/VPS through a command-line interface).
What is Bower?
Bower is a tool that helps you install, update, and manage all of your front-end development dependencies.
A dependency in this context is an open source project that you rely on to build your site, such as Bootstrap, jQuery, and Normalize.css. Bower is similar to npm, except Bower is specifically geared towards front-end developers (HTML, CSS, and JavaScript).
Install Bower
To install Bower, you’ll need:
- Node
- npm (which comes with Node by default)
- Git
If you don’t have Node (and npm) installed yet, you might want to read this tutorial first: How to Install Node.js. If you don’t have Git either, check out our tutorial called How to Quickly Get Started with Git — it’s written by Tobias Günther (who knows a thing or two about Git, given that his company built one of the most popular Git graphical user interfaces in the market). Once you have Node, npm, and Git ready to go, install Bower by running the following command in your command prompt/terminal:
npm install -g bowerThe command above installs Bower globally, which means it will be accessible anywhere in your computer.
Just a funny aside, the command above is similar to using Mozilla Firefox to download Google Chrome. Anyways, moving on. Next, navigate to your project’s directory/folder.
This is important — and I want to say this early on in this tutorial — because the rest of the tutorial assumes you’re already in your project’s directory. If you don’t have one, just create a folder somewhere in your computer, name it something like “bower-tutorial” or “messing-around-with-bower” or whatever, and then navigate to it. You don’t want to be doing all of this in your Desktop folder or something.
Getting Help
Since this is probably your first time using Bower, the command I’d like to talk about first is the help command, which displays inline docs and tips. Issuing the help command without any arguments will show you a list of Bower commands.
bower help 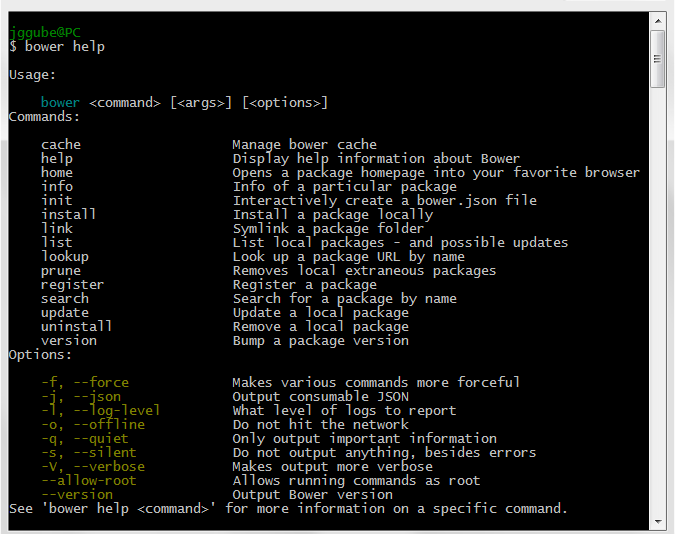 If you want to learn about a particular Bower command, there are two ways to go about it.
The first is to issue the help command followed by the name of the command you want to learn more about. For example, let’s say you want to learn about the prune Bower command. We can do:
bower help prune 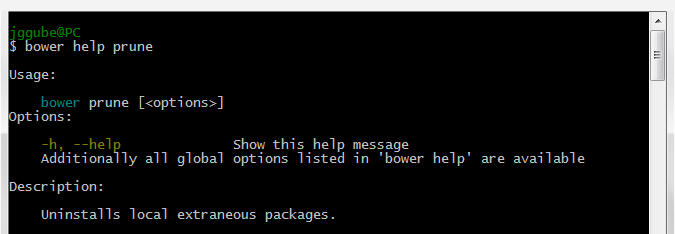 The other method is to type the command followed with the
 -help (or its shortcut, -h) option.
This way of displaying help documentation is useful when you’re typing a Bower command and then, midstream, you suddenly realize you’ve completely forgotten what the command does, or that you’d like to explore what its options are before issuing the command.
bower prune -help The following is exactly the same as bower prune -help, except we’re using the short version of the -help option, which is -h:
bower prune -h By the way, Bower command options will often have shortened versions to make them easier to type. For example, the --verbose option can also be written as -v and --force can be written as -F.
Find Bower Packages to Install
To locate Bower packages you might want to install, you can use the search command followed by a keyword or the package’s name. For example, if we’d like to look for packages tagged with the keyword “responsive”, we can issue this command:
bower search responsive 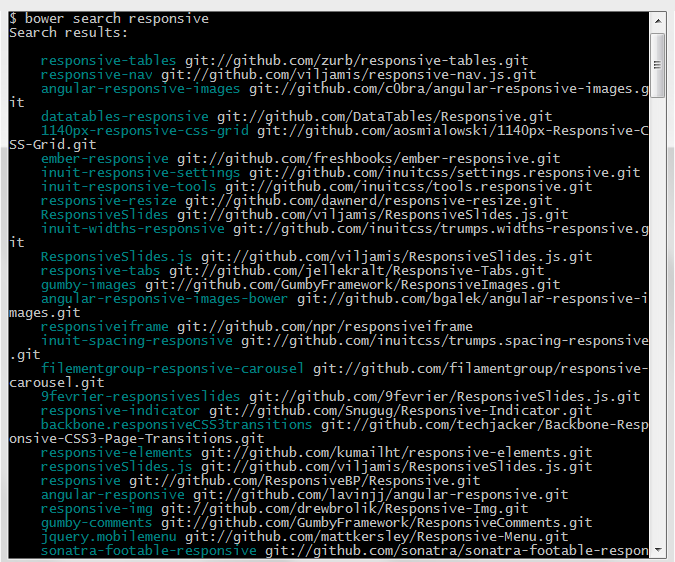 If you already know the name of the project you want to install and want to see if it’s available as a Bower package, you can type its name instead. The package name is equal to the project’s GitHub repository name.
For instance, if we’re interested in seeing if HTML5 Boilerplate has a Bower package, and we know that the project’s name is “html5-boilerplate”, we can type:
bower search html5-boilerplate The command will return all the Bower packages that match the package name you’ve entered.  If you’d rather use a web interface, you can hit up Bower’s search page.
Get Information on a Package
In the above example, you can see that Bower returned several results when we did our search command.
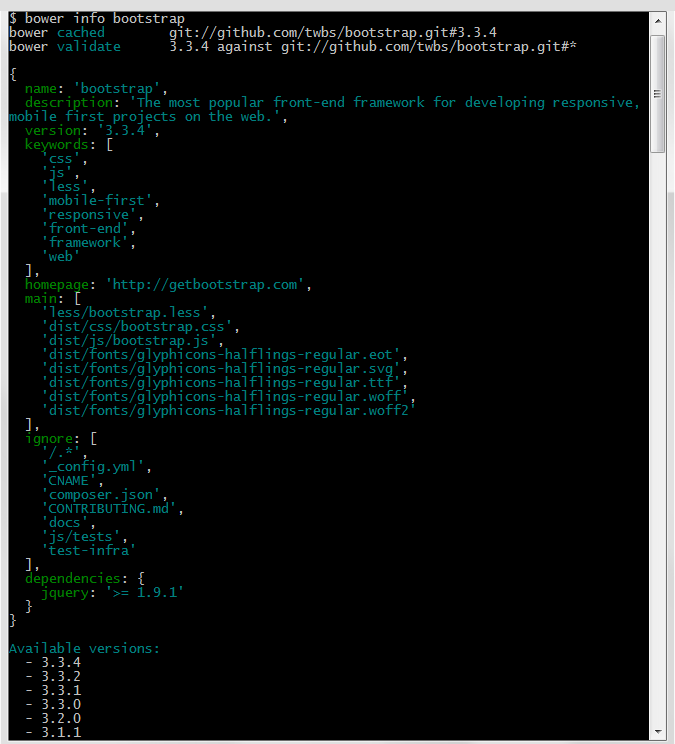
If you’re not sure which package you want, or if you’d like to learn more about a particular package, issue the info command followed by the package name. Let’s output some information on Bootstrap.
bower info bootstrap The command will display the contents of the bower.json manifest file of the package — we will talk about bower.json later on — which typically contains details like the package’s official site, a description of the project, the project’s license, keywords, other available version releases, etc.
Installing Bower Packages
The main way to get Bower packages into your project is through the install command followed by the package name you want to install. All the packages you install will go into a folder called bower_components that will be automatically created in your project’s folder. Let’s grab the jQuery package.
We can do so using this command:
bower install jqueryThe command will get the latest version of jQuery.
Installing a Specific Version
By default the install command will get the latest version of the package. But if you want to use another version, you can specify the version name.
Perhaps you’re feeling a bit adventurous, and would like to use a not-yet-stable release candidate version, or maybe you want to use an older version that’s compatible with an old project you’re working on, or you’re doing some sort of backwards-compatibility testing. To do this, we just need to specify the version number, preceded by a hash (#). I recommend issuing the info command first so you can see all the available versions of the package.
Doing bower info jquery, for example, revealed several available versions of jQuery. 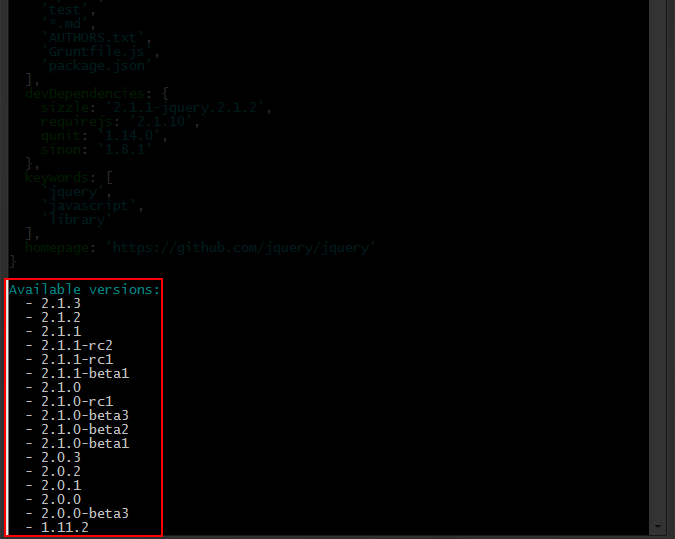 If we wanted to install an old version, like version 1.11 for example, then this is the command we’d use:
bower install jquery#1.11Setting Up Your Own Bower Package
A lot of us use the same set of dependencies in our development projects. And some of us even have multiple sets of dependencies, like one set for our personal projects and another set for work-related projects.
You may have found yourself always using the same third-party dependencies — Sass to write CSS, Angular for front-end functionality, HTML5shiv to support old browsers, etc. — throughout your different development projects. It would therefore be more efficient and manageable to set up a sort of template for your dependencies.
We can do this by creating our own custom Bower package. This is done by creating a manifest file called bower.json in the root folder of your project. You can create bower.json manually using a text editor or source code editor, but it’s just more convenient to do this through the command line using the init command.
bower init Issuing the init command will give you prompts for filling out details about your Bower package, such as its name, version, description, etc. 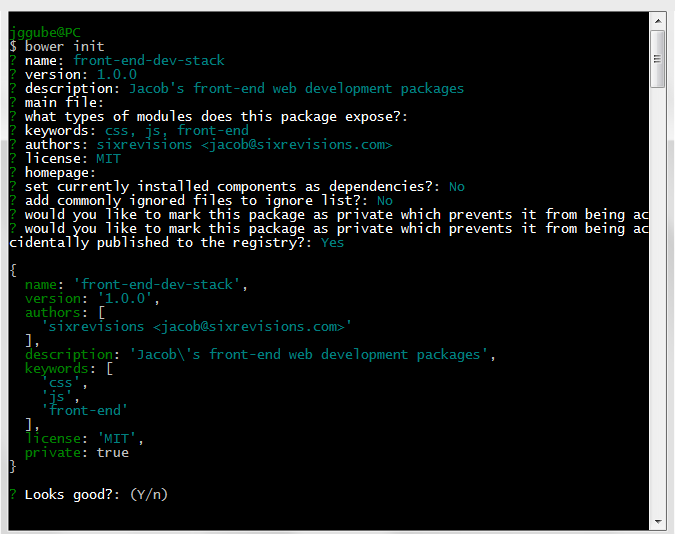 If you already have other Bower packages installed prior to running the
 init command, Bower will ask you if you want to include them as dependencies in your bower.json file. Next, we will include other packages to our own Bower package by specifying them as dependencies.
We do this by issuing the install command with the --save option (or its shortcut -S) to let Bower know we want to include the package we’re installing in our bower.json manifest file. Let’s set up the package to include jQuery, Normalize.css, and HTML5shiv.
bower install jQuery --savebower install normalize.css -Sbower install html5shiv --saveNote: For developer tools such as code linters, CSS compressors, and unit tests — i.e.
packages that are only used during development — use the --save-dev option instead. This will include the package in your bower.json as a developer-dependency (which are listed under the devDependencies JSON object in your manifest file). Now whenever you want to install your packages in another web development project, just use the Bower install command followed by the location of your custom Bower package.
Then, if you want to customize your packages for that new project, you can modify its bower.json file. If you would like to configure your bower.json file manually, or add other settings beyond the ones created by bower init, read Bower’s JSON specifications.
Useful Bower Commands
Here are a few other basic commands that will surely help.
(To see all the Bower commands, go to Bower’s list of commands.)
See All of Your Bower Packages
If you’ve stepped away too long from a dev project — let’s say you’re doing maintenance or redesign work for a client a couple of years down the line — a useful command that will remind you which packages you used in the project is the list command.
bower list What’s great about this command is Bower will also check to see if there are new versions of your packages available. Below, you can see that there are new versions of the packages I’m using: 
Updating Your Packages
It’s crucial to, at the bare minimum, update your third-party dependencies whenever there’s a security patch.
Doing this manually across all of your dev projects (to put it mildly) is quite time-consuming, tedious, and error-prone. But with Bower, all you need to do is issue the update command. To update a specific package, just use the update command followed by the package name.
Let’s update jQuery:
bower update jquery Using the update command without any options or a package-name argument, Bower assumes you want to update all outdated packages.
bower updateUninstall Bower Packages
If you want to remove a package, just use the uninstall command:
bower uninstall jqueryUninstall Dependencies
If you want to remove a package from your bower.json list of dependencies, use the uninstall command with the --save option:
bower uninstall html5shiv --saveConclusion
In this tutorial, we covered the basics of Bower. This tutorial covered the following:
- Installing Bower
- Displaying help docs for Bower commands and options
- Finding and getting information about Bower packages
- Installing Bower packages
- How to create your own Bower package
- Other useful Bower commands for managing your project dependencies (listing, updating, and uninstalling)
In other tutorials, we’ll be exploring intermediate and advanced Bower features such customizing your Bower configuration and Bower’s Programmatic API.
Related Content
- Speed Up Your Web Development Workflow with Grunt
- Why You Should Use Git
- Why I Ditched Angular for React
 Jacob Gube is the founder of Six Revisions. He’s a front-end developer. Connect with him on Twitter.
-
 President of WebFX. Bill has over 25 years of experience in the Internet marketing industry specializing in SEO, UX, information architecture, marketing automation and more. William’s background in scientific computing and education from Shippensburg and MIT provided the foundation for MarketingCloudFX and other key research and development projects at WebFX.
 -

WebFX is a full-service marketing agency with 1,100+ client reviews and a 4.9-star rating on Clutch! Find out how our expert team and revenue-accelerating tech can drive results for you! Learn more
Make estimating web design costs easy
Website design costs can be tricky to nail down. Get an instant estimate for a custom web design with our free website design cost calculator!
Try Our Free Web Design Cost Calculator


Web Design Calculator
Use our free tool to get a free, instant quote in under 60 seconds.
View Web Design CalculatorMake estimating web design costs easy
Website design costs can be tricky to nail down. Get an instant estimate for a custom web design with our free website design cost calculator!
Try Our Free Web Design Cost Calculator


