
What is Time Lapse Photography?
In a nutshell, time lapse photography is the practice of shooting each frame of your film with a specified amount of time in between each frame. Most films are shot and played back at 24-30 frames per second. At 24 frames per second, the human eye cannot detect where one frame ends and the other begins thus creating a smooth, life-like moving picture when shown in sequence.
Time lapse photography is the practice by which more time is allowed to pass in between each frame than normal, thereby creating the illusion that time goes faster when the film is played back at 24 frames per second. In time lapse photography, normally slow moving phenomena such as flowers blooming, clouds passing in the sky, sunsets, etc. can be made to look as though they are moving faster.
You can think of time lapse photography as the antithesis of high-speed photography where normally fast-moving objects (bullets, cars, sports, etc.) are shown to move slowly.
How is Time Lapse Photography Done?
Before we enter Photoshop to create our video sequence, we must first shoot the frames of our time lapse video using our DSLR camera or any camera with an interval timer function. I have a Nikon D7000. Its interval timer function allows the camera to shoot photos at specified intervals of time. With a little brain power and some arithmetic, I figured out how many shots I needed to take and what intervals I needed to take them in. At normal playback speed of 24 frames per second (fps), we know that 1 second of film needs 24 frames in order for it to look smooth and life-like when it is played back.
Therefore, if we want to make a 15 second video we need 24 photos for every second of the video. This means that if we want our video to play at 24fps we need to shoot 360 photos to make a 15 second sequence. The next step is to figure out how long each interval between each shot will take.
This will determine how fast the video will look when it is played. The longer the interval between each frame, the faster the event you’re trying to capture will appear. First you have to estimate how long the event you’re trying to speed up will take.
For instance, you want to capture the last hour before the sun sets. Therefore, if you want to make an hour-long sunset (3,600 seconds) fit into a 15 second sequence (360 photos), your camera needs to take a photo every 10 seconds.
Tips on How to Create a Good Time Lapse Video
- Use a tripod or, at the very least, a steady surface where your camera will not move or wobble.
- Shoot moving objects. For example, the night sky, crowds, sunsets, sunrises, etc.
- If you’re shooting in a time of the day when the light is fairly constant (i.e. midday or at night), use manual exposure settings. Set the shutter speed and the aperture and the ISO to what you think is the best exposure setting for the look you want to have in your video.
This will give you a constant exposure for all the frames in your video, that is, if the light stays constant
- If you’re shooting in a time of day when the light is constantly changing (i.e. sunsets or sunrises), use your camera’s Auto exposure functions such as aperture priority or shutter priority. The downside of using your camera’s auto exposure functions is that sometimes your camera will underexpose or overexpose a few frames in your video sequence causing your finished time lapse video to look like it is flickering.
This is a common occurrence when doing time lapse video and can be somewhat corrected using certain video editors.
The video I made for this tutorial shows a car ride I took with a friend. I took my camera with me and we used masking tape to mount it on his dashboard (I do not recommend using masking tape to mount your camera to anything.) The night was rainy and the roads were bumpy. Needless to say, the video I produced wasn’t the best.
However, it did allow me to learn more about the process and I hope I can share some of what I learned with all of you.
Working in Photoshop
After you’ve shot all the frames in your video sequence, we can now gather all of the photos and start working in Photoshop. This technique will show you how to easily create a short video using stills taken from your camera and if you want to edit them to look a certain way, you can also do that in Photoshop because we’ll be loading our images as a Stack.
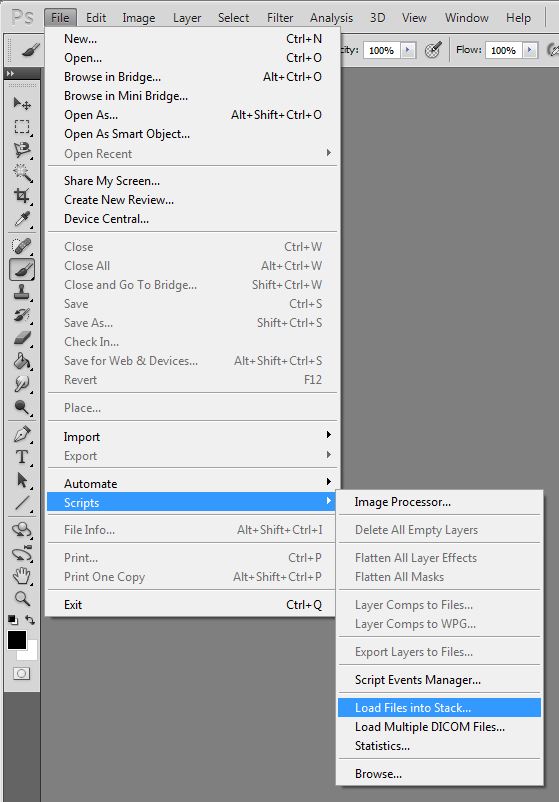
Step 1: Load your files into a Stack
Go to File>Scripts>Load Files into a Stack… Here, you’ll be able to locate all the files of the photos you’ve just taken.
 Locate your files. Wait for the list to be filled then click OK.
  Take a walk.
Do some push ups. Put the dishes in the dishwasher. This part of the process will take some time.
Tip: To make sure your photos are in the proper sequence, it is best to name your files with a numerical suffix. Ex. Timelapse_0001, Timelapse_0002, Timelapse_0003, etc.
If you’re taking up to 999 photos, your numerical suffix should start with 001, 002, 003, etc. If you’re taking more than 1,000 shots, you should start your photos with 0001, 0002, 0003, and so on.
Step 2: Making the Sequence
Once the stack is loaded into Photoshop, you’ll need to open up the Animation panel.
Window>Animation.  Then select all the layers in your stack, either in the Layers panel or the Animation panel. Once you have all the layers selected, click on the fly-out menu of the Animation panel and then click “Make Frames From Layers.” The frames for your video will now appear on the Animation panel.
 You can now convert your frames into frame animation by clicking again on the fly-out menu of the Animation panel and then clicking on “Convert to Frame Animation.”
  Now you can see the sequence of your shots. However, you’ll notice that they are in reverse. That’s because when we loaded the images into Photoshop as a stack, they were loaded sequentially into the Layers panel and thus they were loaded with the last photo being the top layer.
To fix this, select all of your frames in the Animation panel and then click on the fly-out menu, then click “Reverse Frames.”  Now your frames are in the proper order. In the Animation panel, you can set the time between each frame. With all your frames selected, click on one of the small triangles on the bottom of each frame and select “No Delay.”
  Press the “Play” button on the Animation panel to see what your video sequence will look like.
Step 3: Exporting the video
Once you’re satisfied with your sequence, it’s time to export the video. Click on File>Export>Render Video…  Pick the destination of your video on your computer, the file type of your video and the settings with which you’d like to produce your video. Once you are satisfied, click Render.
Wait for a few minutes and your video is now ready! 
Conclusion
There are other methods for producing Time Lapse videos. However, the benefit of using Photoshop to produce a short time lapse video is that since you uploaded your images into a stack, you are able to make non-destructive edits to your images.
It is also helpful in producing files that can easily be inserted into a much larger production that you may be editing in a dedicated video editor such as Adobe Premiere or Final Cut. I hope this tutorial was helpful and if anyone has more insights into making time lapse videos please share with us in the comments section or on our Twitter feed @Designinstruct.
-
 Trevin serves as the VP of Marketing at WebFX. He has worked on over 450 marketing campaigns and has been building websites for over 25 years. His work has been featured by Search Engine Land, USA Today, Fast Company and Inc.
 -

WebFX is a full-service marketing agency with 1,100+ client reviews and a 4.9-star rating on Clutch! Find out how our expert team and revenue-accelerating tech can drive results for you! Learn more
Make estimating web design costs easy
Website design costs can be tricky to nail down. Get an instant estimate for a custom web design with our free website design cost calculator!
Try Our Free Web Design Cost Calculator
Share this article


Web Design Calculator
Use our free tool to get a free, instant quote in under 60 seconds.
View Web Design Calculator
Make estimating web design costs easy
Website design costs can be tricky to nail down. Get an instant estimate for a custom web design with our free website design cost calculator!
Try Our Free Web Design Cost Calculator