- Home
- Blog
- Web Design
- Make Artistic and Elegant Vector Artwork with Illustrator
Make Artistic and Elegant Vector Artwork with Illustrator
-
 30 min. read
-
Summarize in ChatGPT
-
 Trevin Shirey
 VP of Marketing
- Trevin serves as the VP of Marketing at WebFX. He has worked on over 450 marketing campaigns and has been building websites for over 25 years. His work has been featured by Search Engine Land, USA Today, Fast Company and Inc.
Table of Contents
- Preview
- Tutorial Resources
- Step 1: Drawing the Bird
- Step 2: Drawing Flower Shapes
- Step 3: Create a Tree Bark
- Step 4: Creating a Mask
- Step 5: Add an Ampersand Element
- Step 6: Adding More Color to the Bird
- Step 7: Filling In the Ampersand
- Step 8: Exporting the Artwork
- Step 9: Detailing in Photoshop
- Tutorial Summary
Preview
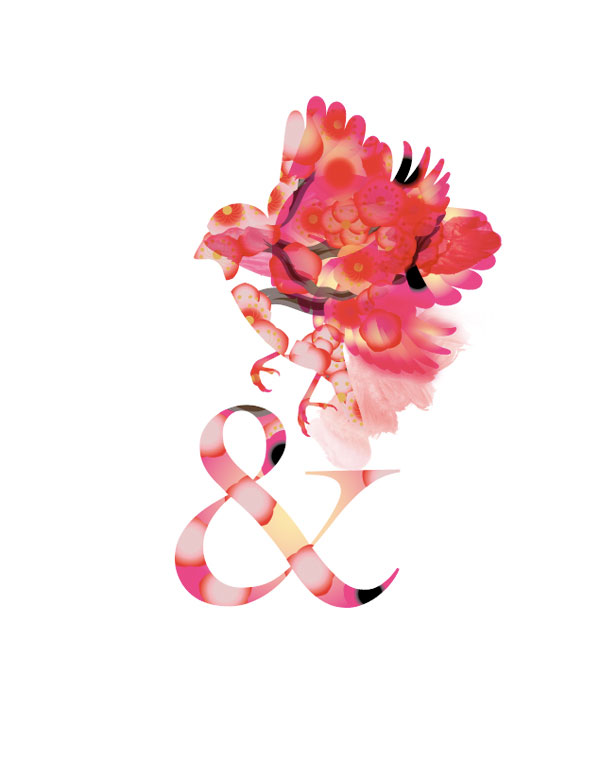
Tutorial Resources
Step 1: Drawing the Bird
First, find a photo of a bird that you wish to trace over and use as a reference image. I found a picture of a bird that I like and just placed it into illustrator. 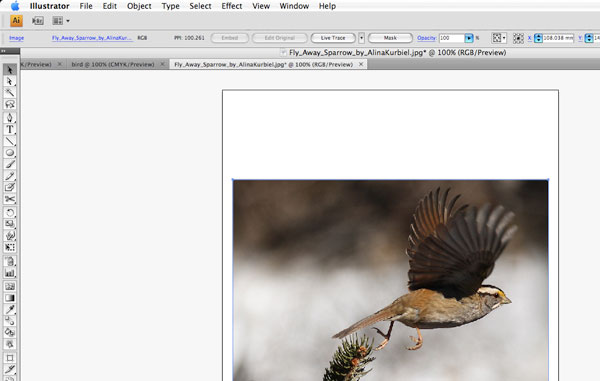 Here are a few suggestions of birds you may wish to use to follow along with this tutorial:
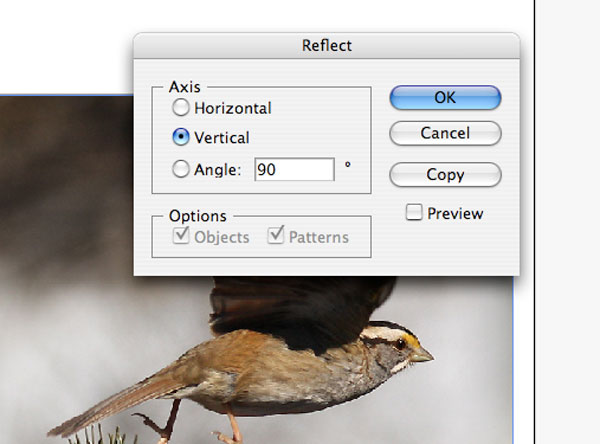
Composition-wise, I’d like it better if the bird was facing the other way, so I reflect the image using Object > Transform > Reflect. 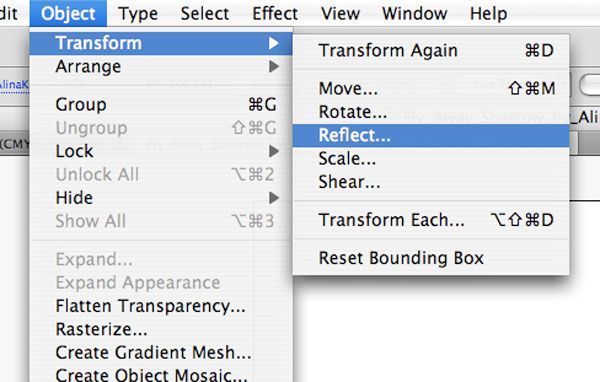 When the Reflect dialog window pops up, I choose the Vertical option for the Axis, then I click OK to apply the reflection.
  Create a new layer on top of the bird image, and lock the bird image underneath so you don’t accidentally select and edit it while you are creating your artwork. Now I’m ready to start tracing the outlines of the bird. I use a combination of the Pen Tool (P) and the Pencil Tool (N) to do this.
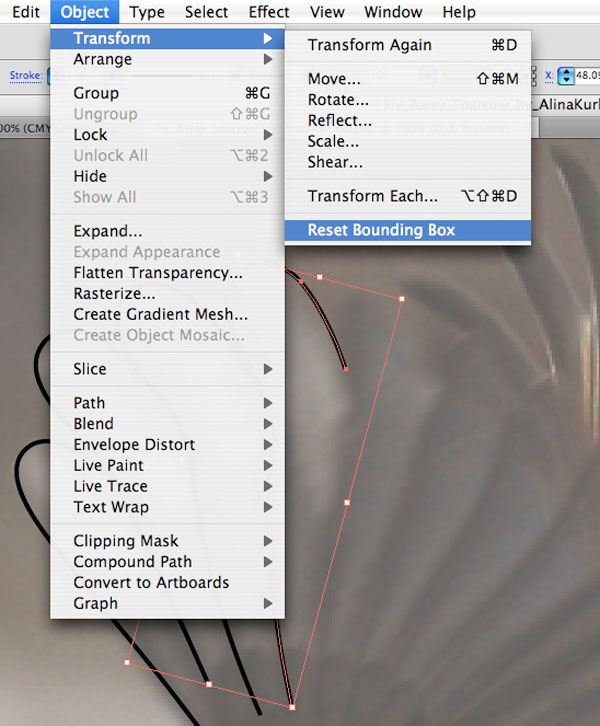
 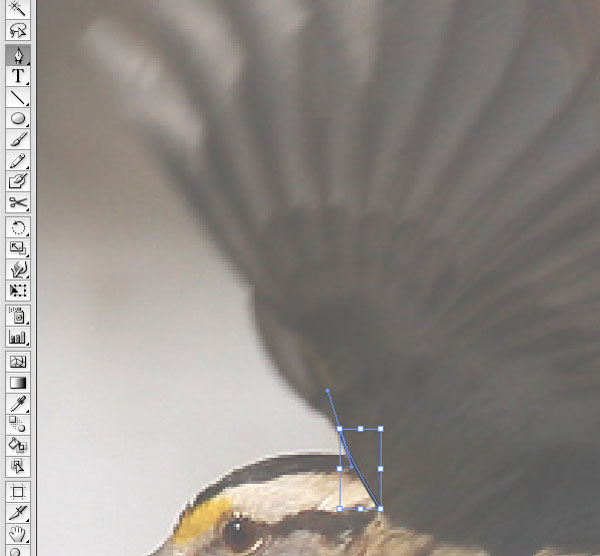 When I get to the wings, in order to avoid having to draw each line from scratch, I take a vector path on the wing that I’ve already drawn, select it with the Selection Tool (V), copy it (Cmd/Ctrl + C) and paste it (Cmd/Ctrl + V). I then move this copied path in place to match up with the wings on the picture. I also rotate and scale the path using my Selection Tool. After rotating vector paths, it also helps to reset its bounding box since the bounding boxes rotate with them as you rotate them.
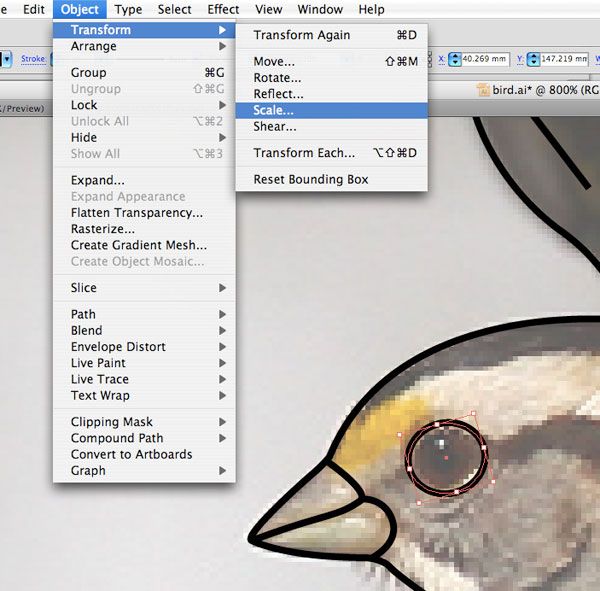
  I created the eye of the bird by drawing a circle using the Ellipse Tool (L). I scaled the circle that I made and rotated it to fit on top of the bird’s eye on the reference photo.
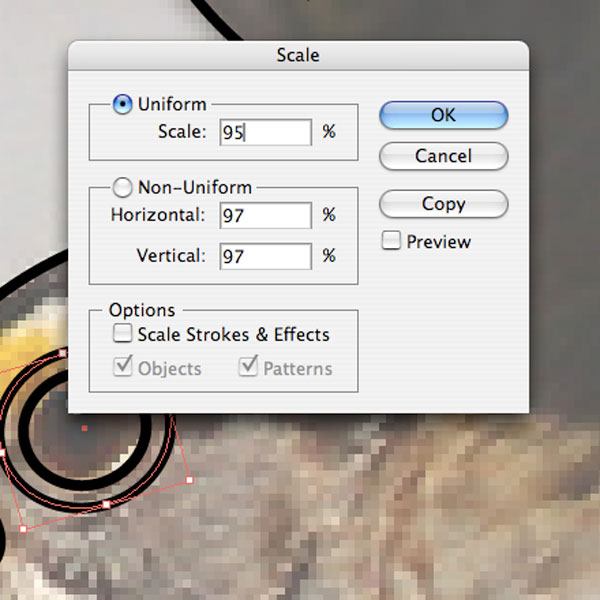
  For the pupils, I duplicated the first circle by selecting it, copying it (Cmd/Ctrl + C) and then pressing Cmd/Ctrl + B (which pastes the copied object behind the original object). Then I scaled it down to match the size of the bird’s pupils.
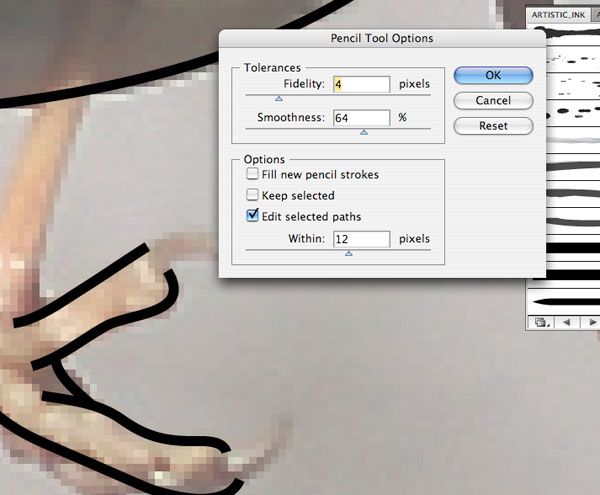
  Drawing the feet was more difficult. The Pen Tool (P) is good for making straight lines and nice curves, but for things that are more organic and with a lot of detail like the bird’s feet, the Pencil Tool (N) might be more useful. Play around with the settings of the Pencil Tool (N) by double-clicking its icon in the Tools Panel (which will open up the Pencil Tool Option dialog window) and testing these settings by drawing a few strokes on the artboard to see what works for you.
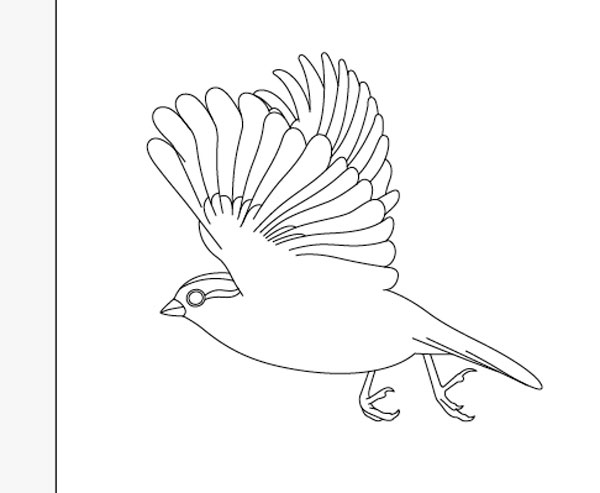
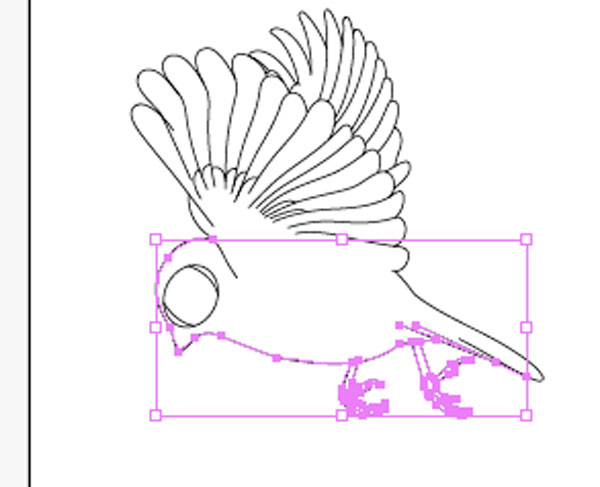
  After tracing the outline of our bird, I now have something that looks like this:
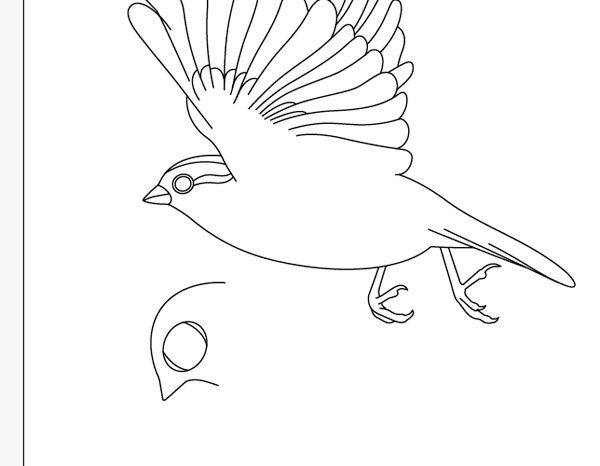
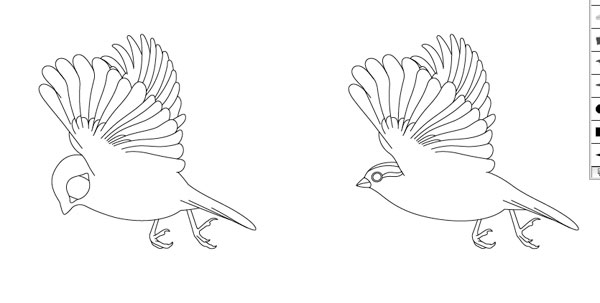
  Now we move onto editing the head of the bird. If you like the head of your bird as it is, you can ignore the following process. But, me, I chose to tweak my bird’s head a bit. First, I made a duplicate of the original bird and stored it in another layer. I wanted to edit the head of the bird so that it’s more stylized and customized. I drew an alternative head using the Pen Tool (P) and the Pencil Tool (N). Then to replace the original head of the bird, I cut the original using the Scissors Tool (C) and attached the new head in its place.
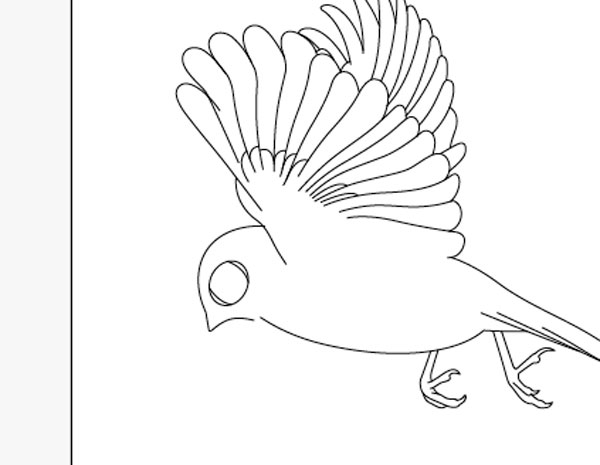 I also edited the body of the bird by making it shorter and stouter. I did this by selecting the vector path that creates the length of the bird’s body and then transforming its height.
  Here is a comparison of the new bird (left) versus the old bird (right):
Step 2: Drawing Flower Shapes
I have had a lot of practice creating flower shapes in Illustrator because I enjoy incorporating them into my artwork. For this piece, I wanted to use basic shapes to construct the flowers. If I wanted a more natural-looking flower, I might have drawn it from a reference photo as I did with the bird, but I think using basic shapes would work better for the effect I want to achieve in this comp. I start by choosing View > Show Grid, View > Snap to Grid, and View > Snap to Point to help me draw the flowers. 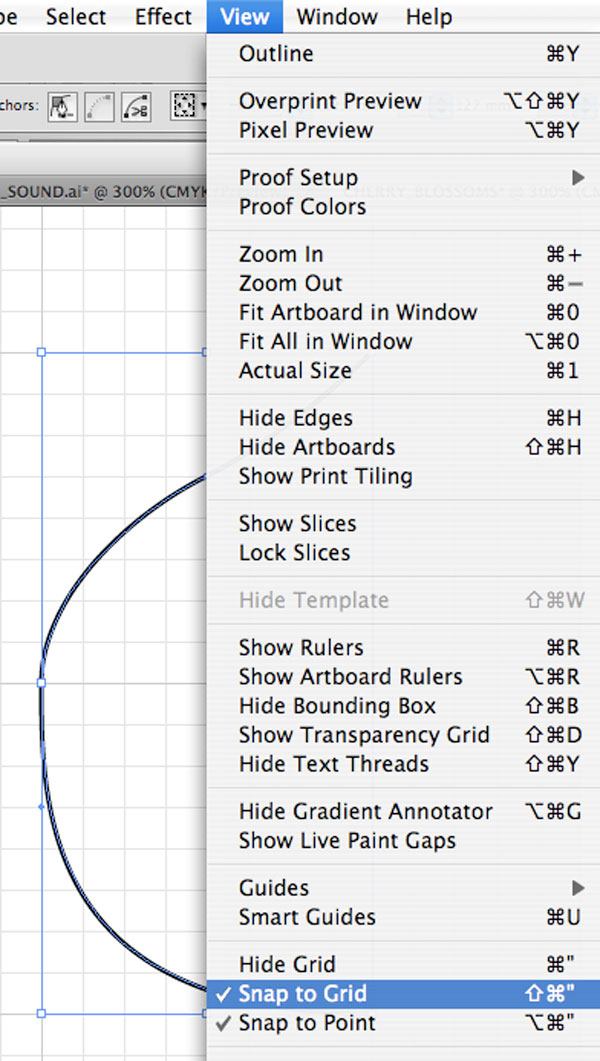 Using the grid as a guide, I begin drawing a shape that will help me create a single petal.
 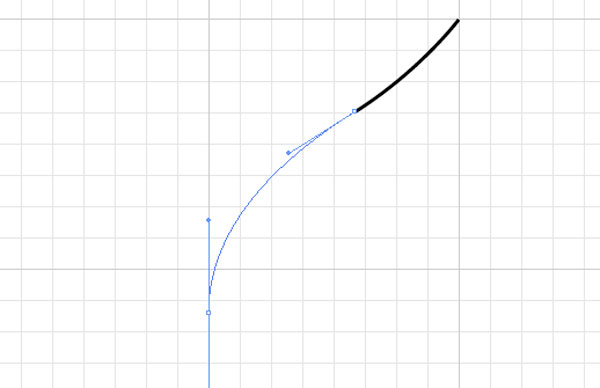 If I am happy with this path, I select and copy it (Cmd/Ctrl + C) and paste it behind the original path (Cmd/Ctrl + B). Then, without changing anything already selected, I choose Object > Transform > Reflect to get the mirror image of the line I just drew.
 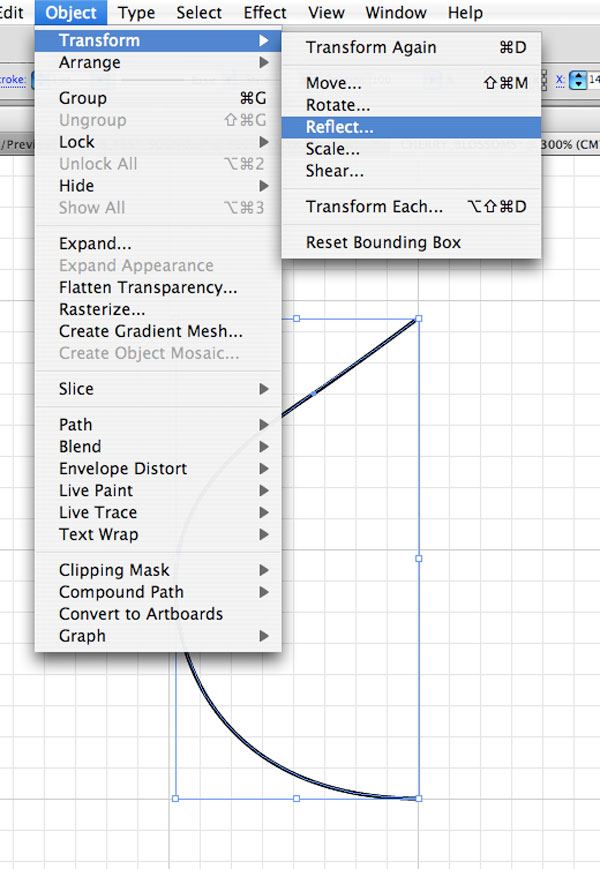 I can move the selected line into place using the arrow keys. I can also use the Shift key plus any of the arrow keys to move objects at greater increments. I use the grid as my placement guide. Then, using the Lasso Tool (Q), I select the two points that connect the top of this shape and then choose Object > Path > Join (Cmd/Ctrl + J) to connect the two paths.
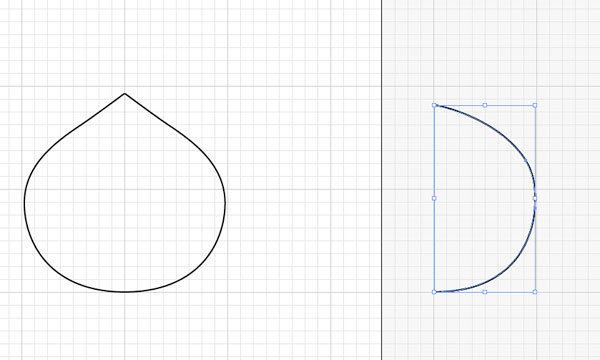
 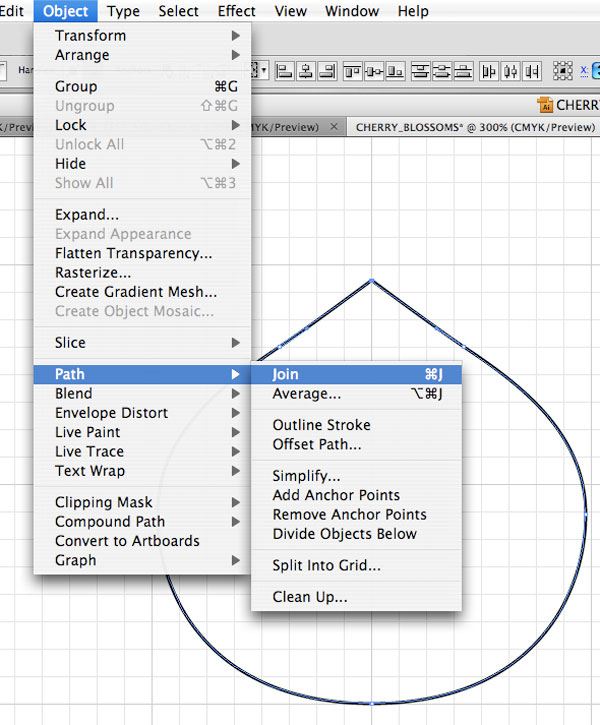 I now have a completed petal shape! Now I want to make one that’s more rounded. I use the same process to make a stouter petal shape.
  Then I return to the first shape I made, to make it into a flower. First, I make a copy of the shape I made and paste it somewhere in the artboard that allows me to work. Then, I select the whole shape that I’ve just copied and I bring it to another area of the artboard before duplicating it again. I then move the newest duplicated shape to the side of the first shape using Shift + arrow keys until the two shapes look something like this.
 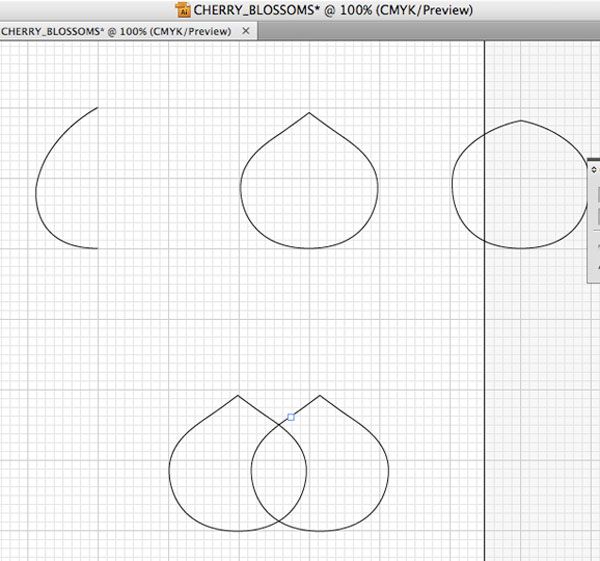 Using the grid as a guide, I cut off part of both shapes with the Scissors Tool (C). After using the Lasso Tool (Q) to select the endpoints of the two paths I want to join, I hit Cmd/Ctrl + J to join them. I’m now left with the following shape:
 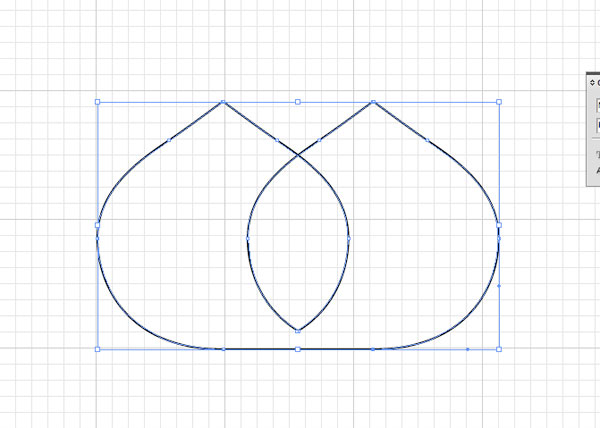 Next, I make another copy of the original shape and place it with the two connected shapes to end up with this:
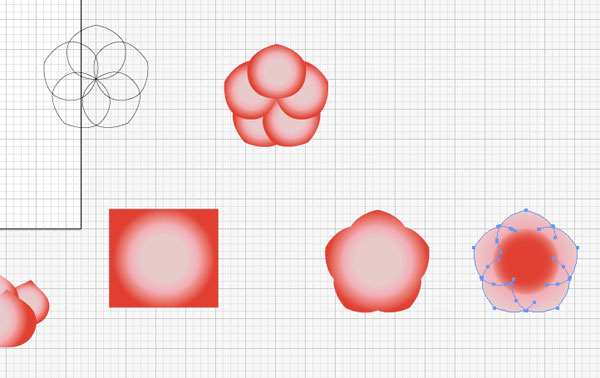
 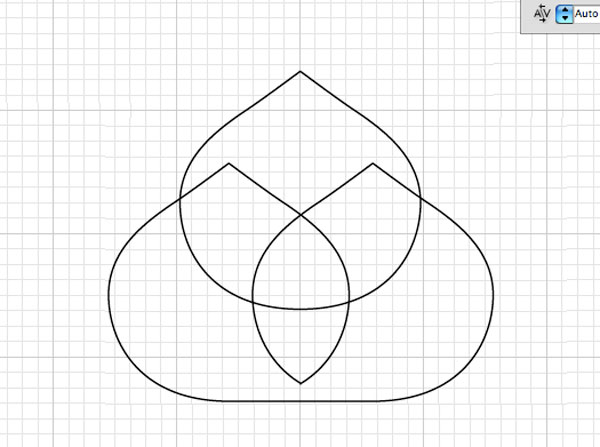 I make more copies of the petals, and after making the appropriate rotate and scale transformations, I end up with a shape that looks sort of like a lotus flower:
 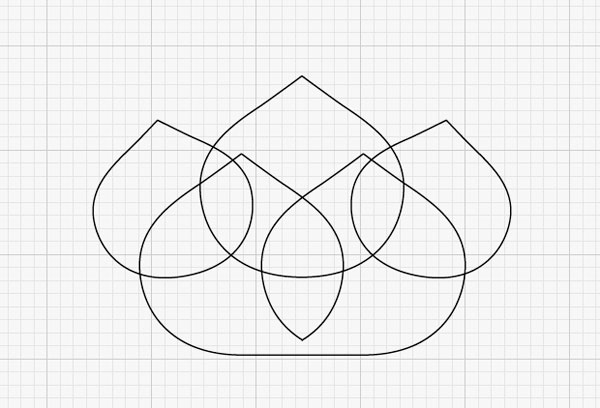 Let’s move on to producing another flower shape. I select the rounded petal that I made earlier, duplicate it (pressing Cmd/Ctrl + C, then Cmd/Ctrl + B), and then rotate the duplicate. Continue duplicating, rotating, and repositioning until you come up with this shape:
 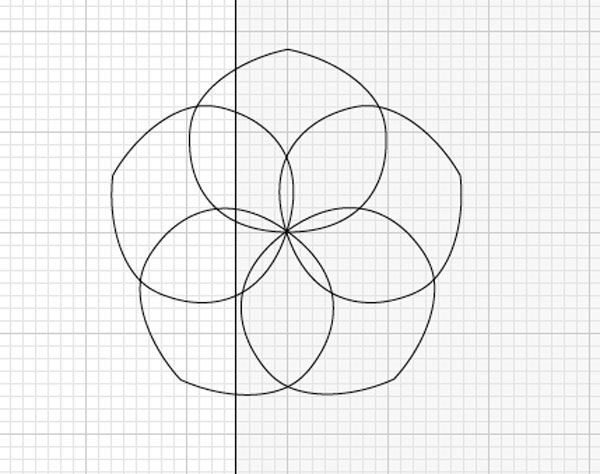 This should be easy if the center of your flower is situated on a single point on the grid, as your rotated flower petals will snap to this point. This happens because we selected the Snap to Grid and Snap to Point options earlier in this step. If you are having trouble with moving your objects around because of these options, feel free to turn them off. For these flowers, I ended up using a color gradient that I’ve used in a previous piece I made; it’s great to use elements from your older pieces because it gives your entire body of work some sort of pattern and unity. By the way, if you’re looking for color scheme ideas, I encourage you to visit COLOURlovers to download color palettes that you can use in your artwork. You can use the Gradient Panel to develop your color gradient. I used a radial gradient. To make it easier to apply the color gradient, I created a square object on the artboard and applied the color gradient onto it. Now, I only have to sample from this square to color the flowers.
 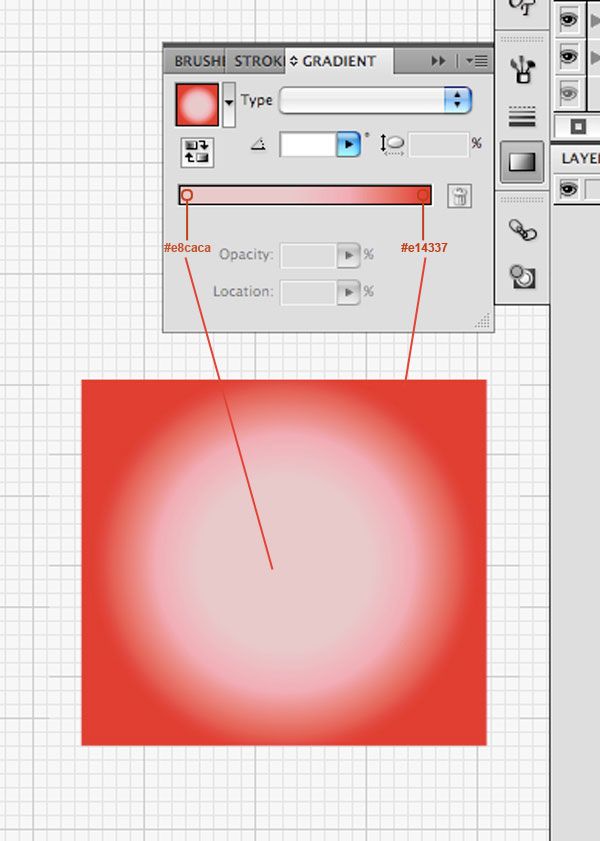 Now that we have a color gradient to sample from, we are ready to give our flowers some color. Select all the paths in the first flower, press Cmd/Ctrl + G to group them together, then while the flower is still selected, use the Eyedropper Tool (I) to click on the box with the gradient color. Using the Eyedropper Tool in this way samples the color from the square object and applies the same color properties to the currently selected objects. Do the same thing with the second flower to give it a fill as well.
 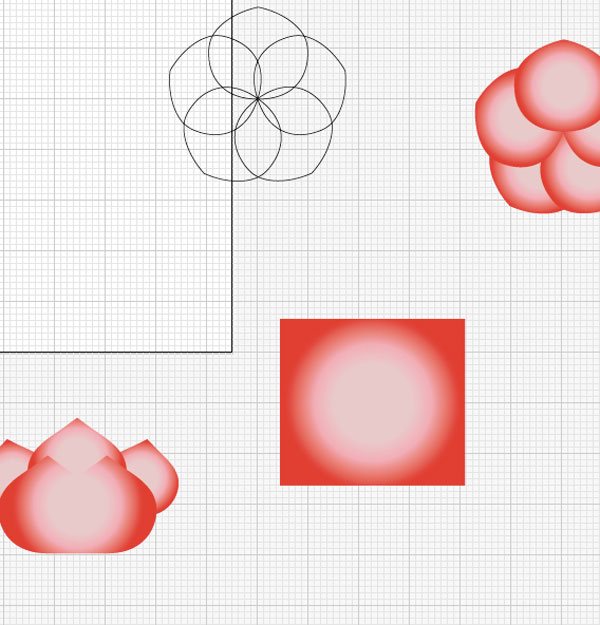 Now let us move on to making another version of the shape we’ve just made — just for variety. Make a duplicate of the flower and paste the duplicate somewhere else on the artboard. Cut the paths using either the Cut Tool or Scissors Tool, like so:
 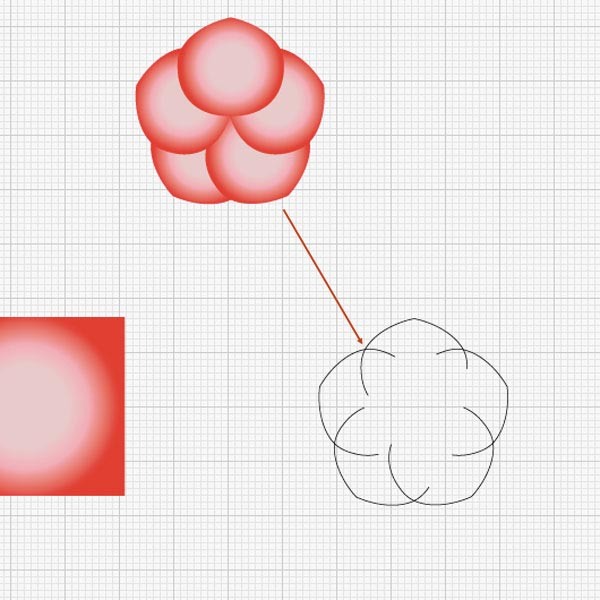 Convert the shape into Live Paint by selecting it entirely and going to Object > Live Paint > Make.
 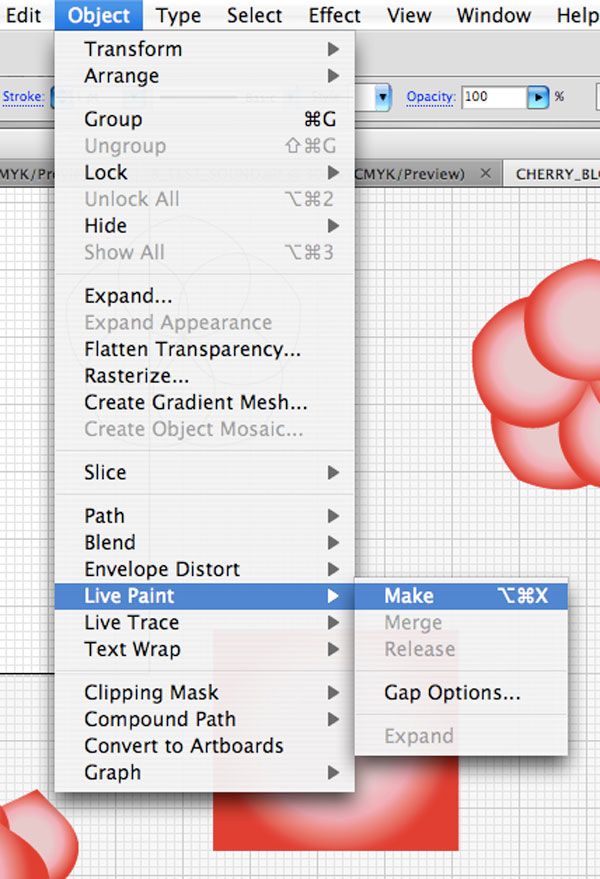 While this object (now a Live Paint object) is still selected, use the Eyedropper Tool (I) and click the square object containing our color gradient to apply color to the selected object. Duplicate this object and play around with the options within the Gradient Panel to get different effects.
  Now we are going to develop the center part of the flower. After selecting a yellow shade that you like for your Fill color (the shade I used is #e2b25d), use both the Ellipse Tool (L) and Pen Tool (P) to create the shape shown below:
 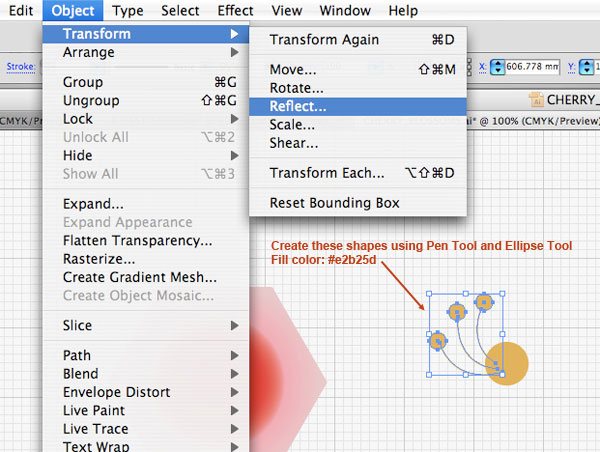 Select all components of the shape, group them (Cmd/Ctrl + G), then copy and paste the group to create another copy. Continue rotating and reflecting the group as we did in previous steps to create the center of the flower.
 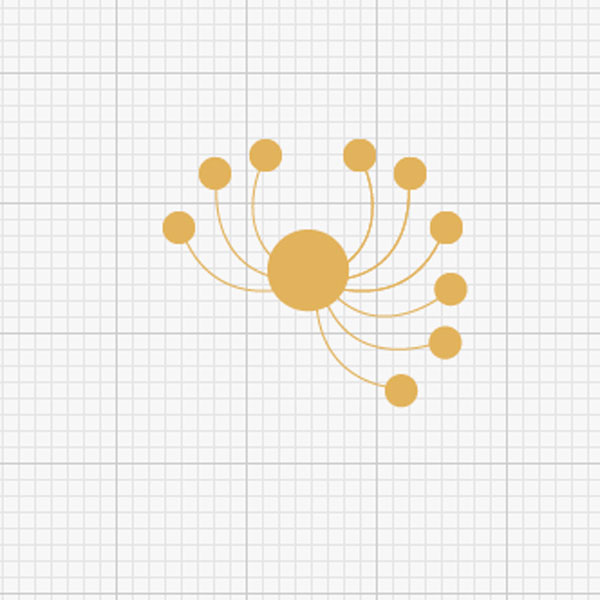 Select all the groups, hit Cmd/Ctrl + G to group everything together, then go to Object > Expand. This is to make sure that after enlarging or shrinking the shape, the proportions of the strokes (lines) to the circles stay the same.
 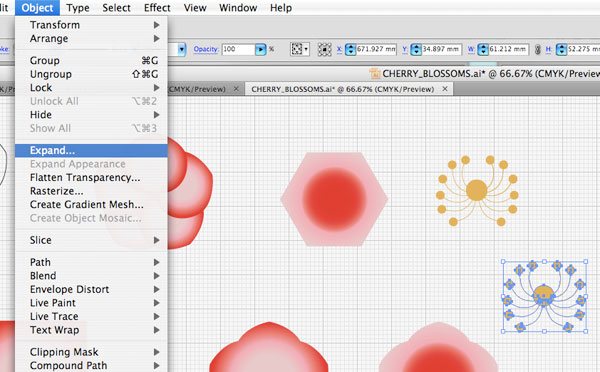 Drag the shape we made on top of the flower shapes we made.
 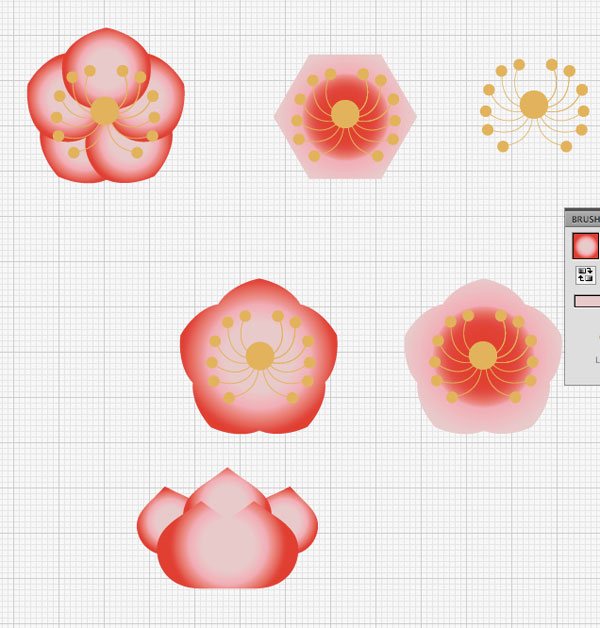 Group each flower and its center together to make moving individual flower shapes around the artboard easier.
Step 3: Create a Tree Bark
Next, we will create a sort of tree bark where the flowers will sit on top of. Use the Pen Tool (P) to draw the bark. 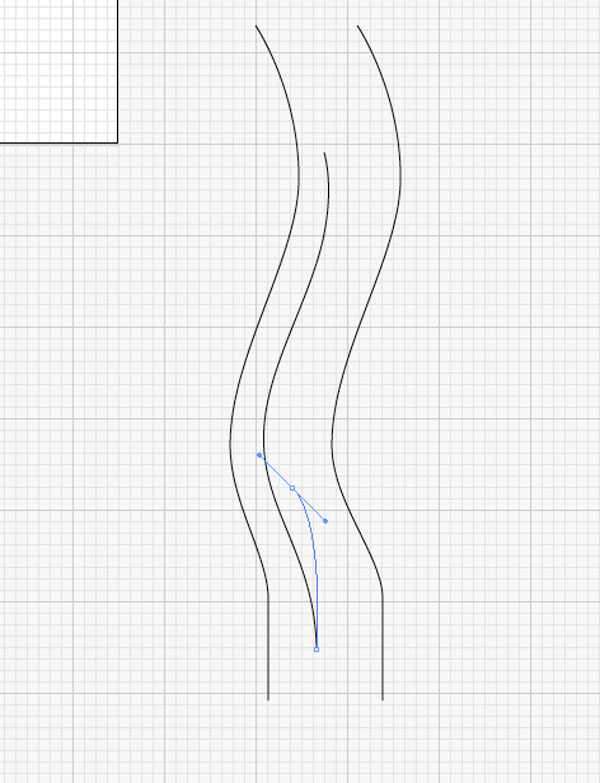 To make the drawing process of the tree bark faster, I just selected what I had drawn for one end of a piece of bark, copied (Cmd/Ctrl + C) it, pasted it (Cmd/Ctrl + B), reflected the copy, and then joined the original and the copy. You can also make a more detailed and intricate piece of bark if you prefer; let your creativity drive the artistic process.
 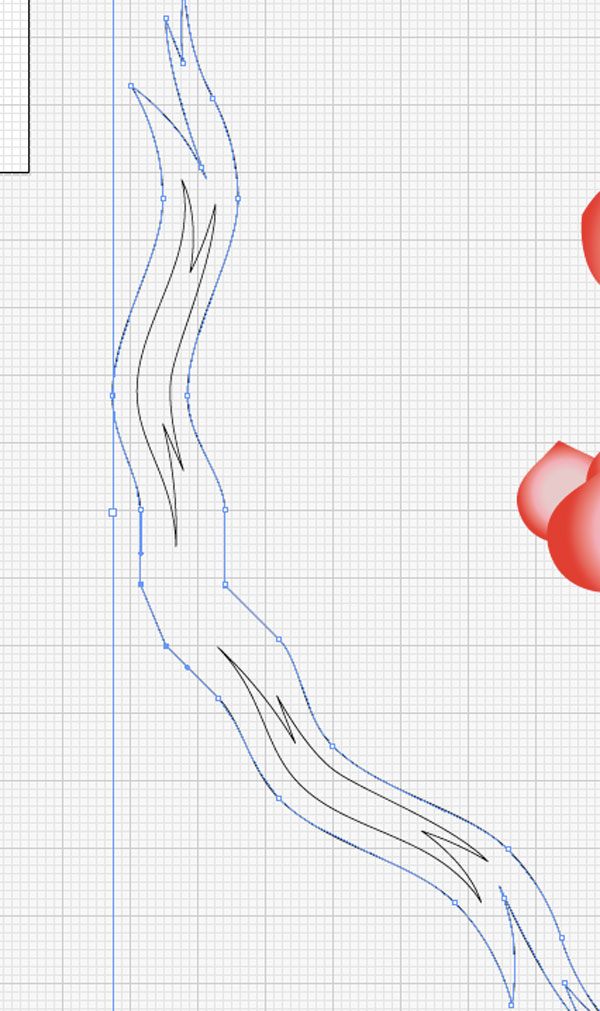 After positioning the shapes the way I want them on the artboard, I then joined the two shapes together and painted the whole bark shape by turning it into a Live Paint object and using the Live Paint Bucket Tool (K) to color it in. I then made sure that the piece of bark was on a layer underneath the flowers, then I arranged the flower shapes on top of the bark.
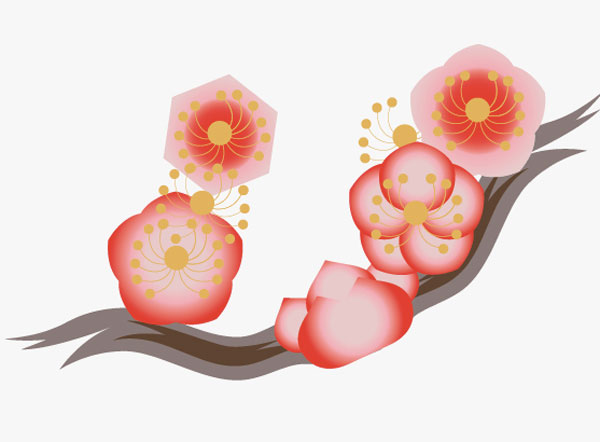
Step 4: Creating a Mask
This step can be done differently if you are already using Illustrator CS5. Illustrator CS5 comes with the Draw Behind command that makes this process easier. But I am still using Illustrator CS4 — and I’m sure many of your are too. So what we will do is create a faux layer mask (you’ll see what I mean by this shortly). To start, create a new Illustrator document with an artboard the size that you would like your final work to be. I recommend setting Size to Letter for this artwork if you have nothing specific in mind. 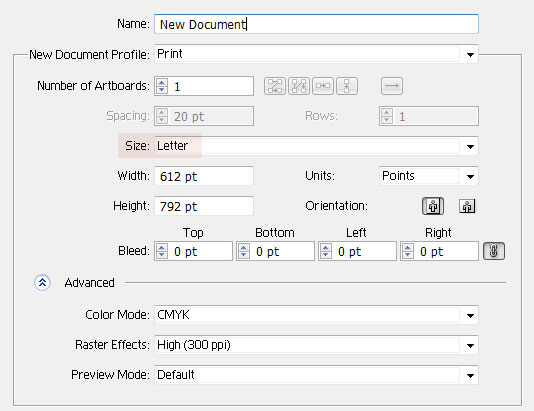 Take the bird we created earlier and paste it on the new artboard. You can rotate it to find the right position you like.
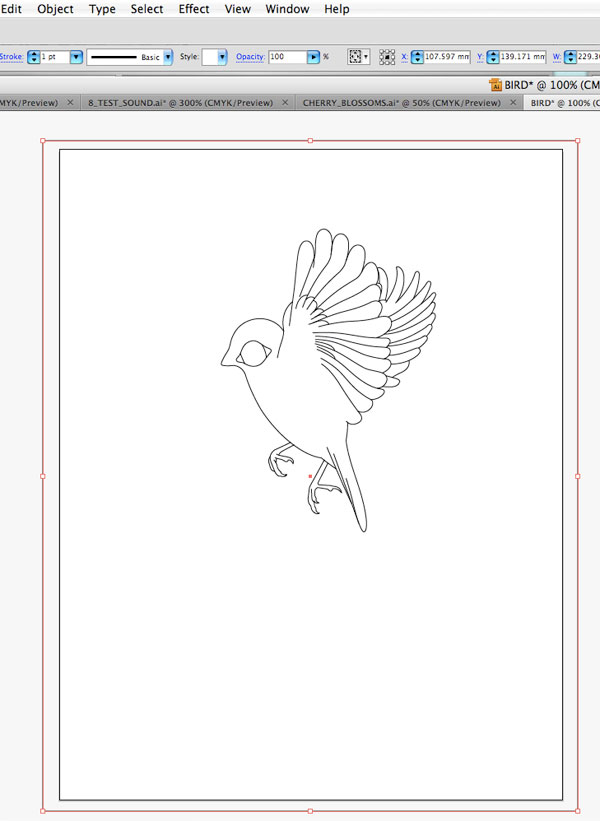
 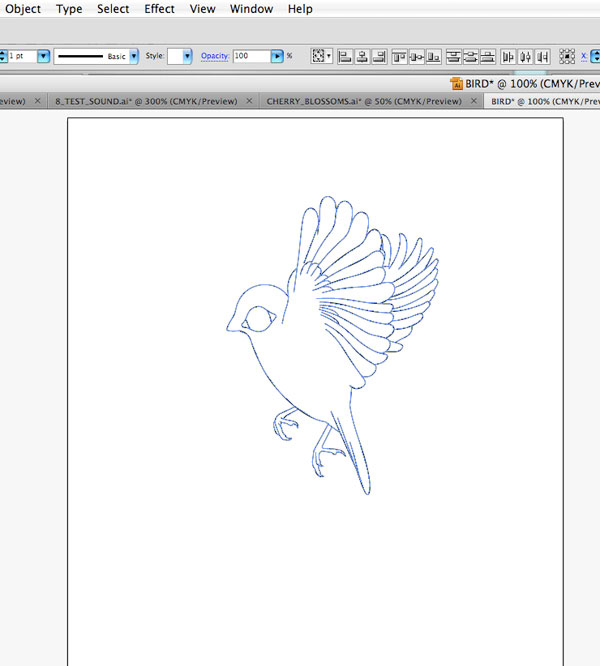 Duplicate the bird in a new layer. You will use this duplicated bird later on; just lock this layer and hide its visibility for now. Using the Rectangle Tool (M), create a rectangle just outside the edges of the artboard. You do not need to make a shape that follows the artboard exactly because we will be exporting the scene later on using the Export > Use Artboard command. As long as the rectangle is bigger than the artboard, you are all set.
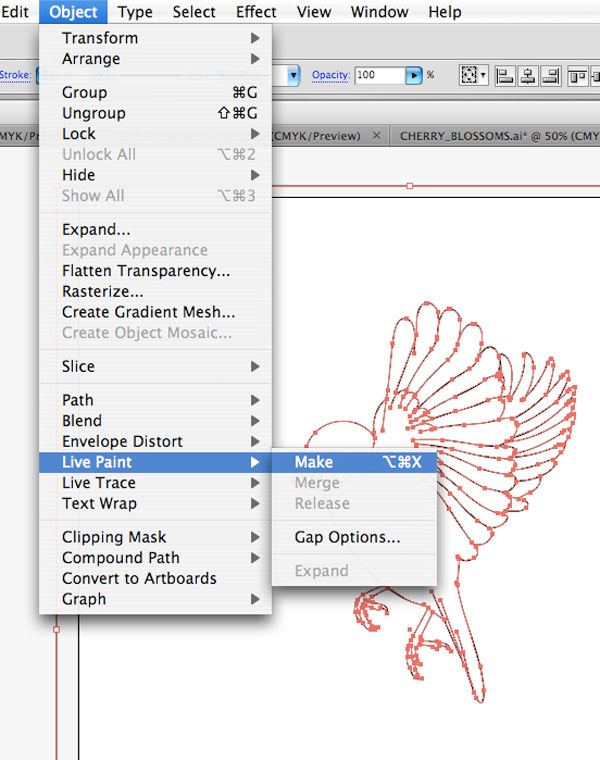
  Select one of the copies of the bird as well as the rectangle. Go to Object > Live Paint > Make to convert the bird and the rectangle shape into a Live Paint group that can be colored in using the Live Paint Bucket Tool (K).
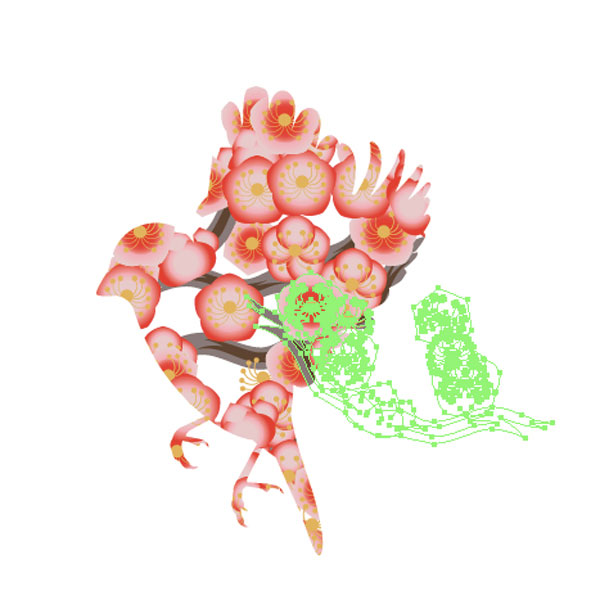
  While this new Live Paint group is still selected, set both the Fill color and Stroke color to None. Deselect the Live Paint group by clicking elsewhere on the artboard with your Selection Tool (V) or going to Select > Deselect (Shift + Cmd/Ctrl + A). Click on the Live Paint Bucket Tool (K) in the Tools Panel to make it the active tool. With the Fill color set to white, click on the space between the outline of the bird and the rectangle to fill this space with white. Lock the layer that contains this Live Paint group. You now have a faux mask that you can work on underneath. You will not see a change in the image, but now we can work with the space inside the bird and fill it up with the flowers we created earlier. Create a new layer and drag it underneath the layer that contains our Live Paint object (bird and rectangle). On this new layer, paste in the flowers we created earlier and drag them underneath the bird on the artboard. You will see that the flowers are only visible inside the outline of the bird because the space outside of the bird was filled with white (thus, it’s sort of like a layer mask).
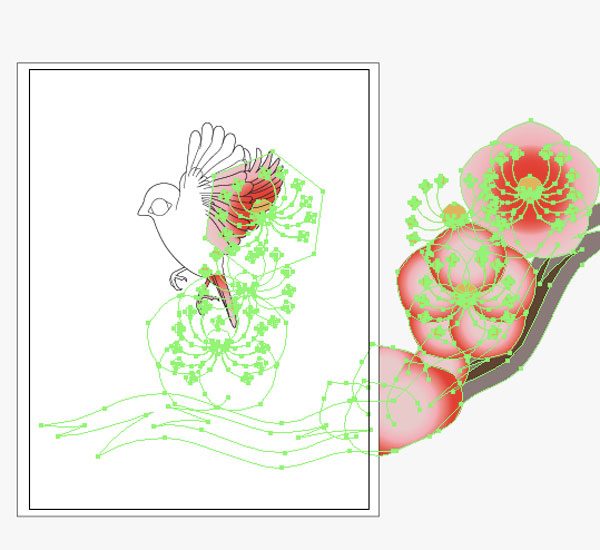
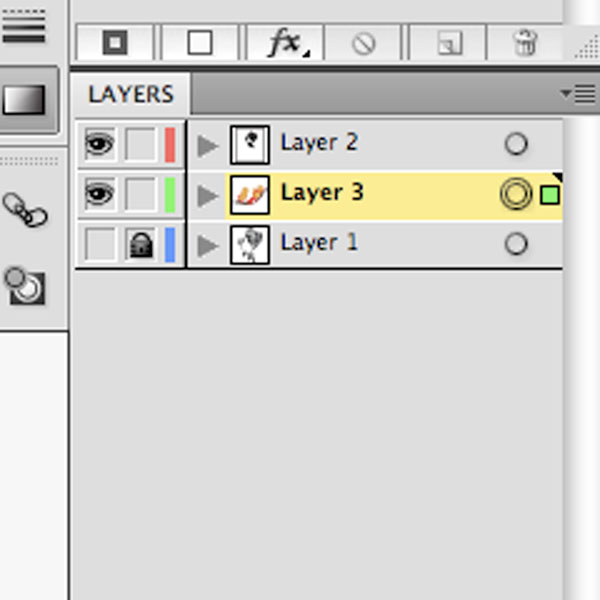 Duplicate, scale, and reposition the flowers around the inside of the bird until you are happy with the outcome. Below, I’ve already changed the outline color of the mask to None (from black).
Step 5: Add an Ampersand Element
To add another element to our composition, we’re going to use an ampersand (&), which will be placed around the feet of our bird. Pick a good font for the ampersand and then use the Type Tool (T) to place it on the artboard. 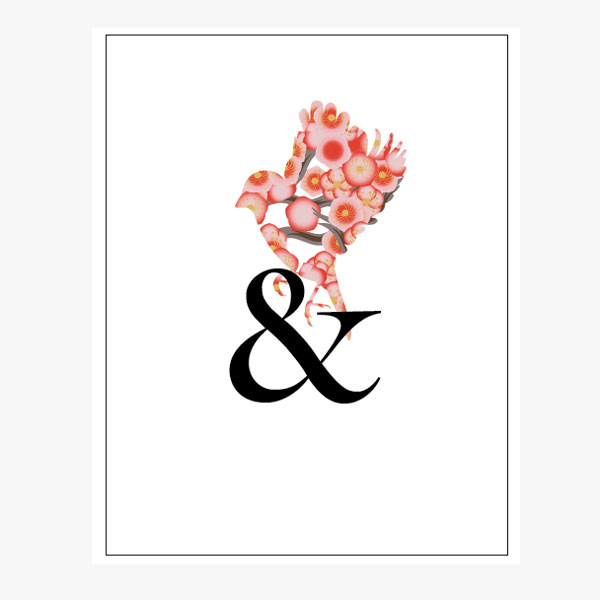
Step 6: Adding More Color to the Bird
In Step 3, I mentioned that I made a duplicate of the bird in a new layer to use for later. This is that later. Take the duplicate and duplicate it again (Cmd/Ctrl + C and then Cmd/Ctrl + B) in a separate layer. Hide and lock the layer that contains the duplicate so we have a backup. We are going to add color to the unlocked and visible copy of the bird. Convert the bird into a Live Paint object by going to Object > Live Paint > Make. We’re using Live Paint objects a lot because it truly makes filling in complex vector artwork much easier. 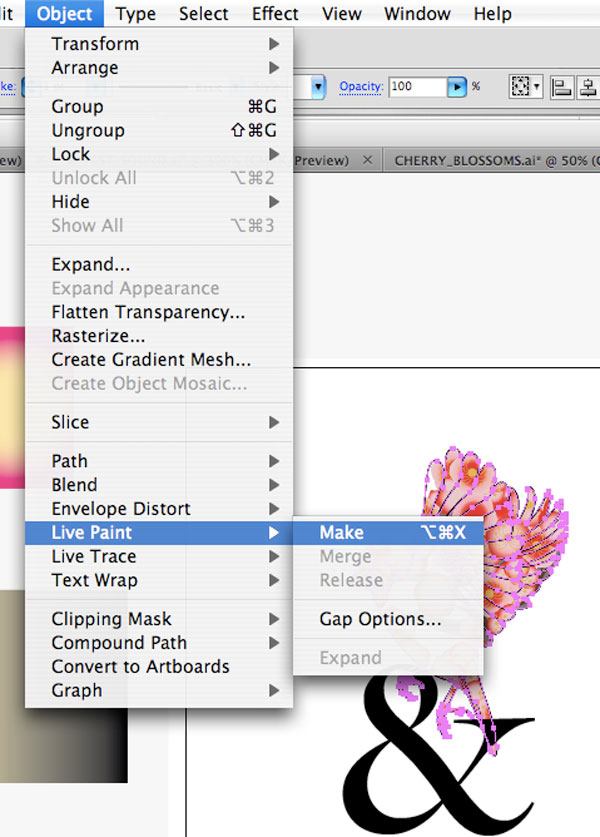 I made another radial color gradient that has a yellow center and pink on the outside. I then applied the color gradient as a Fill color of a rectangular object so that I can later on apply it using the Eyedropper Tool (I). Then I selected the new Live Paint of the bird, switched to the Eyedropper Tool (I) and then clicked on the rectangle with the color gradient to apply it onto the bird.
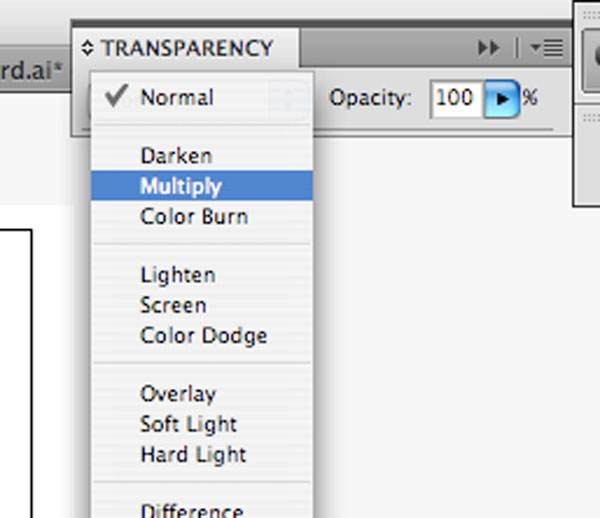
 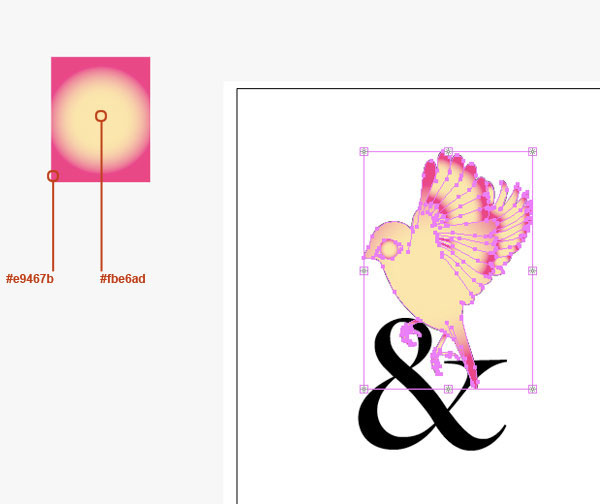 Open up the Transparency Panel (if you don’t have it open) by going to Window > Transparency (Shift + Cmd/Ctrl + F10). Alter the Transparency of this layer by first making sure that it is the active layer in the Layers Panel, then choosing Multiply from the dropdown menu in the Transparency Panel.
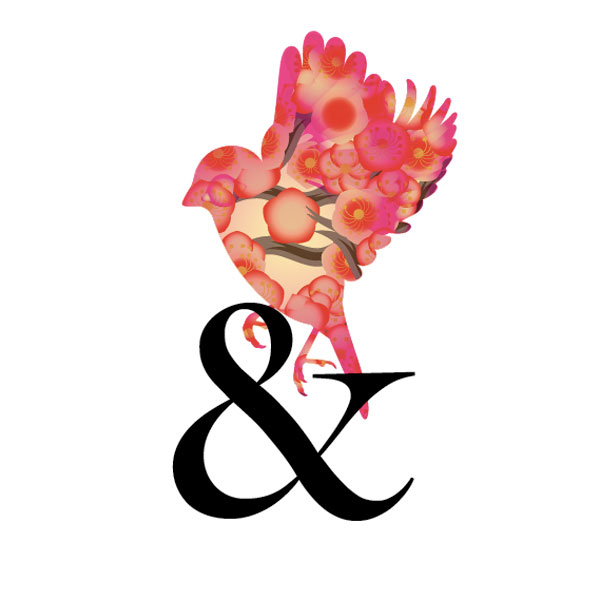 Select the Live Paint object again, and then copy and paste it onto a new layer. Set the Transparency of this layer to Multiply as well.
 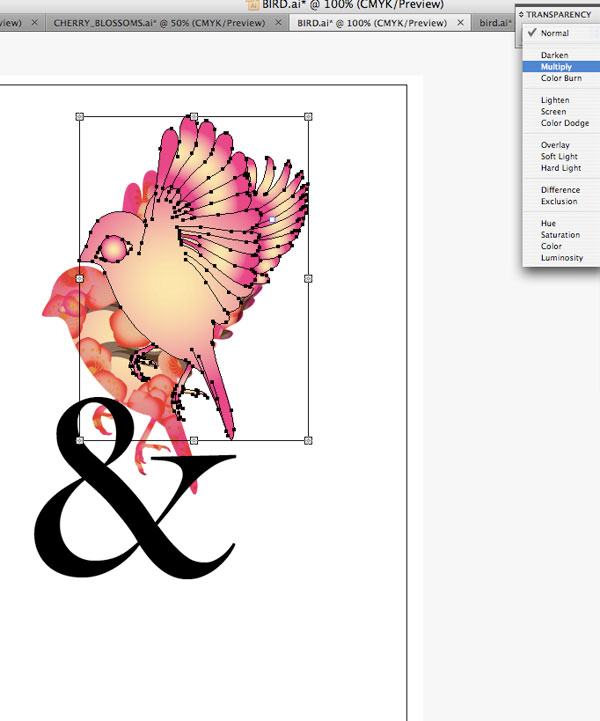 Move this duplicated layer elsewhere on the artboard so we can edit it further. What I want to do now is give the illusion that it has more feathers, so I want to edit this copy of the bird by making it look more like wings instead of an entire bird. Also, I’ve duplicated the bird shape again so I have a backup bird to work with in case I make a mistake. I edit the Live Paint object by using the Pencil Tool (N) to edit the lines while they are selected.
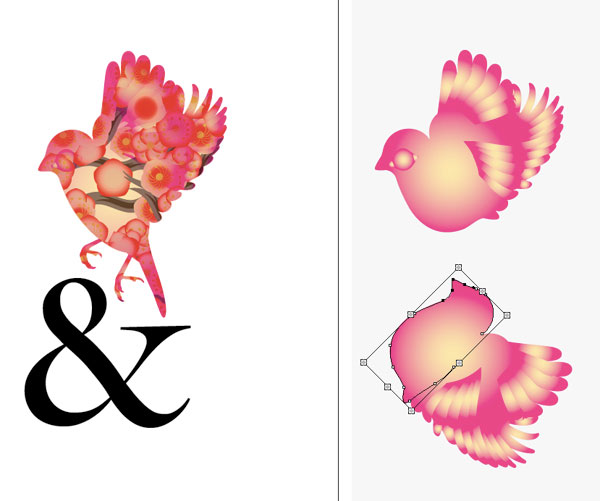
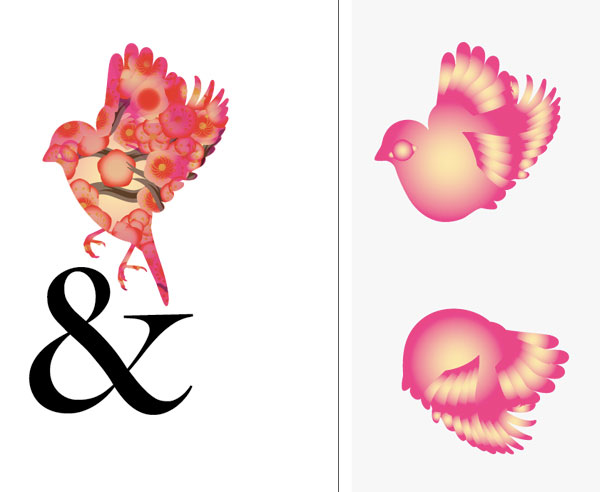 When I finally have the shape I want, since this layer is set with a transparency of Multiply, I can just drag this object that now looks like an extra wing on top of my bird artwork. Afterwards, I rotate and scale it to get it to sit the way I want.
Step 7: Filling In the Ampersand
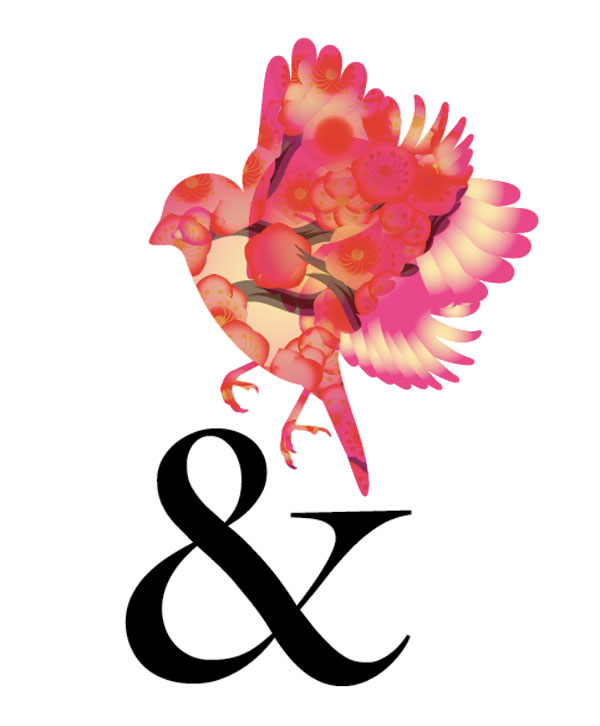
For this next step, I’ve changed the placement of the ampersand (&) by moving it a little further away from the bird so that they are not touching. Notice the position and size is perfect with the feet and tail of the bird descending along the top portion of the ampersand. When creating artwork, it’s these little details that I find make the biggest difference. I create outlines out of the ampersand (&) by selecting it with the Selection Tool (V) and then going to Type > Create Outlines (Shift + Cmd/Ctrl + O). 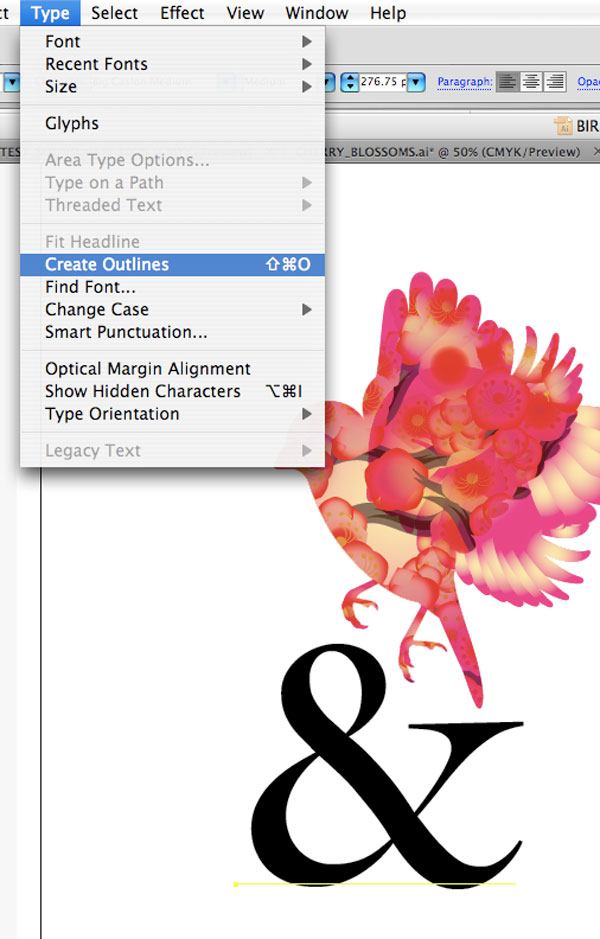 Now I want to make this ampersand part of the Live Paint group so the faux white mask we created earlier can affect it. This also means that I can add flowers underneath the ampersand outline. While both the ampersand and the Live Paint layer with the mask is selected, go to Object > Live Paint > Merge.
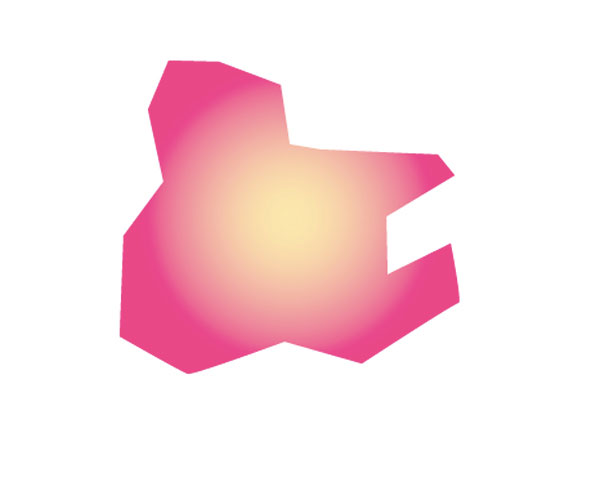
 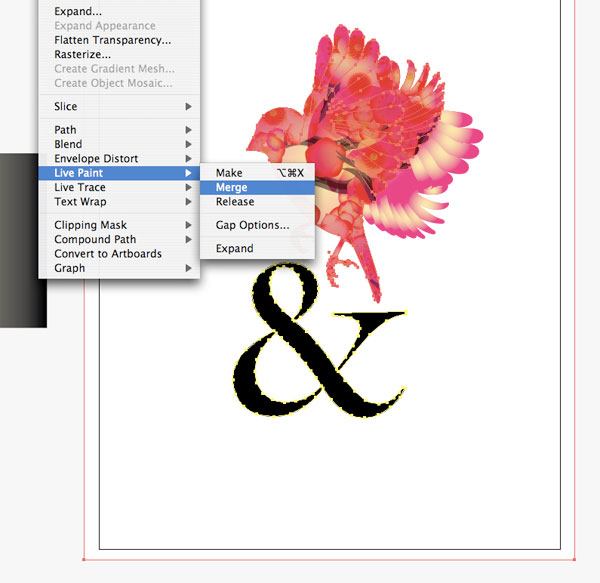 Next, change the Fill color of the ampersand to None using the Live Paint Bucket Tool (K). Now we can arrange some flowers underneath the ampersand shape, just like we did for the bird. To add a background color to the ampersand, make a new layer underneath both the masking layer and the layer that contains the flowers. Make a shape that roughly traces the ampersand sign, making sure that no points of this new shape are visible inside the ampersand shape. Drawing this shape very roughly is OK because the mask will hide its edges. Add color to this new shape by selecting it and then using the Eyedropper Tool (I) to add the pink-yellow color gradient from the rectangular box we created in the previous step. If the order of your layers is correct, this color will show up underneath the flowers and it will be masked by the ampersand shape (as shown below). Here is the shape I drew (with all other layers hidden):
  Here is how the shape fills the ampersand (all layers are visible):
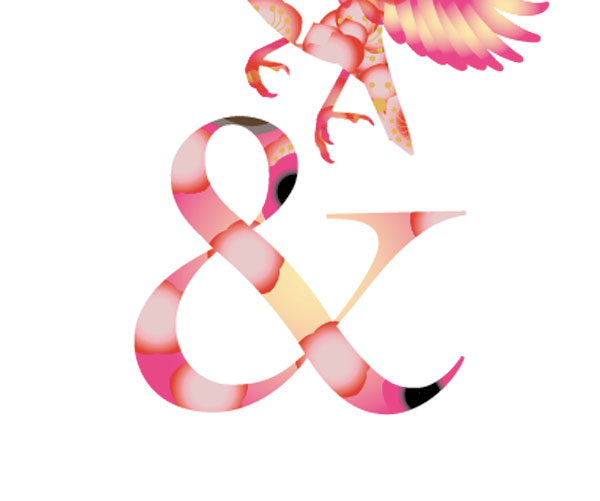 You can add more color by using more color gradients and using the Paint Bucket Tool to fill in selected parts of the composition, since many of the layers in this artwork are composed of Live Paint object. For example, I added a pink-and-black gradient fill.
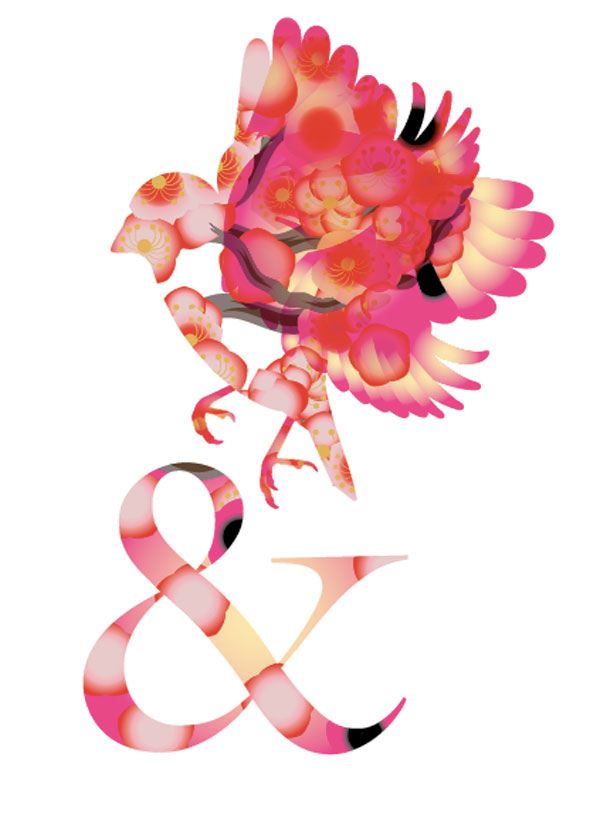
Step 8: Exporting the Artwork
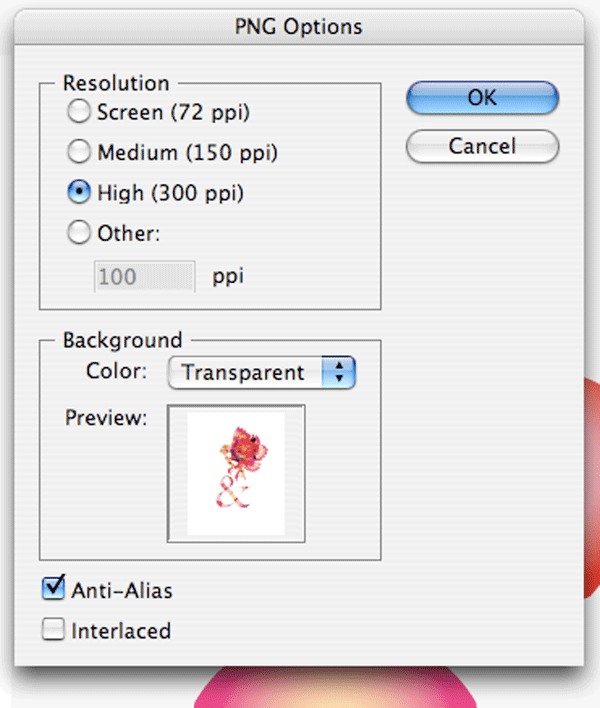
Now that I am happy with the way my artwork looks, I am ready to export it to Photoshop where I will apply the finishing touches. I also decided to export some flower shapes that I can use as color samples for when I work in Photoshop. 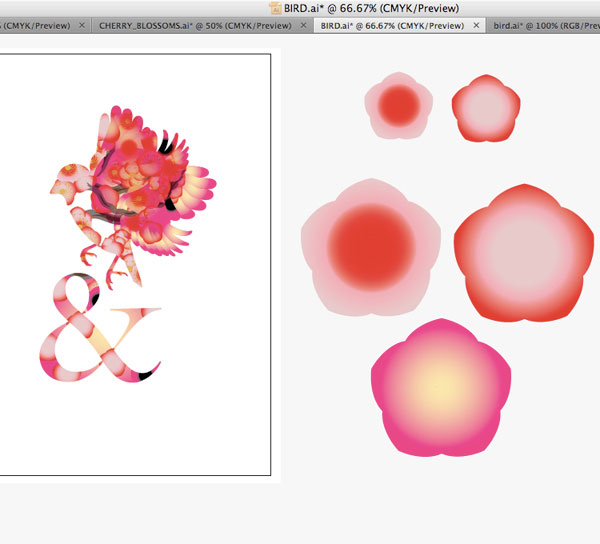 First, export the main artwork by going to File > Export. When the first dialog window appears, make sure the Use Artboard option is checked. This will export our artwork exactly how it appears within the artboard we composed it in. In my example, the flowers are outside the artboard, so they will not be included in the export. There will be a second dialog window called PNG Options; below, you can see the settings I use for the PNG options.
Step 9: Detailing in Photoshop
This is the final step. First, open our exported artwork in Photoshop. Next, we need to download, install and load the Free Hi-Res Watercolor Photoshop Brushes Set II. I try to use these brushes sparingly because as good as they are, they are free and have become popular, and I regularly see them used in many great digital artworks. Alternatively, check out the free Photoshop brushes in the Freebies section here on Design Instruct. 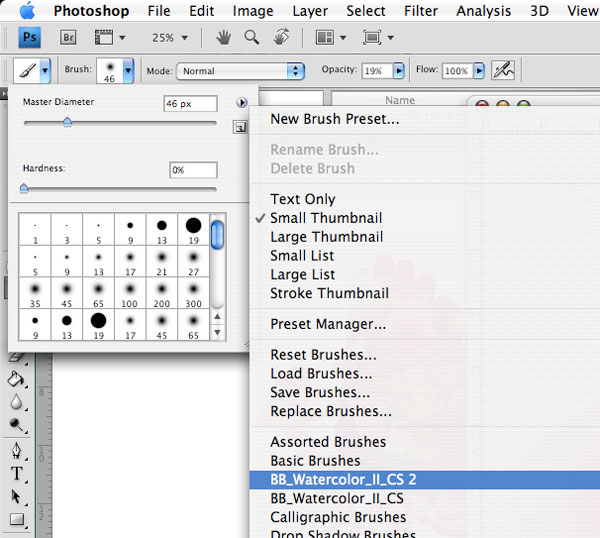 Our artwork (since we exported it) is in PNG format. We should save it as a PSD file (File > Save As). Next, in the Layers Panel, click on the only layer there is and duplicate it (Cmd/Ctrl + J). We now have two identical copies of the same layer. Select the topmost layer in the Layers Panel. Switch to the Magic Wand Tool (W) and set the Tolerance option to 1. With the Magic Wand Tool, click on the white background part of the artwork and press Delete to remove it.
 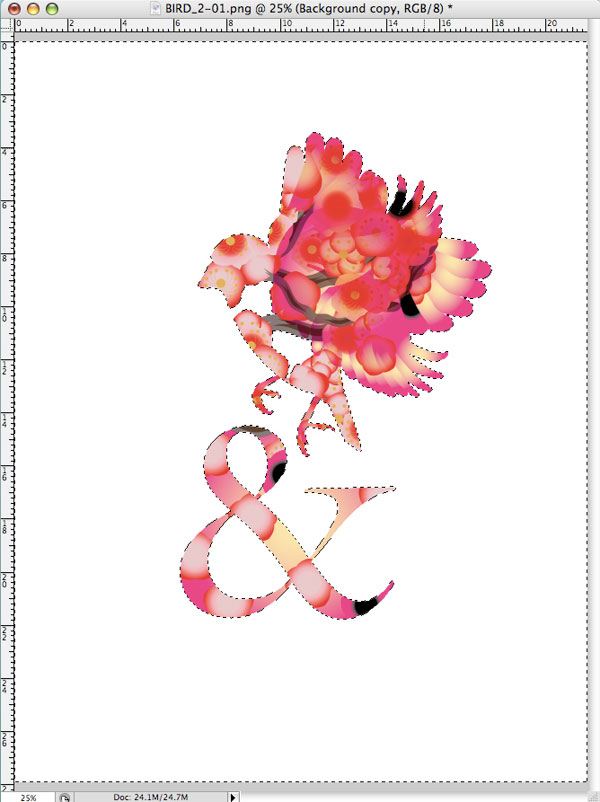 Choose a brush from the brush set we downloaded and set it to a size that you like. On a new layer, apply the brush on top of one of the flowers. Create a selection around the brush stroke by choosing Select > Load Selection.
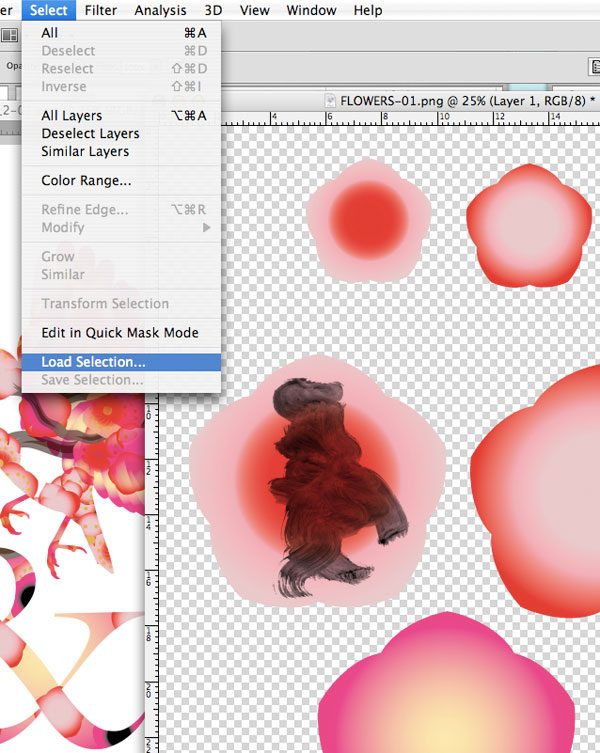
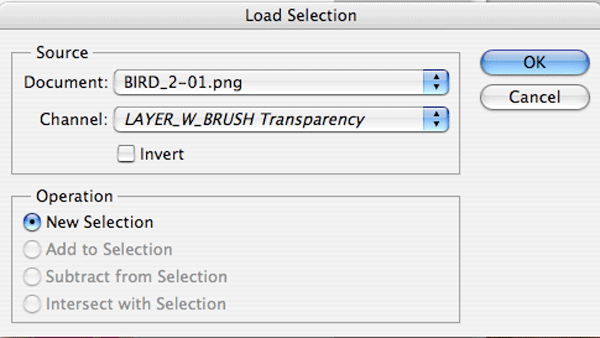 Next, select the flower layer below the brush stroke. Using the Move Tool (V), drag this selection into the PNG image of the bird and ampersand. Put this layer underneath the first layer of the bird and ampersand (&) that has the white background deleted.
 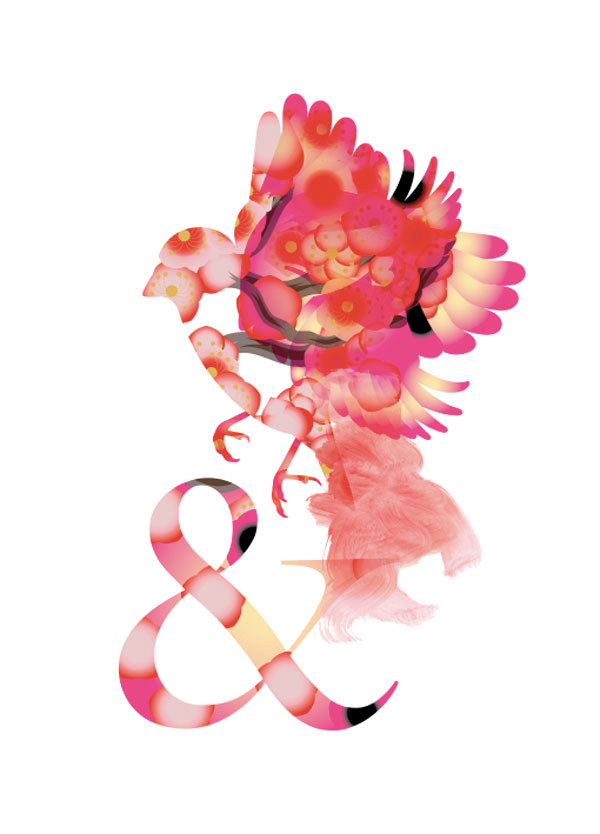 Using either solid colors of your preference or colors sampled from the flower gradients, add different strokes and colors on separate layers both above and below the image of the bird with the ampersand. Press Cmd/Ctrl + T while a layer is selected to transform the different strokes you make, giving them variety. Use the Move Tool (V) to place them around the bird until you get a comp that you like! You can even adjust the Hue/Saturation of some of the strokes by going to Image > Adjustments > Hue/Saturation. Also, play around with layer blending modes of the watercolor splatters. Here are some of the strokes I made (without the layer with the bird and ampersand visible):
 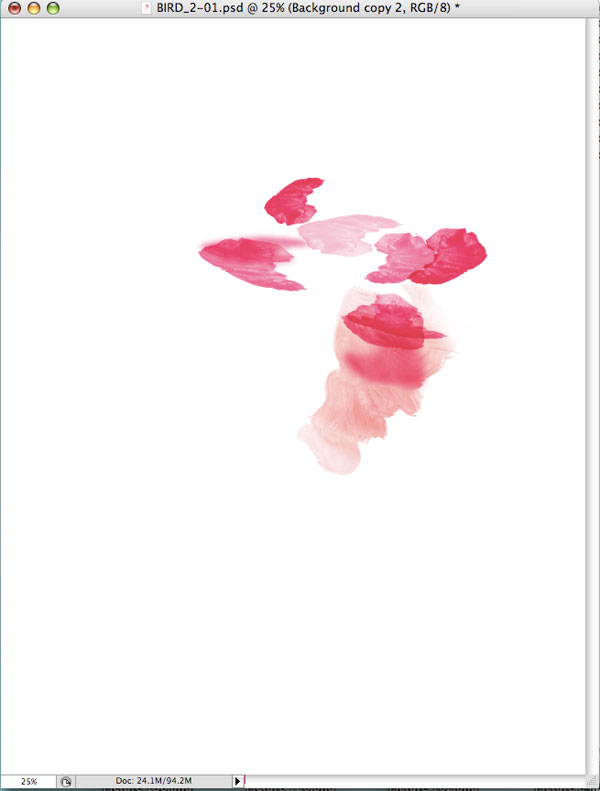 When you feel that your composition is finished, just save your artwork in the format you want and you’re done!
Tutorial Summary
In this tutorial, we covered many techniques for composing artistic artwork in Illustrator. We then finished off our work in Photoshop by adding detailing elements (particularly watercolor splatter brush strokes). I hope you found this tutorial to be helpful! 
-
 Trevin serves as the VP of Marketing at WebFX. He has worked on over 450 marketing campaigns and has been building websites for over 25 years. His work has been featured by Search Engine Land, USA Today, Fast Company and Inc.
 -

WebFX is a full-service marketing agency with 1,100+ client reviews and a 4.9-star rating on Clutch! Find out how our expert team and revenue-accelerating tech can drive results for you! Learn more
Make estimating web design costs easy
Website design costs can be tricky to nail down. Get an instant estimate for a custom web design with our free website design cost calculator!
Try Our Free Web Design Cost Calculator
Table of Contents
- Preview
- Tutorial Resources
- Step 1: Drawing the Bird
- Step 2: Drawing Flower Shapes
- Step 3: Create a Tree Bark
- Step 4: Creating a Mask
- Step 5: Add an Ampersand Element
- Step 6: Adding More Color to the Bird
- Step 7: Filling In the Ampersand
- Step 8: Exporting the Artwork
- Step 9: Detailing in Photoshop
- Tutorial Summary


Web Design Calculator
Use our free tool to get a free, instant quote in under 60 seconds.
View Web Design Calculator
Proven Marketing Strategies
Make estimating web design costs easy
Website design costs can be tricky to nail down. Get an instant estimate for a custom web design with our free website design cost calculator!
Try Our Free Web Design Cost Calculator
What to read next


