Tutorial Preview

Tutorial Resources
| Download Link | Type | Author |
| ChunkFive | Font | The League of Moveable Type |
Step 1: Create a New Document in Illustrator
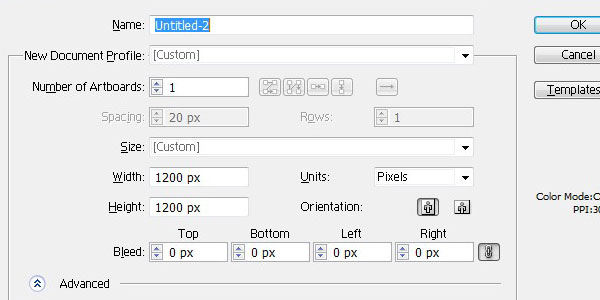
Open up Adobe Illustrator. Create a new document with the artboard’s size at 1200x1200px.
Step 2: Create the Text
Use the Type Tool (T) to write your desired text (in this tutorial, I’ll use the text: “DI”). The font I used is ChunkFive and the font size is around 630pt.
Change the text’s color to orange – #FF9900.

Step 3: Make the Text 3D
Make sure that your text is selected in the artboard, and then go to Type > Create Outlines (Shift+Ctrl+O) to convert the text to a vector shape.
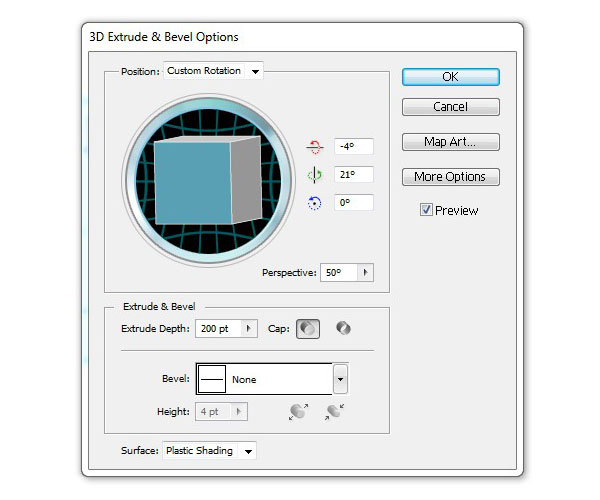
Now go to Effect > 3D >Extrude & Bevel and change your 3D settings to match the image below.
Press the OK button to apply the effect.
Step 4: Create a Wireframe
Next, we need to duplicate the 3D text: First make sure that your 3D text is selected in the artboard, go Edit > Copy (Ctrl+C) and then Edit > Paste (Ctrl+F).
If you can’t see Illustrator’s Appearance panel in your workspace, go to Window > Appearance. Now, in the Appearance panel, click on 3D Extrude & Bevel, which will open up the 3D Extrude & Bevel Options window.
In the 3D Extrude & Bevel Options window, there’s a dropdown option called Surface that’s at the bottom of the window. Change the Surface option to Wireframe.
Now we should have the 3D wireframe text, and also the solid 3D orange text we created earlier that’s behind it.

By making a wireframe, it makes the individual components of our 3D text easier to work with.
The 3D orange text behind our wireframe will only be used as a reference (for later).
Step 5: Change the Color of the Wireframe
Let’s change the color of our wireframe text to an orange color.

Step 6: Switch Over to Photoshop
Fire up Photoshop. Create a new 1200x1200px document.
Fill the background layer with black – #000000.
Copy (Ctrl+C) and paste (Ctrl+V) the solid orange text from Illustrator into our Photoshop document.
Next, Copy (Ctrl+C) and paste (Ctrl+V) each piece of the wireframe text into our Photoshop document. If asked, choose the Smart Object option when you’re pasting a piece into Photoshop. Make sure you line up the pieces with the solid orange text layer that’s already in Photoshop.
Also make sure that each piece is on its own layer.
Step 7: Apply Layer Effects to the Wireframe Layers
After you’re done copy-pasting each piece of the wireframe, give each layer a Gradient Overlay and Stroke.
For the Gradient Overlay, change the gradient colors so that the gradient goes from an orange-brown color to a white color. The Blend Mode option should be Multiply and Opacity should be set at 20%.
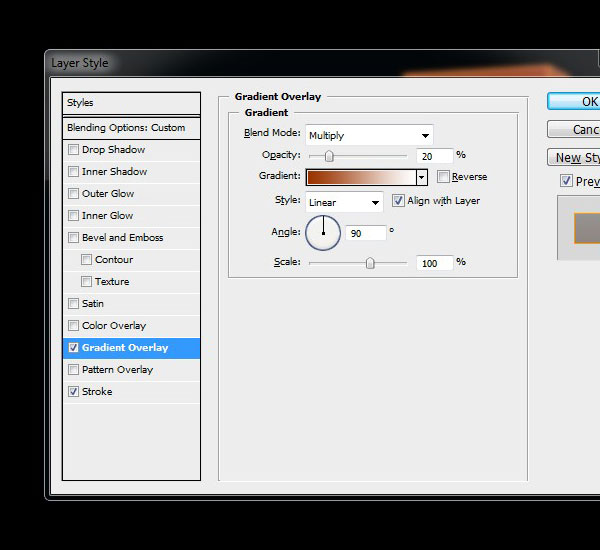
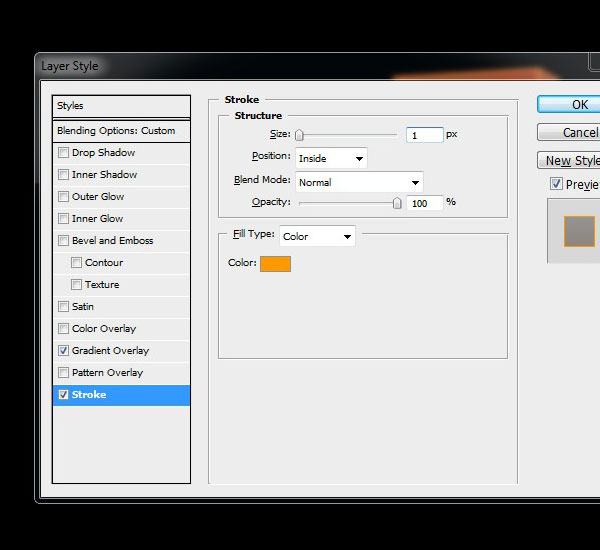
For the Stroke layer effect, the stroke should be a yellow-orange color – #FF9900 and the Size option should be set at 1px.
Now, in the Layers panel, change the Fill option of each layer to 40%.
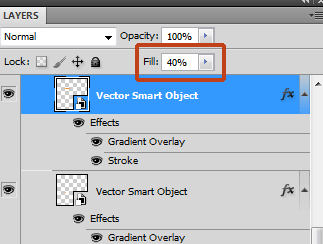
We are changing the Fill option instead of the Opacity option because it doesn’t change the opacity of the Gradient Overlay or Stroke, whereas the Opacity option will.
Here’s where we are right now:

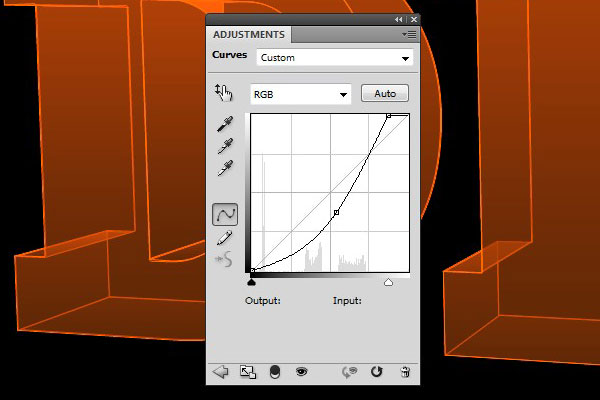
Step 8: Add a Curves Adjustment Layer
Let’s add a Curves adjustment layer to make overall changes to our document’s colors, and to do this, go to Layer > Adjustment Layer > Curves. This will give our text a darker see-through look.
Step 9: Modify the Stroke of the Text Faces
We want to have a thicker stroke on the front faces of the “D” and “I” letters to make them stand out more. In the Layers panel, locate the layer that has the face of the “D”.
Double-click on Stroke, which will open up the Stroke settings for this layer for us to modify.
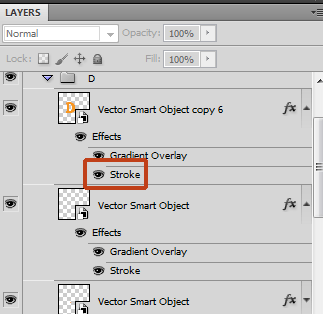
Change the stroke Size option from 1px to 3px.
Do the same thing for the letter “I” too.

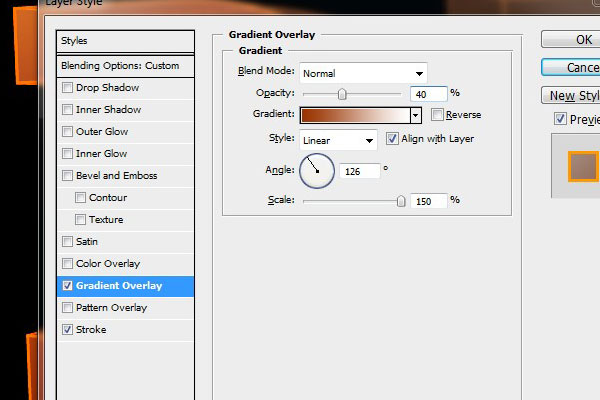
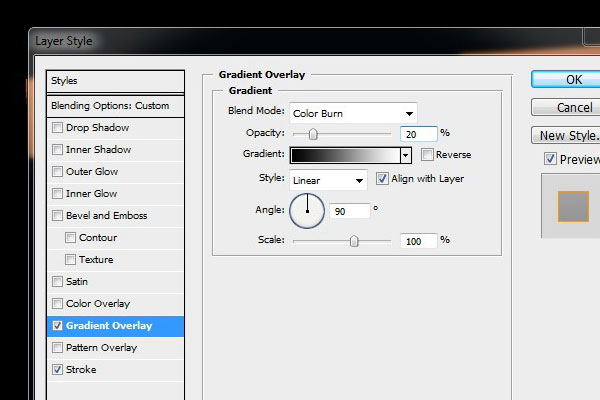
Step 10: Edit the Gradient Overlays
To make the face of our text look a bit better, we’re going to change the black gradient to a brown – #993300 and white gradient. See the image below for the settings I used.
For the rest of the sides of the text, edit their Gradient Overlay layer effects by changing their Blend Mode options to Color Burn and angle the gradient so the darkest part is coming from the bottom and the back of the text sides. Also change the Opacity of each layer to 20%.

Step 11: Create a Glow Effect
We are going to make the text faces glow.
To do this, start by changing your Foreground Color (which you can find in the Tools panel) to white.
Then switch to your Brush Tool (B) and, in the Options bar at the top of your Photoshop workspace, change the brush’s Size to 10px and Hardness to 0%.
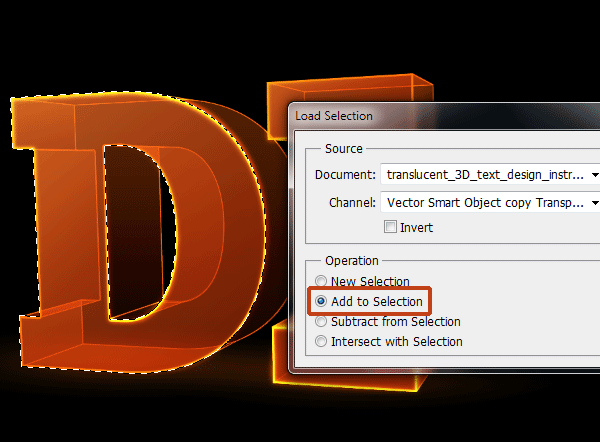
Choose the “D” text face layer in the Layers panel as the active layer. Afterwards, go to Select > Load Selection.
Now choose the “I” text face layer in the Layers panel as the active layer, and then go to Select > Load Selection again, but this time make sure you choose the Add to Selection option.

Create a new layer (Layer > New > Layer), rename the new layer to “Text Glow” and then put it just below the Curves adjustment layer.
With the text faces still selected, go to the Paths panel, click the button in the upper-right corner of the panel to reveal the panel’s menu, and then choose Make Work Path from the menu that appears.
Right-click on the work path and then choose Stroke Path from the menu that appears; make sure you choose the Simulate Pressure option.

Change the Blend Mode of the “Text Glow” layer to Overlay.
Go to Filter > Blur > Gaussian Blur and change the blur’s Radius to 3px before applying the filter.

Step 12: Adding a Glowing Shadow
Finally, we’re going to add a glowing drop shadow at the bottom of our 3D text.
To start, change the Foreground Color to #FF9900 and then switch to the Radial Gradient Tool (G). Create a new layer below all the other layers and make a small radial gradient.

Use the Free Transform Tool (Edit > Free Transform) to make the gradient wider (stretch it out) and so that it covers the bottom of the “D” letter.
Make another glowing drop shadow for the “I”.
Drop the Opacity of both the glowing drop shadow layers to 50% and then let’s call it a day!

Tutorial Summary
In this tutorial, we used Illustrator and Photoshop to create translucent 3D text.
We used Illustrator to help us generate the basic shapes of our work. We then moved over to Photoshop to apply various styling effects.
Here is the final result:
Download Source Files
- translucent_3D_text_design_instruct (ZIP, 24.5 MB)
-
 Trevin serves as the VP of Marketing at WebFX. He has worked on over 450 marketing campaigns and has been building websites for over 25 years. His work has been featured by Search Engine Land, USA Today, Fast Company and Inc.
 -

WebFX is a full-service marketing agency with 1,100+ client reviews and a 4.9-star rating on Clutch! Find out how our expert team and revenue-accelerating tech can drive results for you! Learn more
Make estimating web design costs easy
Website design costs can be tricky to nail down. Get an instant estimate for a custom web design with our free website design cost calculator!
Try Our Free Web Design Cost Calculator
Table of Contents
- Tutorial Preview
- Tutorial Resources
- Step 1: Create a New Document in Illustrator
- Step 2: Create the Text
- Step 3: Make the Text 3D
- Step 4: Create a Wireframe
- Step 5: Change the Color of the Wireframe
- Step 6: Switch Over to Photoshop
- Step 7: Apply Layer Effects to the Wireframe Layers
- Step 8: Add a Curves Adjustment Layer
- Step 9: Modify the Stroke of the Text Faces
- Step 10: Edit the Gradient Overlays
- Step 11: Create a Glow Effect
- Step 12: Adding a Glowing Shadow
- Tutorial Summary
- Download Source Files
Share this article


Web Design Calculator
Use our free tool to get a free, instant quote in under 60 seconds.
View Web Design Calculator
Make estimating web design costs easy
Website design costs can be tricky to nail down. Get an instant estimate for a custom web design with our free website design cost calculator!
Try Our Free Web Design Cost Calculator