- Home
- Blog
- Web Design
- Design a Textured "Coming Soon" Web Page in Photoshop
Design a Textured "Coming Soon" Web Page in Photoshop
-
 17 min. read
-
 Trevin Shirey
 VP of Marketing
- Trevin serves as the VP of Marketing at WebFX. He has worked on over 450 marketing campaigns and has been building websites for over 25 years. His work has been featured by Search Engine Land, USA Today, Fast Company and Inc.
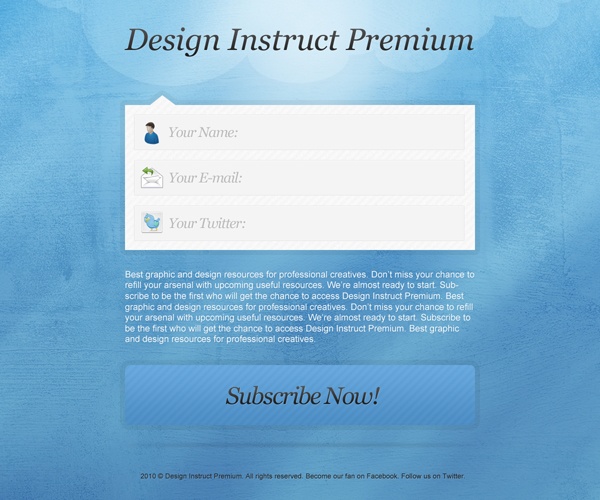
Preview
Click on the image below to see the work in full scale.
Tutorial Resources
- Icons: Function Icon Set by Liam McKay (Function)
- Texture: Grunge Grab Bag Texture 02 by JC Parmley (Design Instruct)
- Image: stripes-pattern
Step 1: Create a New Photoshop Document
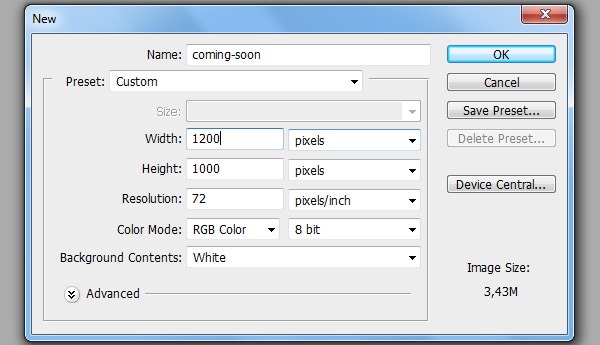
Start by creating a new document in Photoshop (Ctrl/Cmd + N). The canvas size should be 1200px by 1000px and it should have a white background.
Step 2: Create Photoshop Guides
Now add Photoshop guides so that we can maintain proper alignment of our design elements. To add a guide, go to View > New Guide.
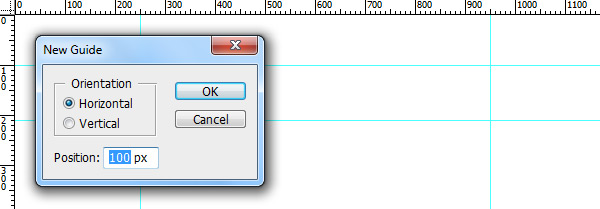
We will create 2 vertical guides and 5 horizontal guides.
Create vertical guides at the following positions:
- 250px
- 950px
Create horizontal guides at the following positions:
- 100px
- 210px
- 500px
- 730px
- 850px
Step 3: Creating the Textured Background
Double-click on the locked Background layer and rename it to “White”. This process unlocks the Background layer so that we can modify it.
Create a new layer group (Layer > New > Group) called “Background” and move the “White” layer into the group. All of the layers associated with the design’s background will go in this layer group.
Next, create a new layer (Layer > New > Layer or press Shift + Ctrl/Cmd + N) named “Gradient”.
Set your Foreground Color to blue (#005C9D) and your Background Color to brighter blue (#40A5DB), then choose the Gradient Tool (G).
Fill the “Gradient” layer using the Gradient Tool by dragging from the bottom to the top of the canvas; hold down Shift while dragging to make a perfectly vertical color gradient. Afterwards, reduce the “Gradient” layer’s Opacity to 70%.
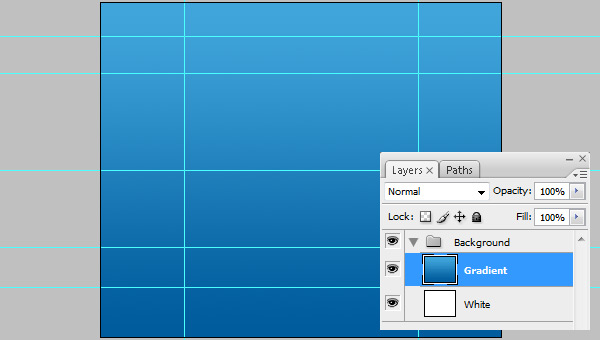
Set your Foreground Color to white (#FFFFFF) and Background Color to black (#000000). Create a new layer named “Stripes”, then use the Clouds filter (Filter > Render > Clouds) on this new layer.
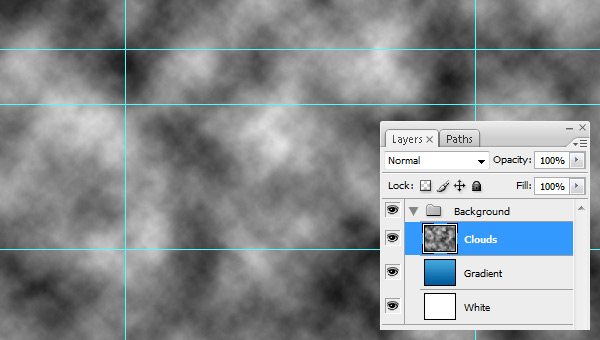
After that, go to Filter > Blur > Motion Blur and set the Angle to 45o and Distance to 450px.
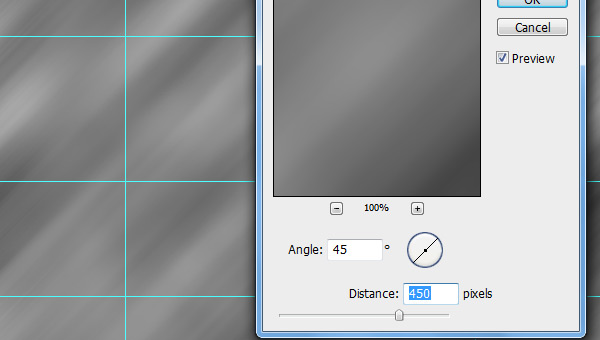
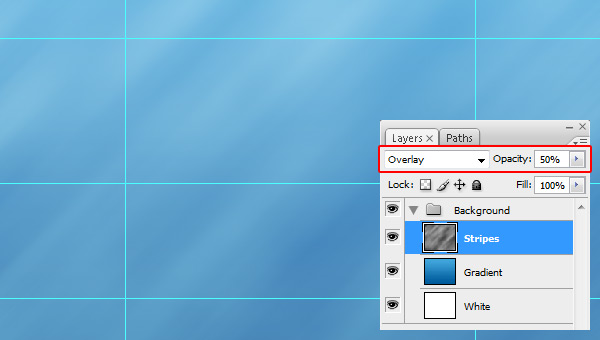
Set the Blend Mode of the “Stripes” layer to Overlay and reduce the Opacity to 50%.
As you can see below, this results in a sort of striped, light ray effect.
We’re going to create clouds on top of the web layout. Create a new layer group called “Clouds” and move it inside the “Background” layer group; place it above other layers inside this group.
Set the Foreground Color to white (#FFFFFF) and, using the Ellipse Tool (U), draw several ellipses to make an illustrative, cartoon-like cloud as shown below.
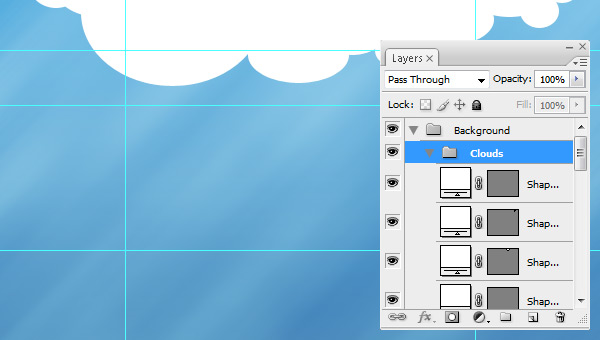
After that, right-click on the “Clouds” layer group and, in the contextual menu that appears, choose Merge Group (Ctrl/Cmd + E). This will merge the layer group into one layer.
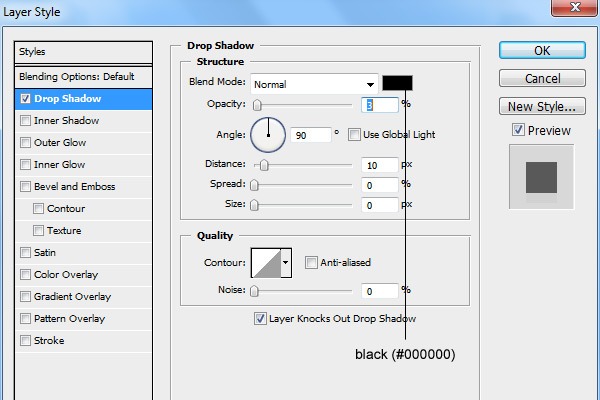
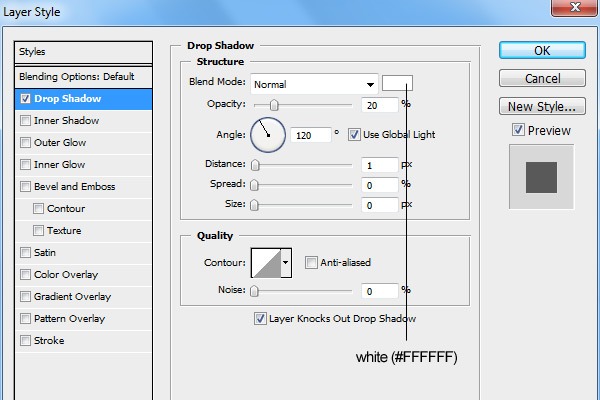
With the “Clouds” layer being the active layer in the Layers Panel, go to Layer > Layer Style > Blending Options to access the Layer Style dialog window and then give the layer a Drop Shadow.
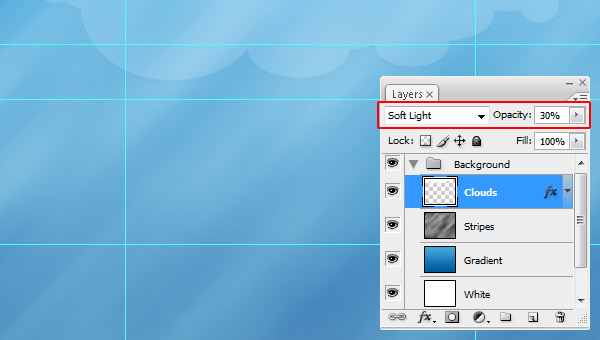
Set the “Clouds” layer’s Blend Mode to Soft Light and reduce its Opacity to 30%.
Create a new layer (Shift + Ctrl/Cmd + N) called “Light” and place it above all the other layers.
Choose the Brush Tool (B) and use the Options Bar to load the Basic Brushes library that comes with Photoshop. Set your Foreground Color to white (#FFFFFF), choose the Soft, Mechanical brush tip, and set 700px as the Master Diameter of the brush. Click once at the top-center of the canvas to apply the brush stroke.
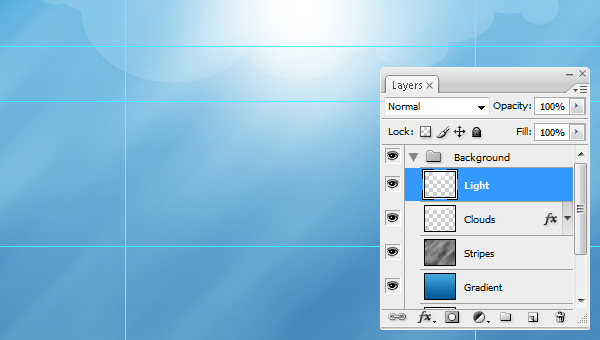
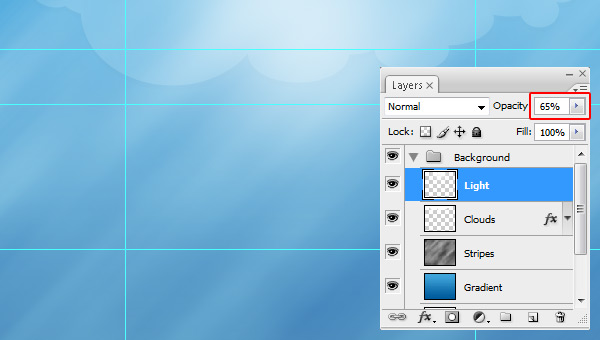
Reduce the “Light” layer’s Opacity to 65%.
We are now going to add a texture to our background. I’ve used the Grunge Grab Bag: Texture Pack from the Design Instruct freebies section. Specifically, I used Grunge Grab Bag Texture 02.
Download and open this texture in Photoshop. Place it in our document, and then rename its layer to “Texture”. Press Ctrl/Cmd + T to activate Free Transform and then resize your texture to fit inside the canvas.
Go to Image > Adjustments > Black & White to convert the texture to grayscale.
Let us blur the texture layer a little bit.
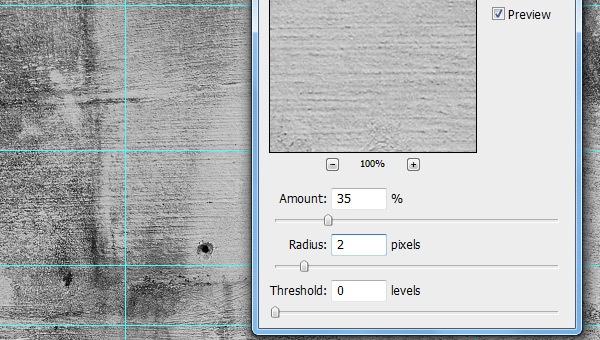
Go to Filter > Sharpen > Unsharp Mask and use the following settings:
- Amount: 35%
- Radius: 2px
- Threshold: 0 levels
Now set the texture layer’s Blend Mode to Soft Light and reduce its Opacity to 40%.
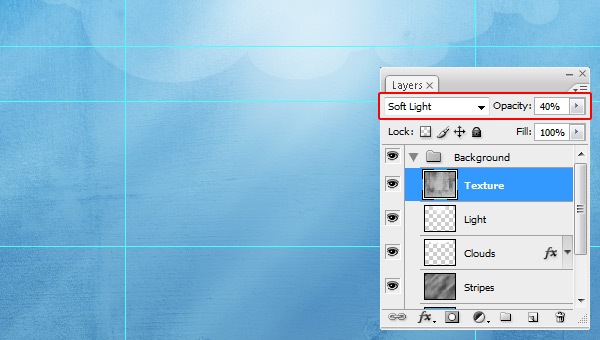
We are done with the background.
Step 4: Creating the Header
In the Layers Panel, you may now collapse the “Background” layer group by clicking on the small gray triangle next to the group’s name; this will allow us to focus on another part of our work, as well as make our Layers Panel easier to navigate.
Create a new layer group called “Header” (it should be on top of the “Background” layer group).
Choose the Horizontal Type Tool (T) and, in the Options Bar, set up the tool so that you’re using the font: Georgia, Italic, 62px font size. Write your website’s name (in this tutorial, I wrote “Design Instruct Premium”). Use the Photoshop guides we created earlier to align the text.
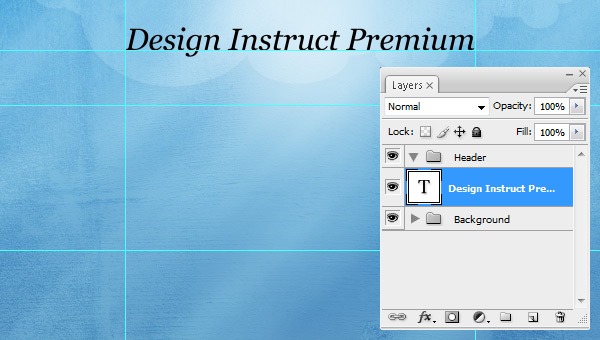
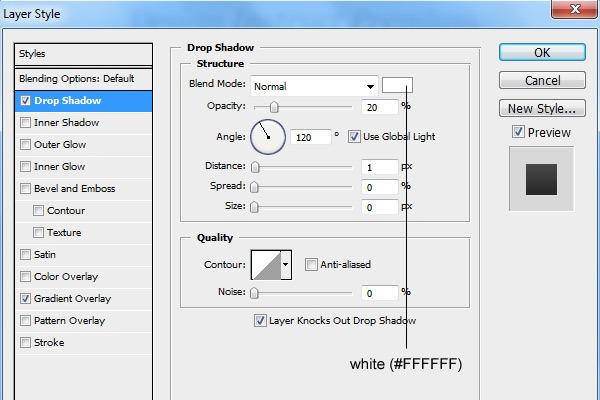
Double-click on the text layer to access the Layer Style window, then give it a Drop Shadow and Gradient Overlay.
Drop Shadow
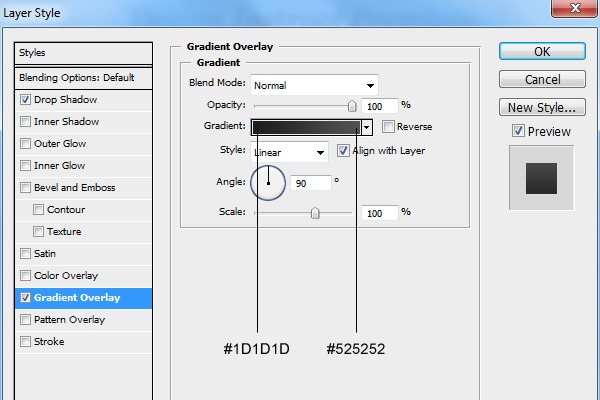
Gradient Overlay
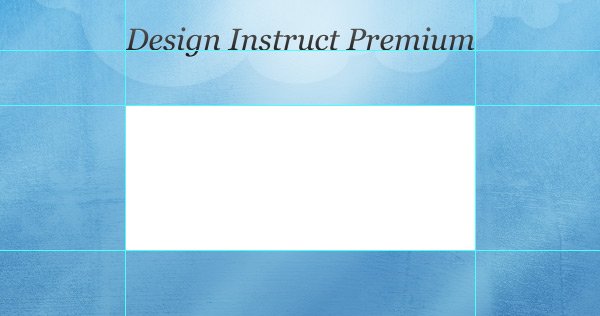
This is the result of our layer style (which could be recreated in HTML by using CSS3’s text-shadow property and gradient() value).

Step 5: Create the Body Container
Create a new layer group called “Body” and move it below the “Header” group.
Set the Foreground Color to white (#FFFFFF) and then use the Rectangle Tool (U) to draw a rectangle between the Photoshop guides we created, as shown below.
Now switch to the Custom Shape Tool (U). Make sure that you have the Arrows shape library loaded (it come with Photoshop by default). Locate the shape named Arrow 12 and draw an arrow (shown below).
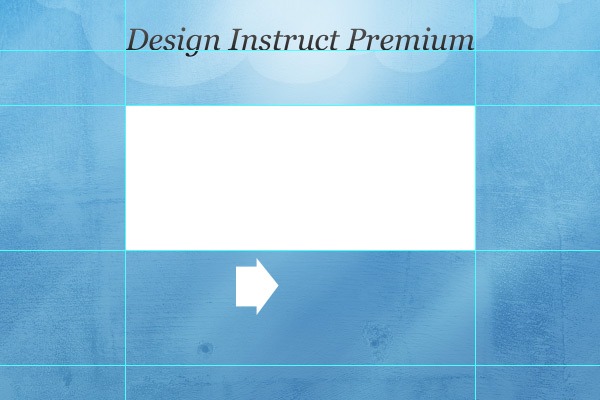
Use Edit > Free Transform > 90o CCW to rotate the arrow so that it points up.
Use the Move Tool (V) to position the arrow as shown below.
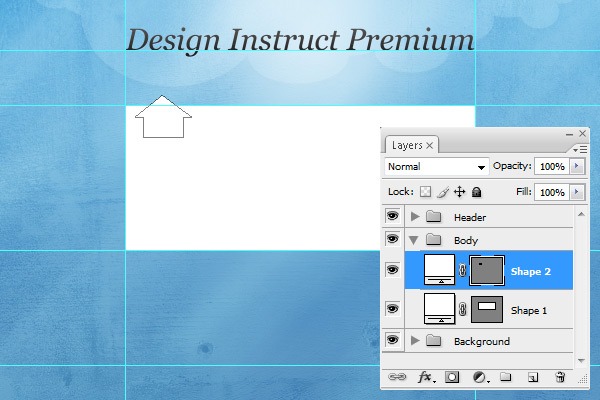
Select the rectangle layer and the arrow layer in the Layers Panel, and then go to Layer > Merge Layers (Ctrl/Cmd + E) to combine them. This results in making the body container look sort of like a speech bubble. Rename the merged layer to something intuitive, such as “Box”.
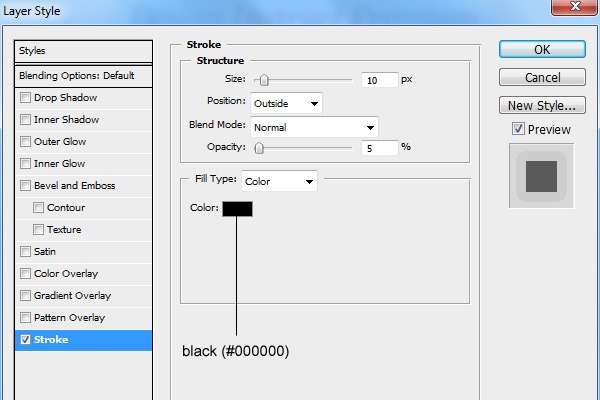
With the “Box” layer the active layer, go to Layer > Layer Style > Blending Options to access the Layer Style window so that you can give the layer a Stroke.
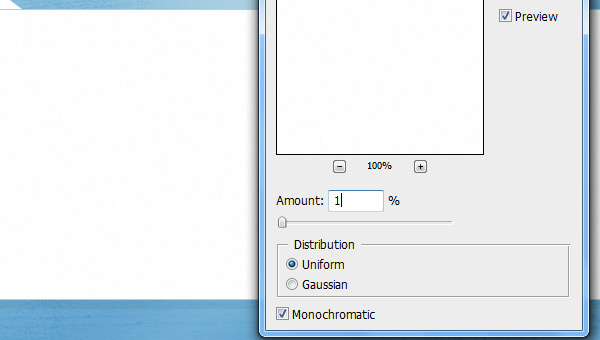
Go to Filter > Noise > Add Noise and use the following settings:
- Amount: 1%
- Distribution: Uniform
- Monochromatic: checked
Download this stripes pattern pattern and open it in Photoshop. Go to Edit > Define Pattern to save the image as a Photoshop pattern (learn more about this topic by reading the Photoshop patterns guide).
Create a new layer (Shift + Ctrl/Cmd + N) called “Stripes”. Choose the Paint Bucket Tool (G) and set it to the Pattern option in the Options Bar, then use the Pattern picker (also located in the Options Bar) to locate and choose the stripes pattern you installed.
Load a selection around the box by Ctrl/Cmd + clicking on the “Box” layer’s thumbnail.
Use the Paint Bucket Tool to fill the selected area with the stripes pattern.
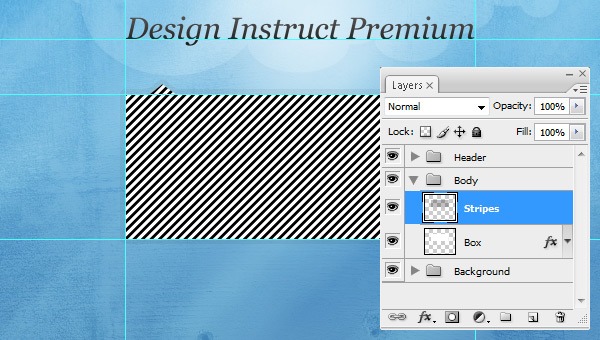
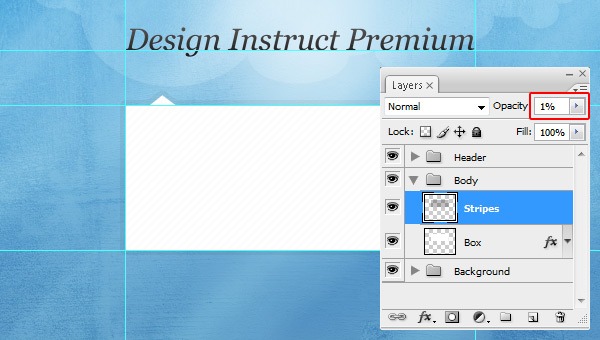
Reduce the “Stripes” layer’s Opacity to 1%.
Step 6: Creating Web Form Input Fields
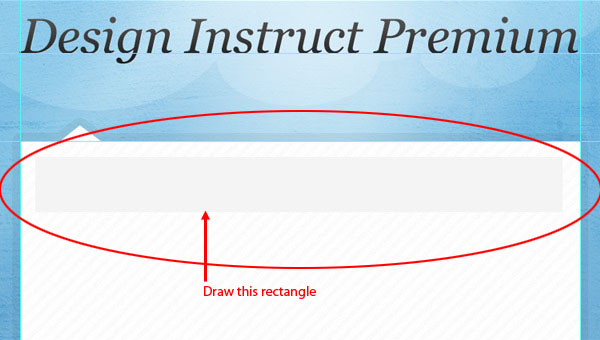
Create a new layer (Shift + Ctrl/Cmd + N) named “Input”. Set the Foreground Color to gray (#F4F4F4), then, using Rectangle Tool (U), draw a rectangle as shown below.
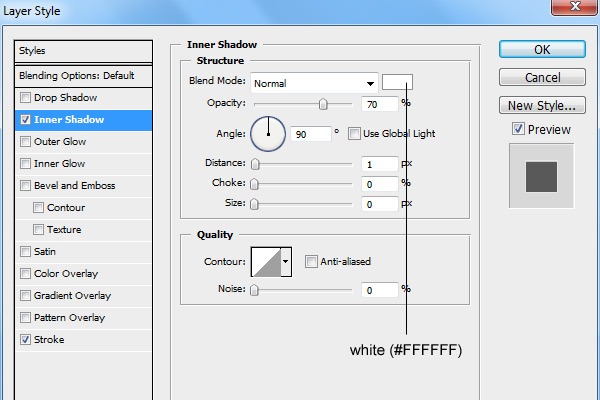
Next, give the “Input” layer an Inner Shadow and Stroke layer style.
Inner Shadow
Stroke
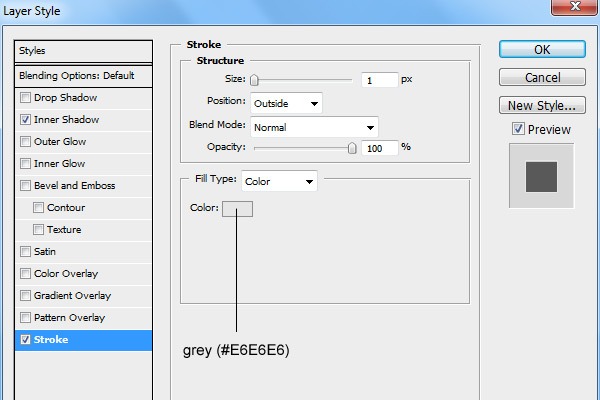

Make sure that the “Input” layer is still the active layer, then click Ctrl/Cmd + J to duplicate the layer. Use the Move Tool (V) to move the duplicate under the first one.
Then create a third rectangle using the same process.
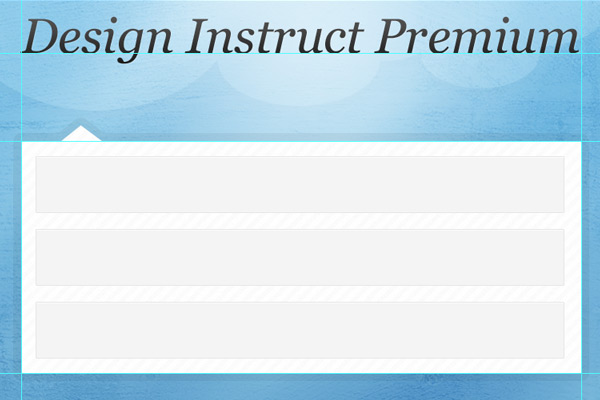
Download the Function Icon Set, unpack the ZIP archive, then locate and open up these icons:
- mail_reply_48.png
- twitter_boxed_48.png
- user_48.png
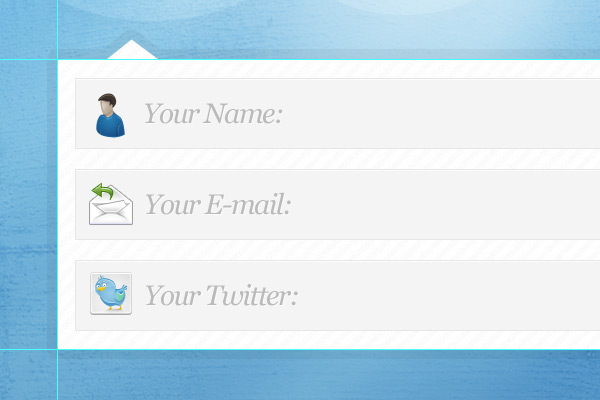
Place the icons in our document as shown below:
![]()
Set the Foreground Color to gray (#BABABA), switch to the Horizontal Type Tool (T), set up the tool so that it uses Georgia, Italic, 28px font size, and then write “Your Name:” (or something similar). This text is the label of our input field.

Give the text layer a Drop Shadow layer style.
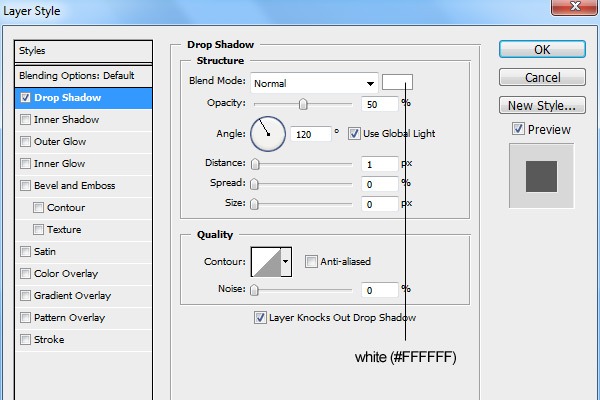

Write more labels on the input fields using the same process as above.
Step 7: Adding an Introductory Paragraph
Set the Foreground Color to a bright blue (#F7FBFE) and write an introductory paragraph underneath the body using Arial, Regular, 18px font size using the Horizontal Type Tool (T).

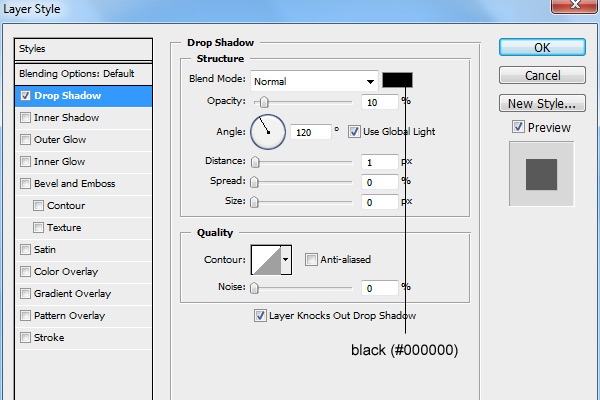
Give the Introductory paragraph a Drop Shadow layer style.
Step 8: Creating a Large UI Button
Create a new layer (Shift + Ctrl/Cmd + N) called “Button”. Switch to the Rounded Rectangle Tool (U), set the Radius to 10px, and then draw a large button between the Photoshop guides as shown below.
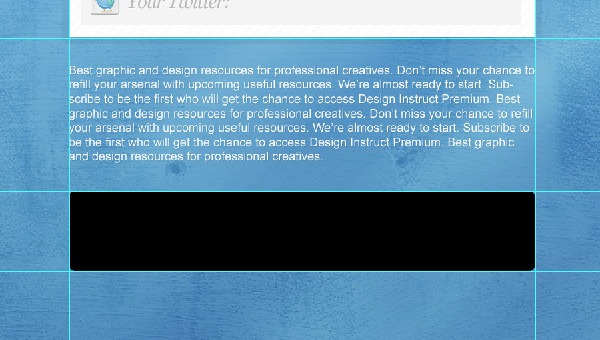
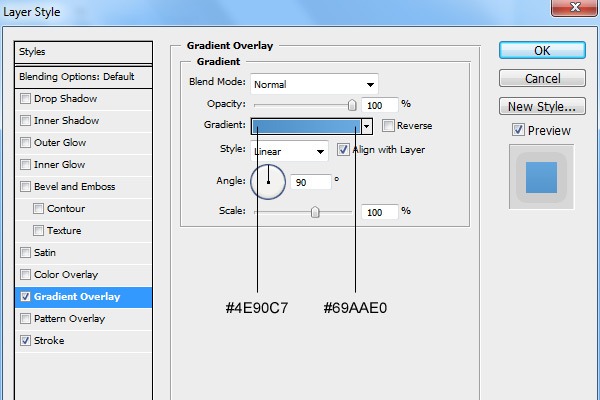
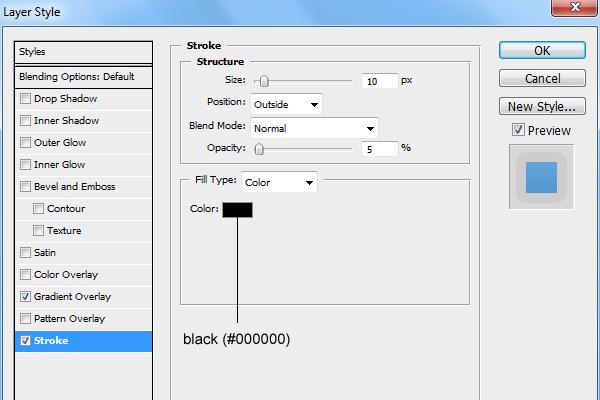
Give the “Button” layer a Gradient Overlay and Stroke.
Gradient Overlay
Stroke
Load a selection around the button by Ctrl/Cmd + clicking on the “Button” layer’s thumbnail preview in the Layers Panel.
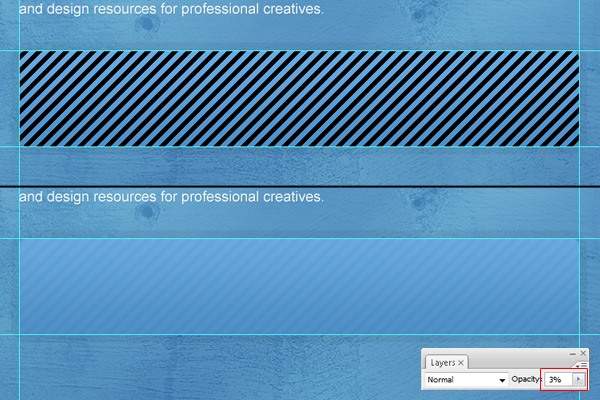
After that, create a new layer (Shift + Ctrl/Cmd + N) called “Button stripes”. Fill the selection with the stripes pattern that we have used before on the new layer, then lower the layer’s Opacity to 3%.
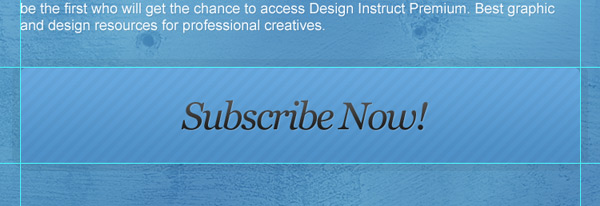
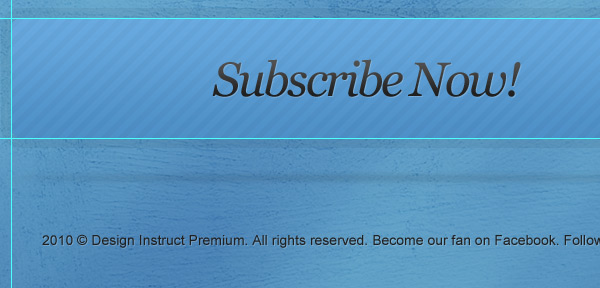
Switch to the Horizontal Type Tool (T) and choose Georgia, Italic, 48px font size to write the text for the button (write the text, “Subscribe Now” or something similar). Right-click on the “Header” text layer (the layer that says “Design Instruct Premium”), then choose Copy Layer Style from the contextual menu that appears.
Next, right-click on the “Subscribe Now” text layer, and then choose Paste Layer Style from the menu that appears. This should copy the Gradient Overlay/Drop Shadow layer style that we applied to the “Design Instruct Premium” layer.
Create a new layer (Shift + Ctrl/Cmd + N) called “Shadow”. Set the Foreground Color to black (#000000), then use the Ellipse Tool (U) to draw a very short and wide ellipse right below the button.
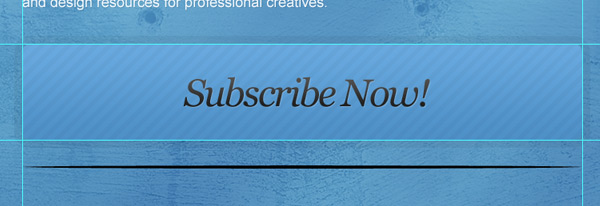
Soften up the ellipse by going to Filter > Blur > Gaussian Blur — use a Radius of 3px.
Lower the Opacity of the “Shadow” layer down to 20%.

Step 9: Create the Footer
Create a new layer group named “Footer”. Set the Foreground Color to a very dark gray (#202020) and then use the Horizontal Type Tool (T) set at Arial, Regular, 14px font size to write your copyright information. Give this text layer a Drop Shadow.
Tutorial Summary
Congratulations!
We’ve finished our “coming soon” web page design. We covered some useful and trendy techniques like how to create a detailed and textured background, how to create a simple and stylish box, how to make a big UI button, how to use patterns, and how to stylize text.
I’d like to hear your opinion about this tutorial and the final result. Share your own results with us by linking to it in the comments and posting it up on the Design Instruct community Flickr group pool.
Download Source Files
- textured_comingsoon_webpage (ZIP, 9.07 MB)
-
 Trevin serves as the VP of Marketing at WebFX. He has worked on over 450 marketing campaigns and has been building websites for over 25 years. His work has been featured by Search Engine Land, USA Today, Fast Company and Inc.
 -

WebFX is a full-service marketing agency with 1,100+ client reviews and a 4.9-star rating on Clutch! Find out how our expert team and revenue-accelerating tech can drive results for you! Learn more
Make estimating web design costs easy
Website design costs can be tricky to nail down. Get an instant estimate for a custom web design with our free website design cost calculator!
Try Our Free Web Design Cost Calculator
Table of Contents
- Preview
- Tutorial Resources
- Step 1: Create a New Photoshop Document
- Step 2: Create Photoshop Guides
- Step 3: Creating the Textured Background
- Step 4: Creating the Header
- Step 5: Create the Body Container
- Step 6: Creating Web Form Input Fields
- Step 7: Adding an Introductory Paragraph
- Step 8: Creating a Large UI Button
- Step 9: Create the Footer
- Tutorial Summary
- Download Source Files


Web Design Calculator
Use our free tool to get a free, instant quote in under 60 seconds.
View Web Design Calculator
Proven Marketing Strategies
Make estimating web design costs easy
Website design costs can be tricky to nail down. Get an instant estimate for a custom web design with our free website design cost calculator!
Try Our Free Web Design Cost Calculator

