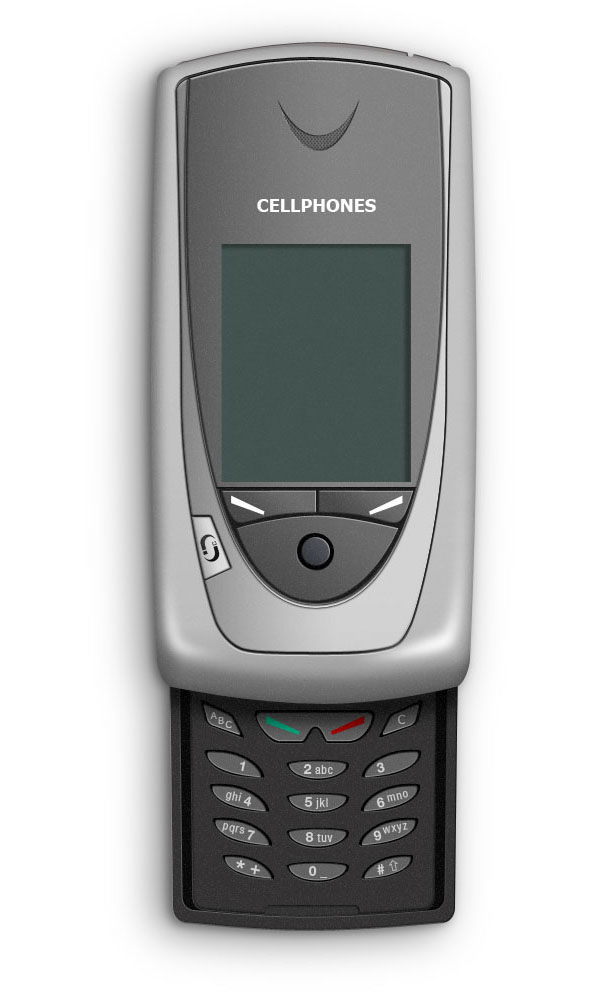
Preview
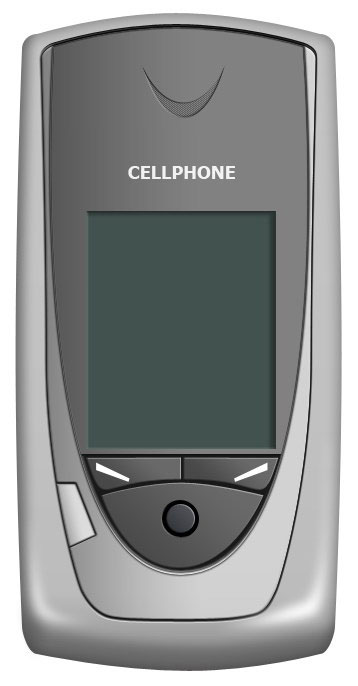
First, let’s take a look at the cell phone we’re going to create in this tutorial. This cell phone is modeled after one of Nokia’s products.
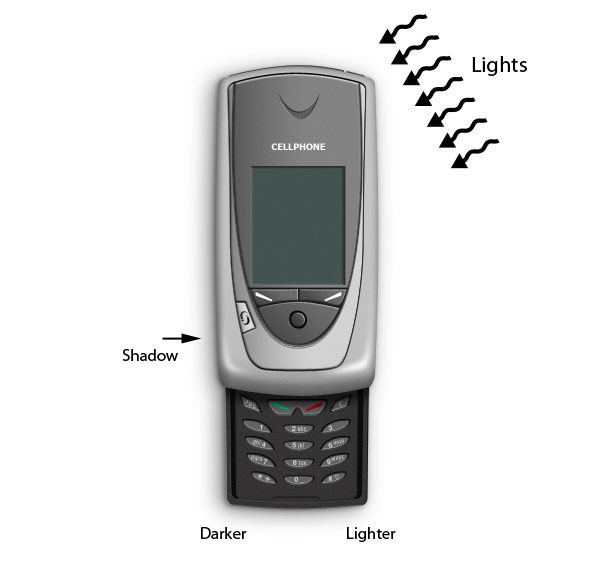
Step 1: Determining the Light Source
The most important factor in creating a realistic product digitally is consistency with the light sources. Therefore, before you draw anything, you must determine where light is coming from because it will affect the detailing, coloring, and shading of your work.
In this tutorial, we will pick the top right corner of the canvas for our light source.
The first consequence of this is that the shadows will be at the bottom left of object. The second result of having the light source at the right side is that the object will be darker on the left side.
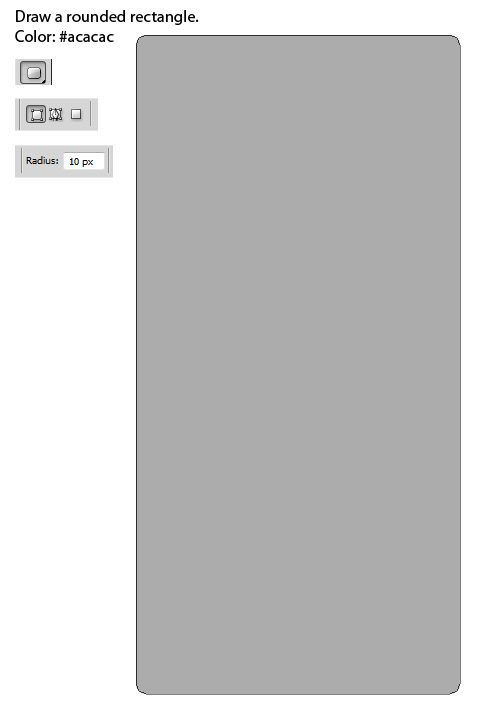
Step 2: Drawing the Base Shape
Let us begin drawing. First, in Photoshop, create a new document (Ctrl/Cmd + N) with Width at 500px and Height at 1000px.
Start by drawing the main base shape of the cell phone.
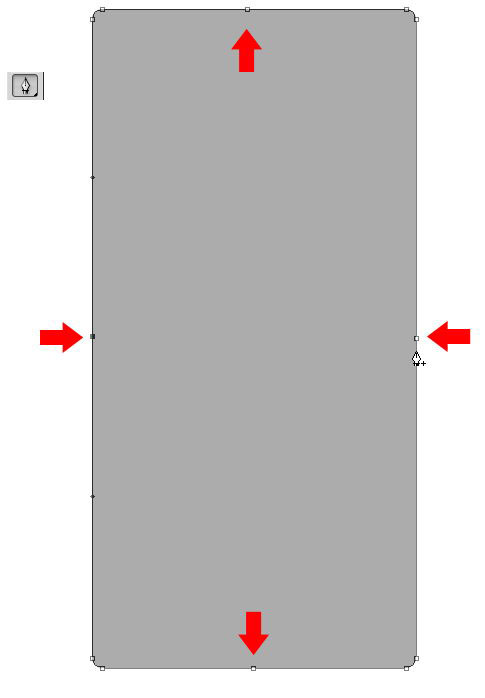
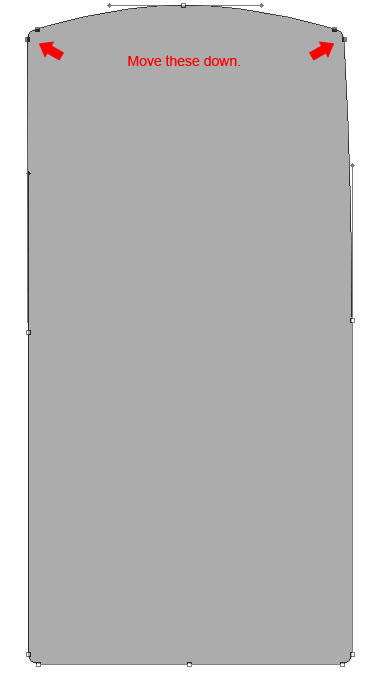
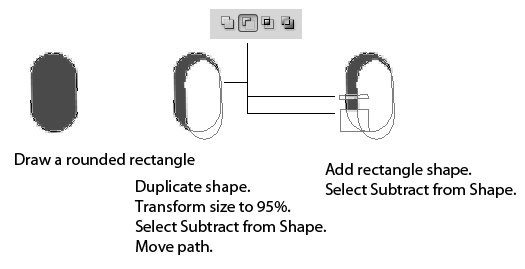
Usually, it’s easier to begin by drawing a predefined basic shape such as rectangle, ellipse, or star, then edit it manually using the Pen Tool (P). In this case, the basic shape is a rounded rectangle. Draw a rounded rectangle with the Rounded Rectangle Tool (U) with Radius set at 10px and Color set to a gray color (#acacac).
With the Pen Tool (P), make 4 additional anchor points by clicking on the shape’s path at the middle of each side.
Select the corner anchor points at the top and pull them down to create a hump at the top middle of the shape.
Press Ctrl/Cmd + T to activate the Free Transform command for the selected points.
Hold down Alt and move them inward.
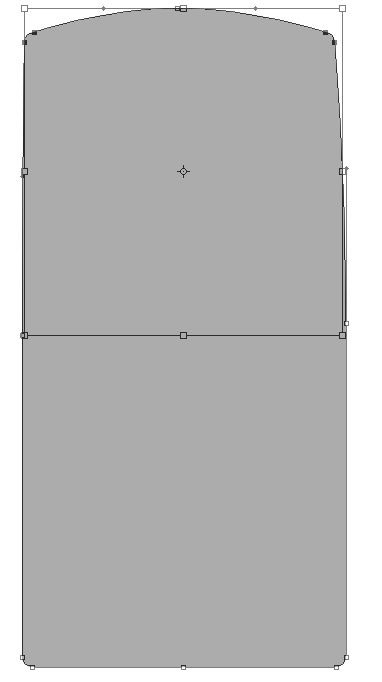
Repeat the same process for the bottom portion of the base shape.
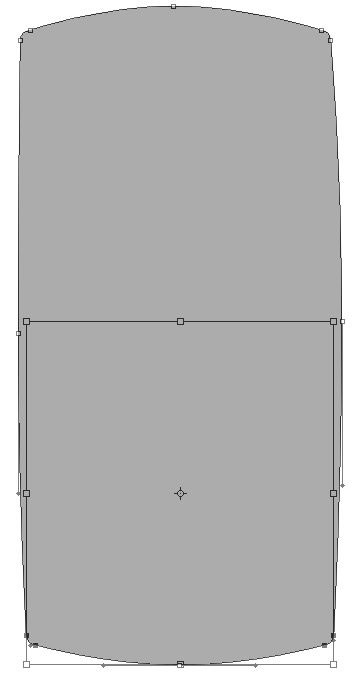
Note: We will be using this technique quite frequently in this tutorial, so it’s best to get the hang of it now.
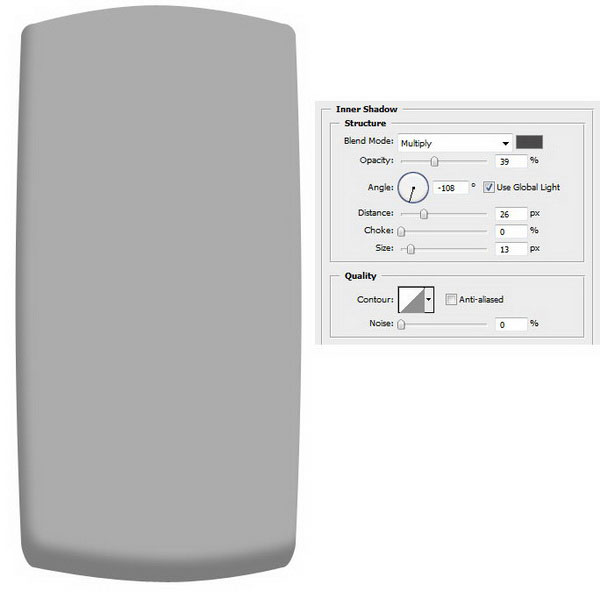
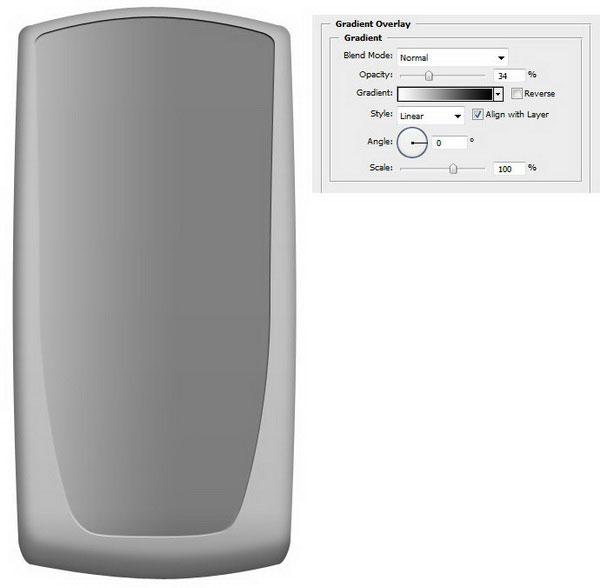
Step 3: Adding Layer Styles for a 3D Effect
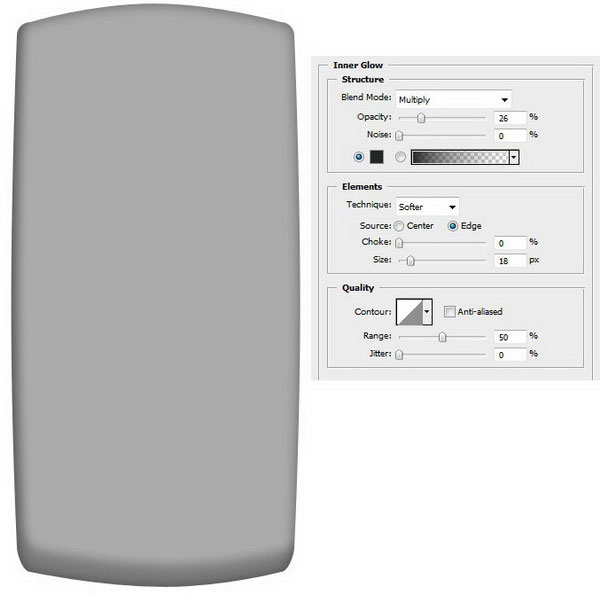
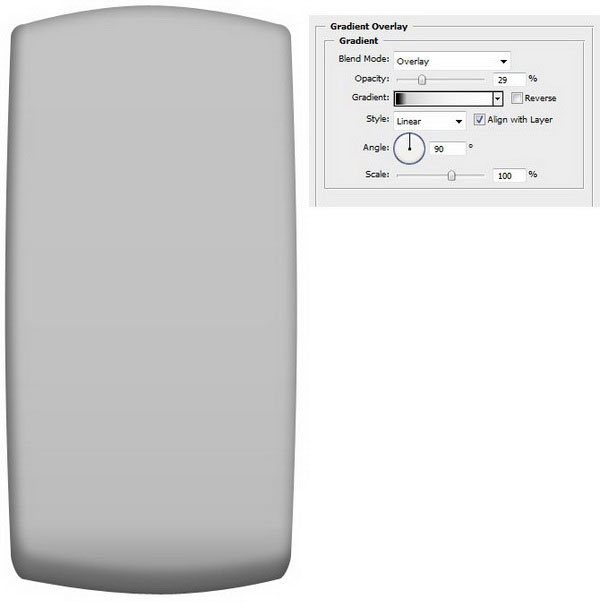
After creating the base shape, we need to add some layer styles to its layer to give it a realistic look. We will add an Inner Shadow, an Inner Glow, and a Gradient Overlay. These layer styles will add a 3D effect onto the shape.
To apply layer styles, double-click on the layer in the Layers Panel, which should open the Layer Styles dialog window.
Inner Shadow
Inner Glow
Gradient Overlay
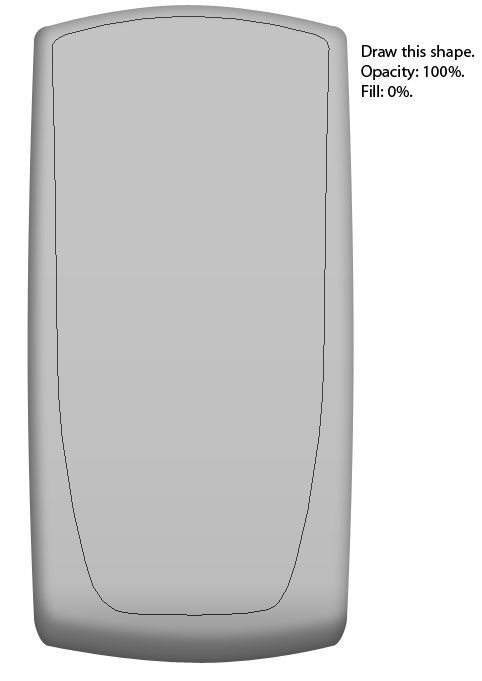
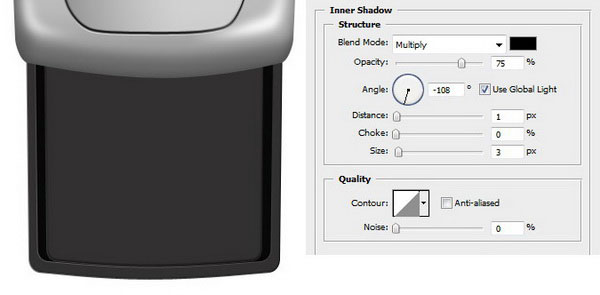
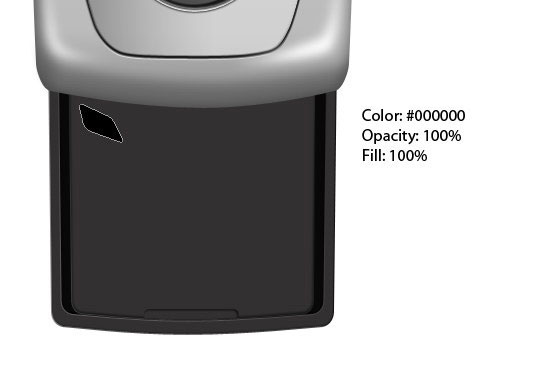
Step 4: Draw the Inner Area of the Cell Phone
Use Rounded Rectangle Tool (U) combined with the Free Transform command to draw the inner shape. Use the same technique that we used for drawing the base shape. Make sure to remove the fill of this shape by right-clicking inside of its path on your canvas, choosing Blending Options from the contextual menu, then under Advanced Blending, lowering the Fill Opacity to 0%.
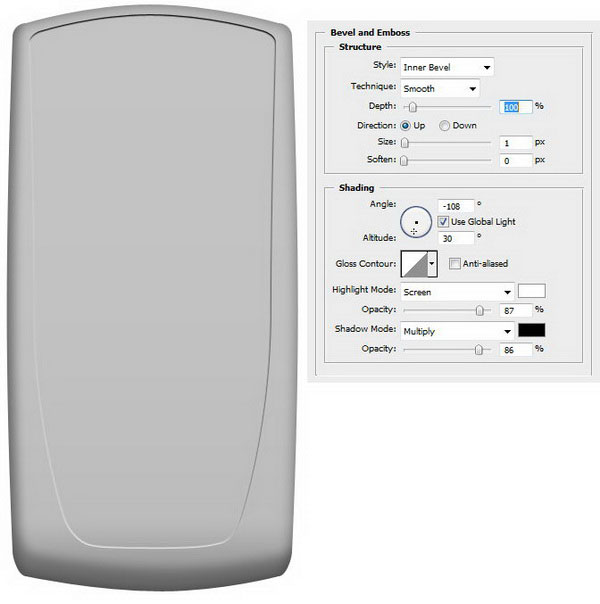
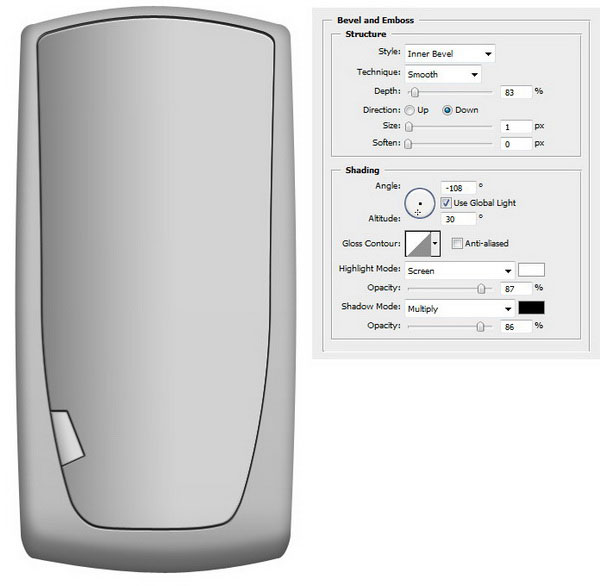
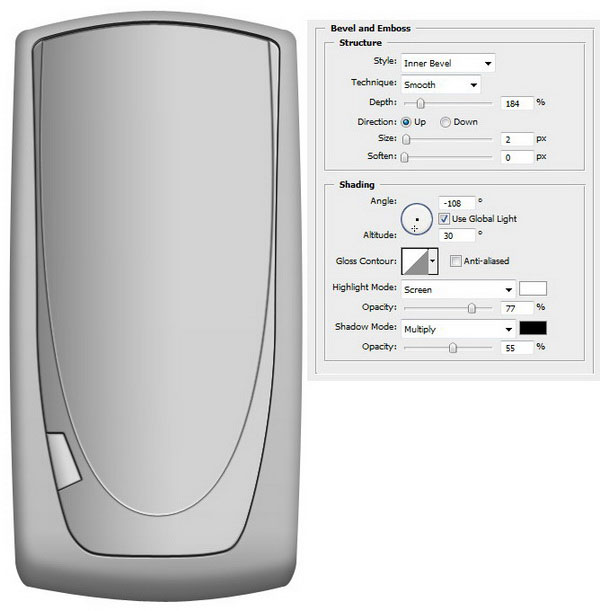
We will make it look as if the inner area is pressed down into the base shape.
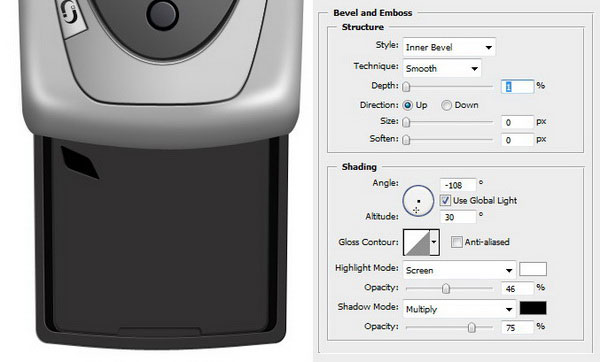
We can do this by giving its layer a Bevel and Emboss layer style and a Gradient Overlay layer style.
Bevel and Emboss
Gradient Overlay
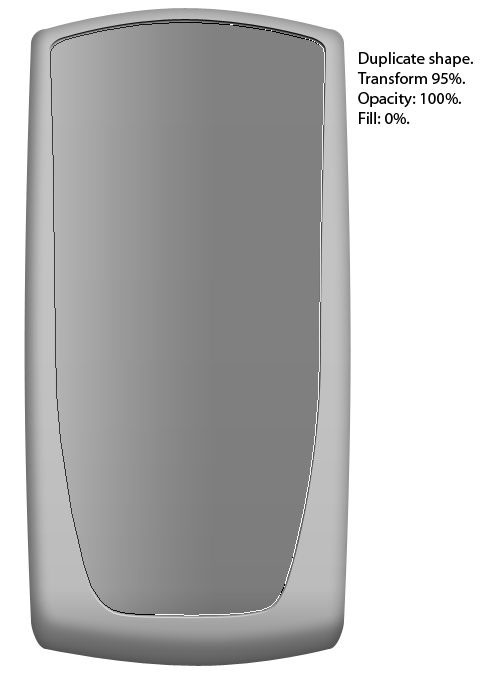
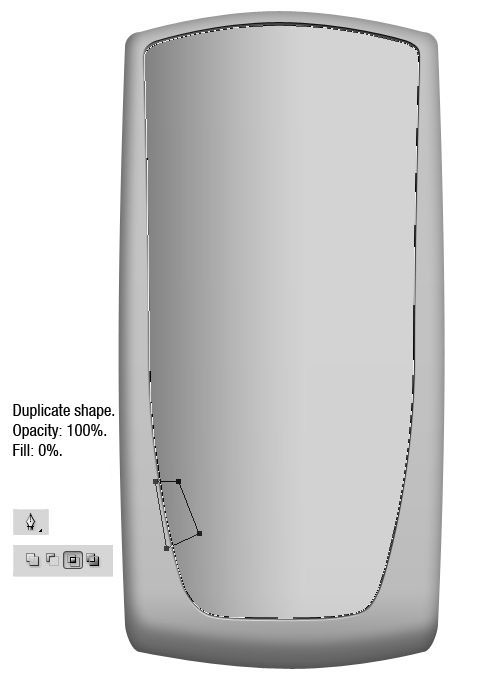
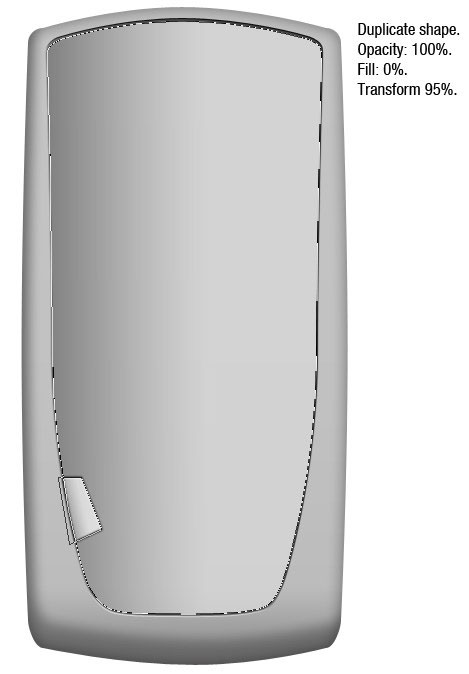
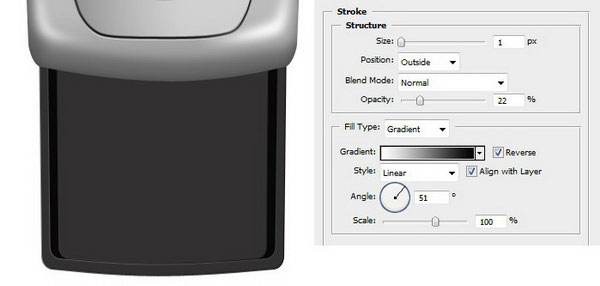
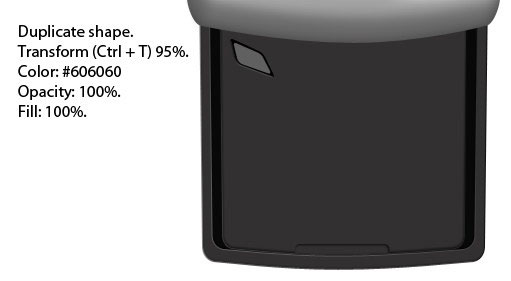
Step 5: Duplicate the Inner Shape
Duplicate the shape we have just created by selecting it in the Layers Panel and then pressing Ctrl/Cmd + J. Scale it down to 95% of its original size using Edit > Transform Path > Scale. You can also do this freehand using Free Transform (Ctrl/Cmd + T), it’s up to you how accurate you want to be.
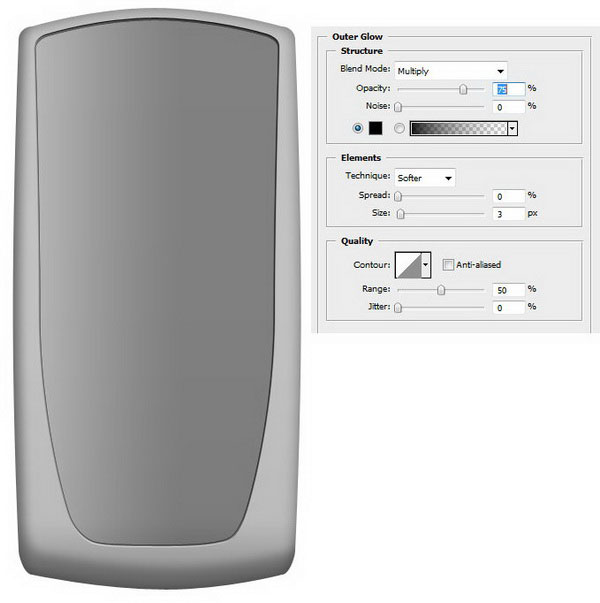
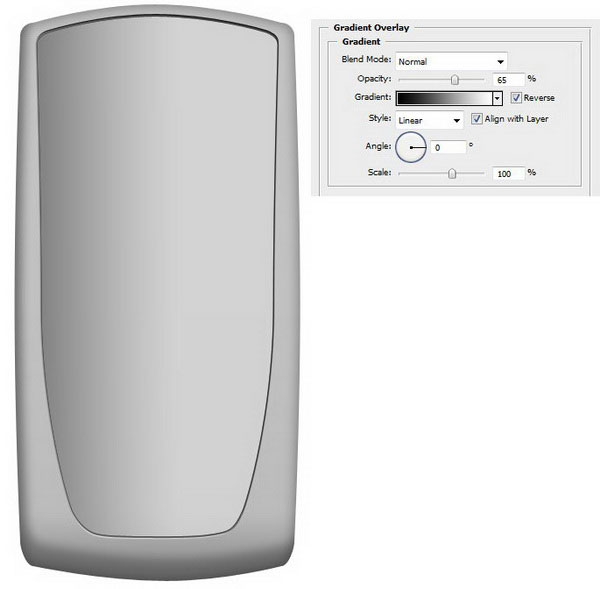
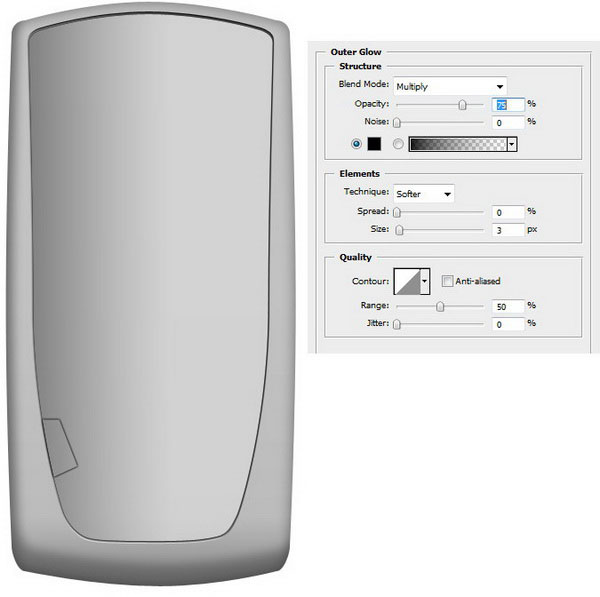
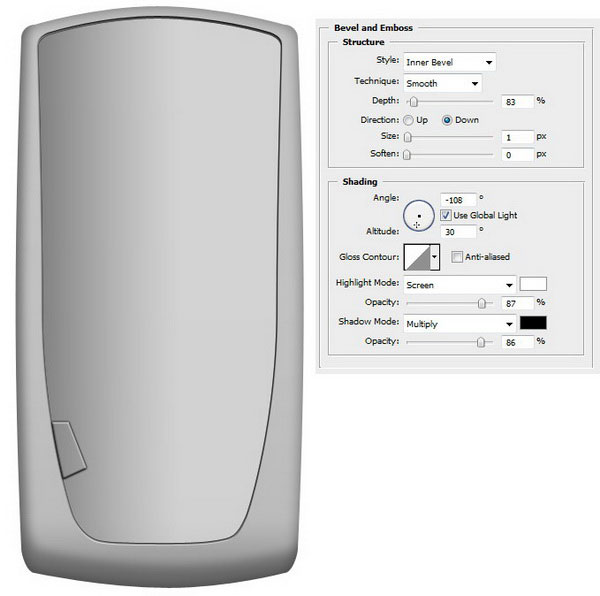
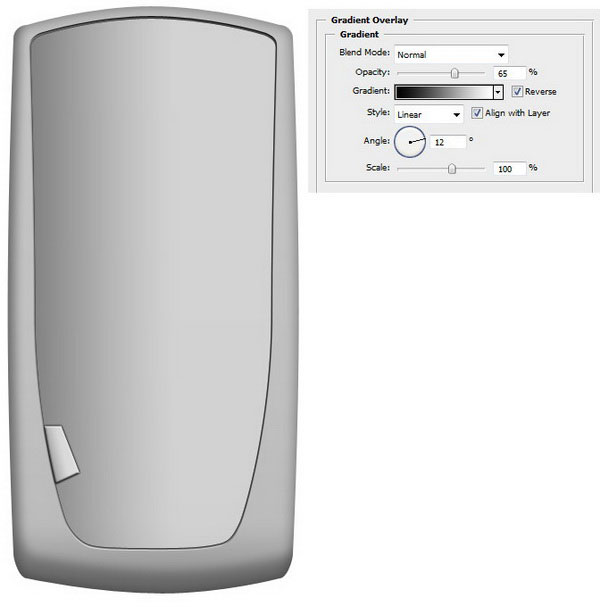
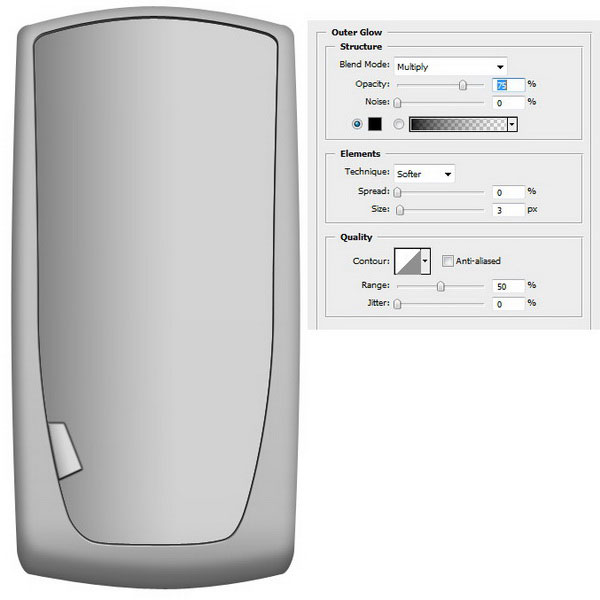
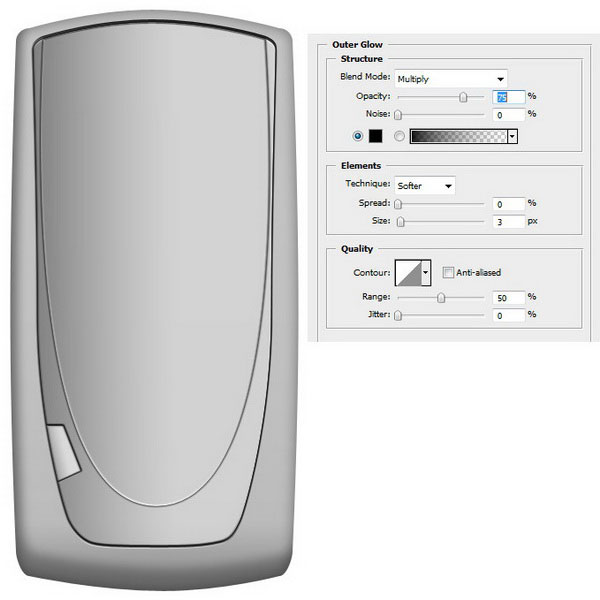
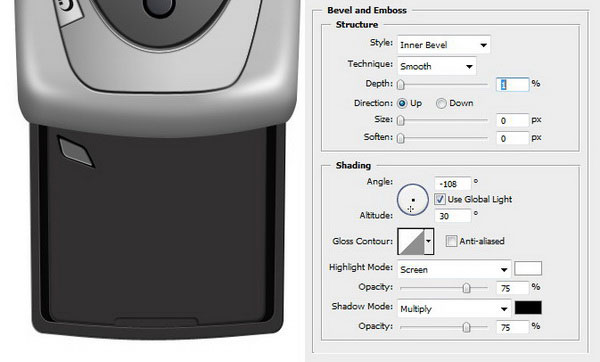
Give our duplicated inner shape an Outer Glow and a Gradient Overlay (you know the drill by now).
Make sure to adjust the layer styles’ options to match the direction of our light source.
Outer Glow
Gradient Overlay
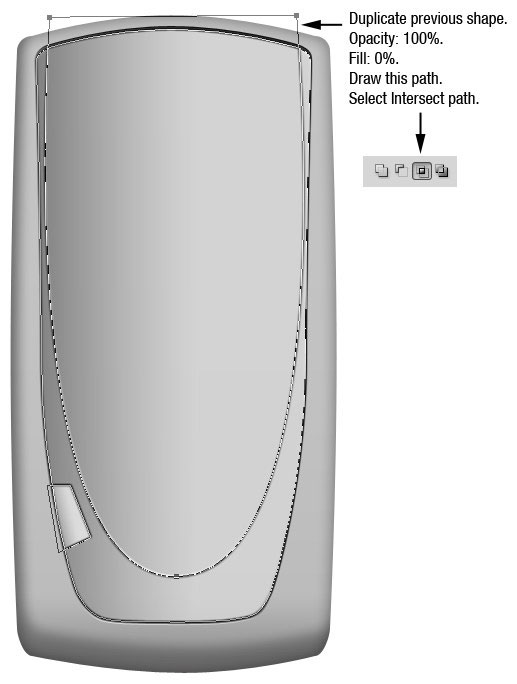
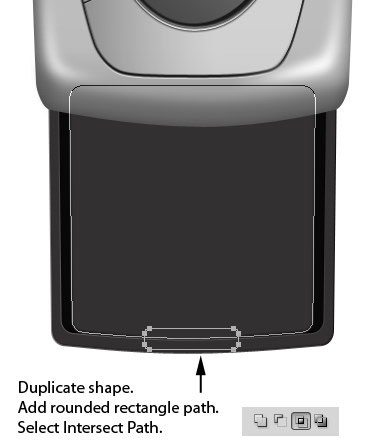
Step 6: Create the Right Button
Duplicate the shape layer (Ctrl/Cmd + J) we just made. Use the Pen Tool (P), but switch the mode to Paths and utilize the Intersect path areas option in the Options Bar (this saves us from having to be very accurate on the edge of the inner shape).
With the Pen Tool, draw a path that represents the right button on the most recently duplicated layer.
Next, apply an Outer Glow, a Bevel and Emboss, and a Gradient Overlay.
Outer Glow
Bevel and Emboss
Gradient Overlay
Step 7: Duplicate the Button
Duplicate the button shape. Use Free Transform on it by hitting Ctrl/Cmd + T.
Inside the transform control box, right-click and then choose Scale from the menu. Change the size of the duplicated button to 95%.
On the duplicated button that we scaled down, add an Outer Glow layer style and a Bevel and Emboss layer style.
Outer Glow
Bevel and Emboss
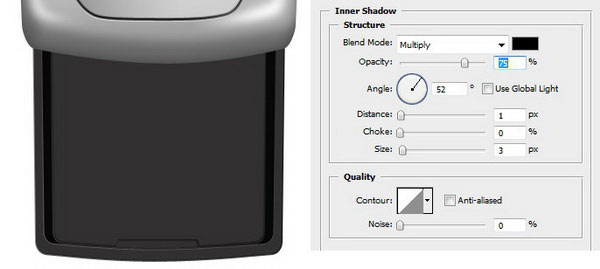
Step 8: Create the Second Inner Shape
Remember the first inner layer we created? Duplicate that layer.
With the Pen Tool (P), draw a path that arcs, and make sure that the Intersect path areas option for the Pen Tool is selected.
Give the second inner area an Outer Glow layer style and a Bevel and Emboss layer style.
Outer Glow
Bevel and Emboss
Step 9: Duplicate the Second Inner Shape
Again, duplicate the previous shape and scale its size down to 99%. Set its fill color to black (#000000) and lower its Fill Opacity to 40% so that it appears darker than its background but also lets the gradient overlay of the shape below it show through.
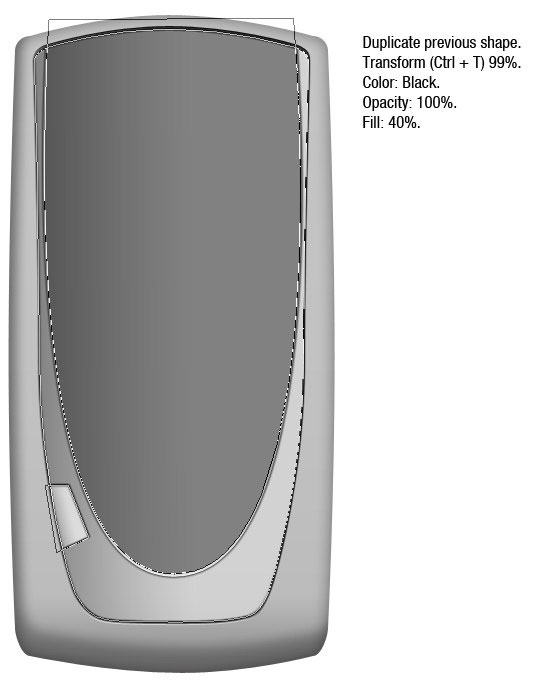
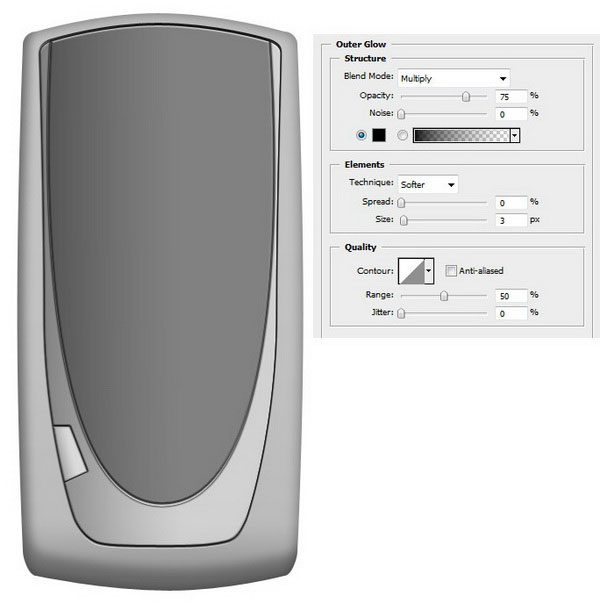
Give the duplicated shape a Bevel and Emboss and an Outer Glow.
Bevel and Emboss

Outer Glow
Step 10: Create the Background of the Center Buttons
Next up, we will need to create an area at the bottom of the second inner shape for the main mobile phone buttons. First, duplicate the shape from the previous step.
Use the Rectangle Tool (U) to make rectangular path at the bottom (remember to select the Intersect path areas option).
Set the color of this path to black and make sure that it has 100% Opacity and 100% Fill.

Give this shape a Bevel and Emboss layer style.
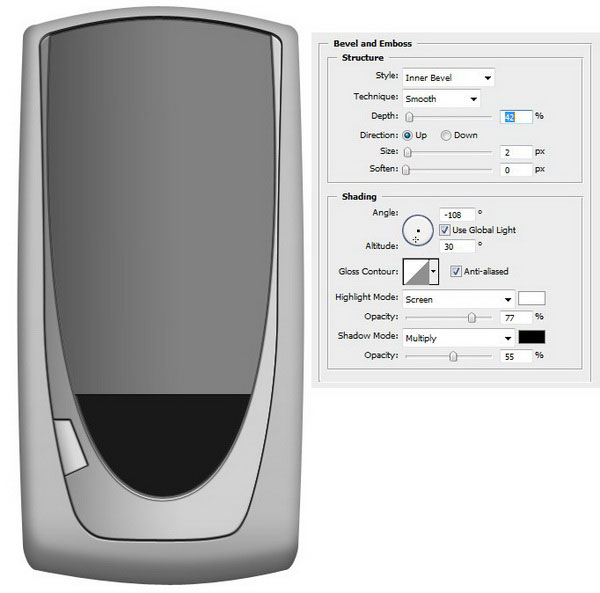
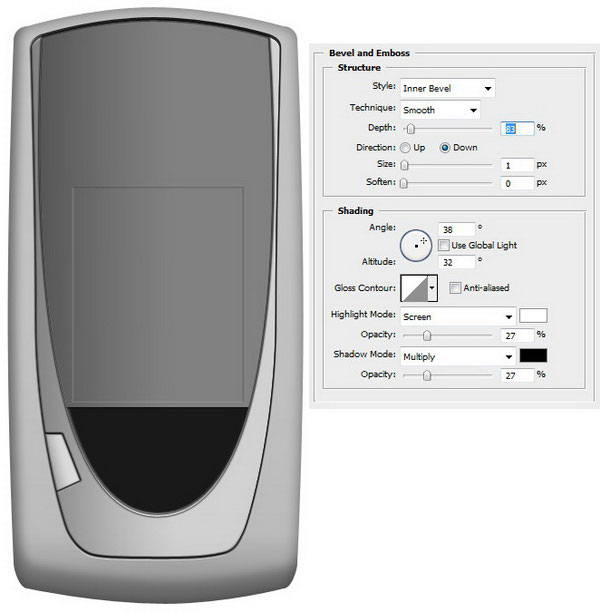
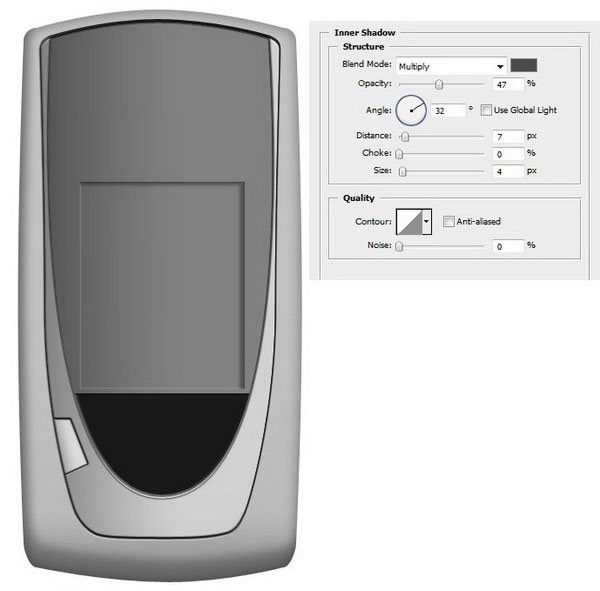
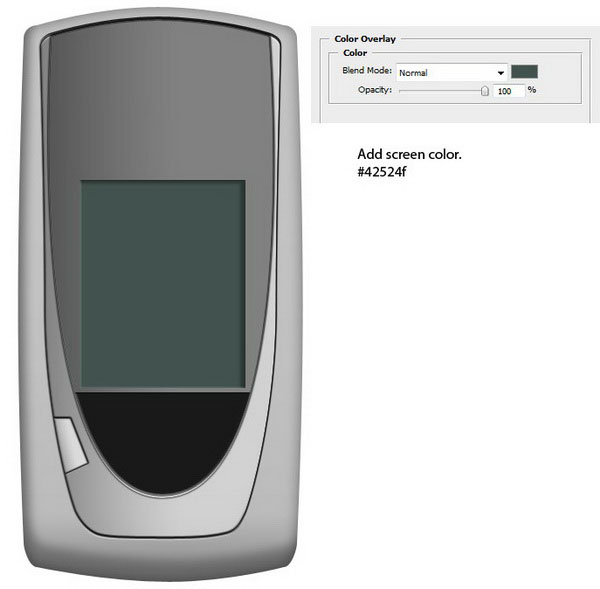
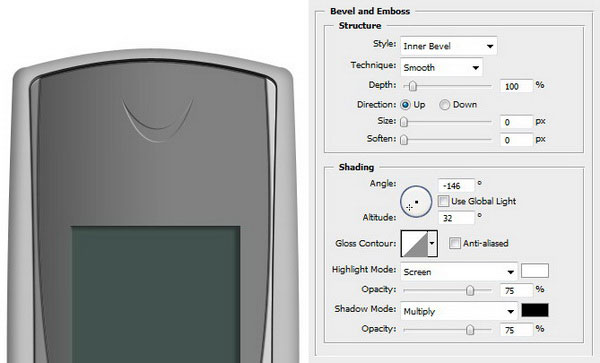
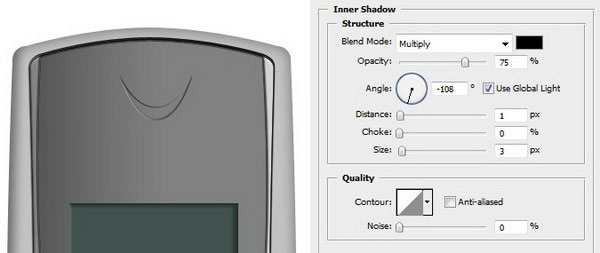
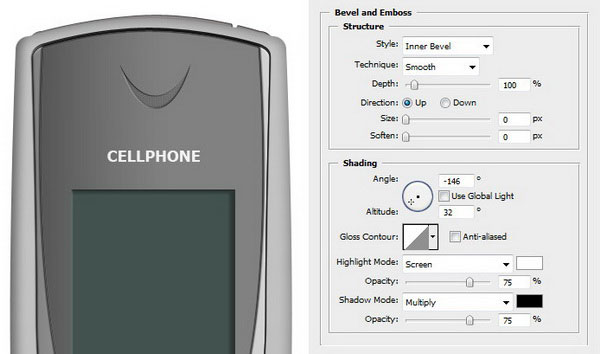
Step 11: Create the Cell Phone’s Screen
Use Rectangle Tool to draw the screen’s shape. It shouldn’t have a fill color.

Give it three layer styles: Bevel and Emboss, Inner Shadow, and Color Overlay.
Bevel and Emboss
Inner Shadow
Color Overlay
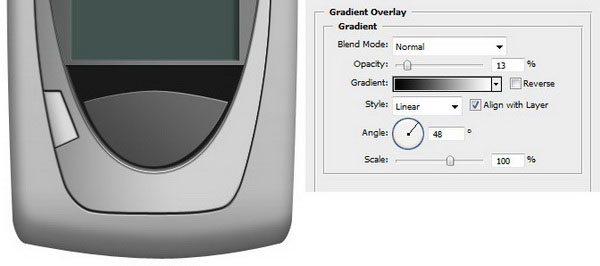
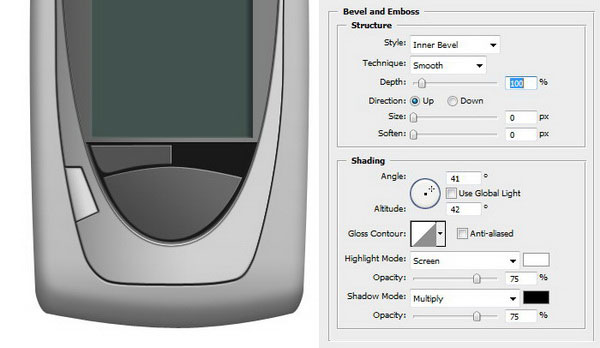
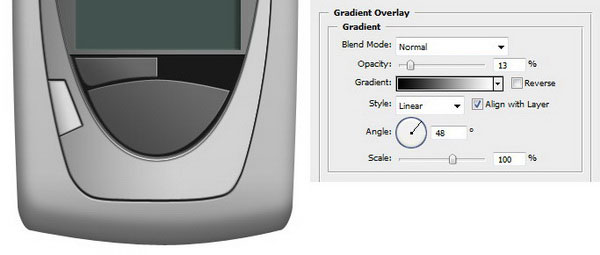
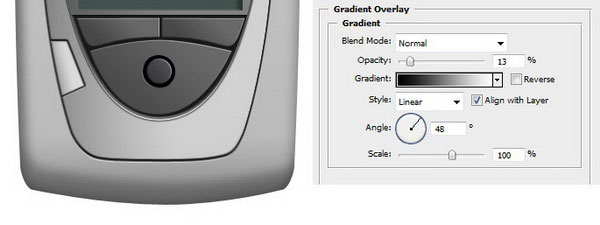
Step 12: Draw the Main Button
Draw an arced shape with the Pen Tool as shown below.

Give this shape a Bevel and Emboss layer style and a Gradient Overlay layer style.
Bevel and Emboss

Gradient Overlay
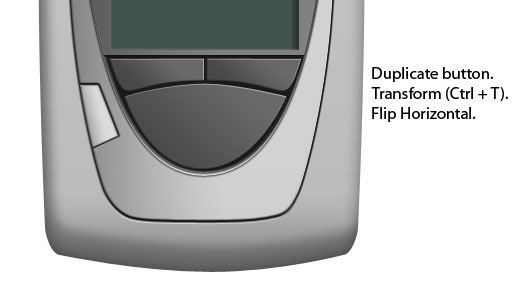
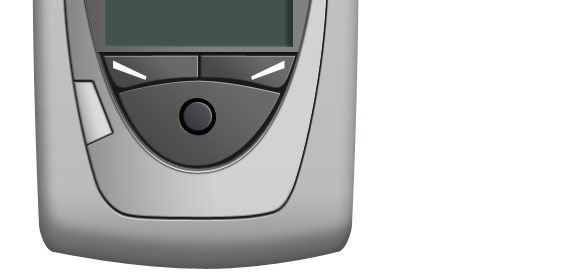
Step 13: Draw the Left Button
Above the main button, create another button shape.

We will use the same layer styles as with the main button (Bevel and Emboss and Gradient Overlay).
Bevel and Emboss
Gradient Overlay
Step 14: Create the Right Button
Just duplicate the left button, hit Ctrl/Cmd + T to enter Free Transform, right-click inside the transform box and choose Flip Horizontal from the menu that appears. Afterwards, use the Move Tool (T) to move it to the right side.
Step 15: Draw the Joystick Navigation Background
Draw a circle shape in the middle of the main button using the Ellipse Tool (U).
Hold down Shift to make a perfect circle.
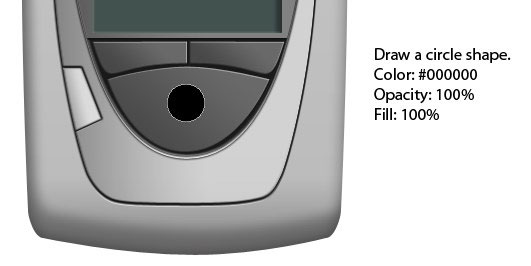
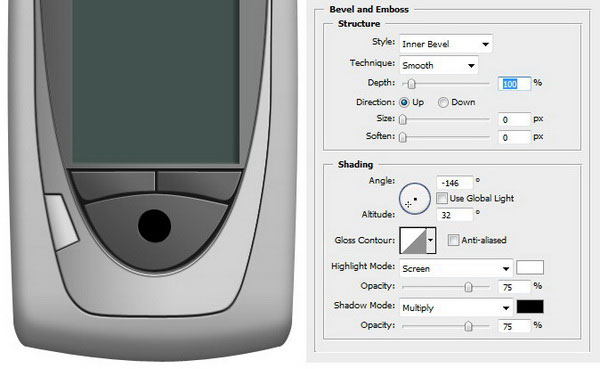
Give the joystick’s background a Bevel and Emboss layer style.
Step 16: Draw the Joystick Control
Draw another circle shape (or just duplicate the joystick background and scale it down and change its Color).
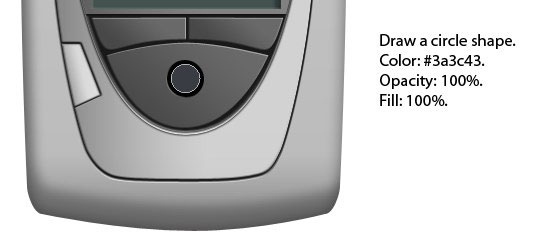
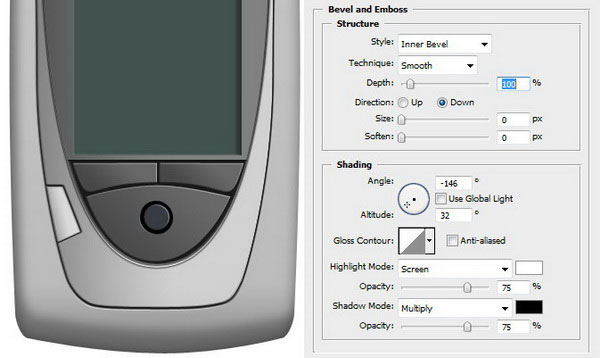
Give the joystick control a Bevel and Emboss and a Gradient Overlay.
Bevel and Emboss
Gradient Overlay
Step 17: Draw the Button Icons
Just draw a simple polygonal shape on each button using the Pen Tool (P). Feel free to replace them with a shape of your own.
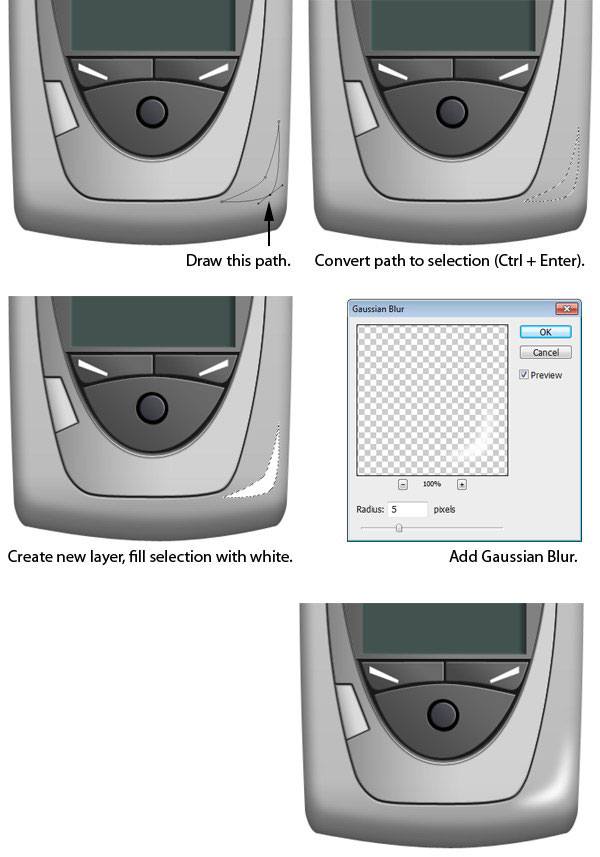
Step 18: Draw a Bottom Corner Highlight
The cell phone shape is very flat at the moment; we will fix that by adding some highlights and shadows. Draw a path for the highlight on bottom right corner.
Convert this path into a selection by right-clicking inside the path and choosing Make Selection (or just press Ctrl/Cmd + Enter).
Create new layer and fill (Edit > Fill or Shift + F5) your selection with white (#ffffff) on this new layer.
Deselect your selection (Ctrl/Cmd + D) and then apply a Gaussian blur filter (Filter > Blur > Gaussian blur) with a Radius of 5px.
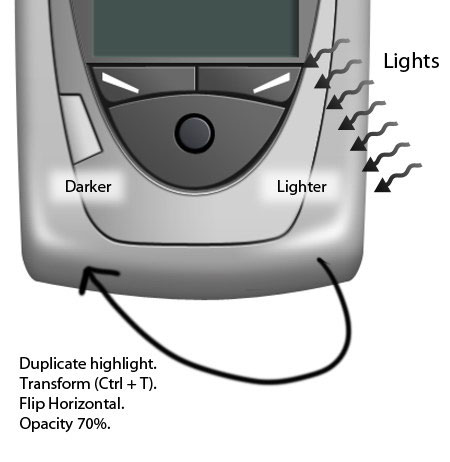
Step 19: Create the Left Bottom Corner Highlight
Just duplicate the highlight layer we just drew and flip it horizontally (Edit > Transform > Flip Horizontal). Place the flipped highlight on the opposite side using the Move Tool (V).
We must remember that our light source is from the top right, so the highlight on left side should not be as strong as the right side. To lower its brightness, simply reduce the layer’s Opacity to 70%.
Step 20: Create a Dark Spot on the Left Corner
Create a new layer for the dark spots on the bottom corners.
Use the Brush Tool (B) to paint a dark spot on bottom left corner and reduce the layer’s Opacity to around 20%.
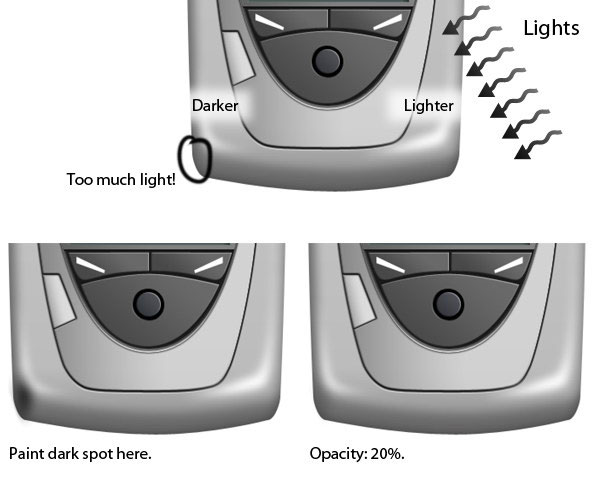
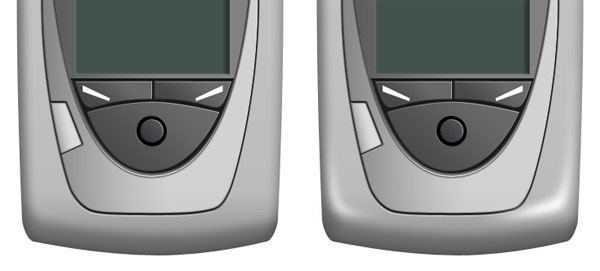
Below, you can see the difference before and after the highlights and shadow. These small and subtle details add big differences to the realism of our work.
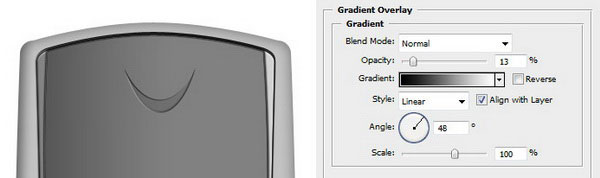
Step 21: Draw the Speaker
Draw a sort of half-moon shape for the speaker using two ellipses and the Ellipse Tool (U). See the image below to guide you.
Set the Opacity to 100% and Fill to 0% and choose the Subtract from from path area option.

Give the speaker shape a Bevel and Emboss, an Inner Shadow, and a Gradient Overlay.
Bevel and Emboss
Inner Shadow
Gradient Overlay
Step 22: Create a Photoshop Pattern for the Speaker’s Fill
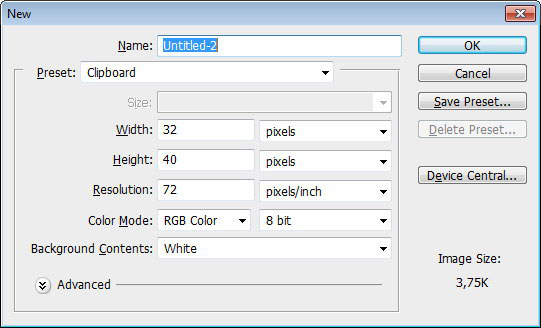
Let’s create a pattern for the inner part of the speaker. To start, create a new Photoshop document with size of 32x40px.
Use the Zoom Tool (Z) to zoom in really close to the canvas. Draw a black circle at the top right corner.

Duplicate the circle and place it on the lower left corner.
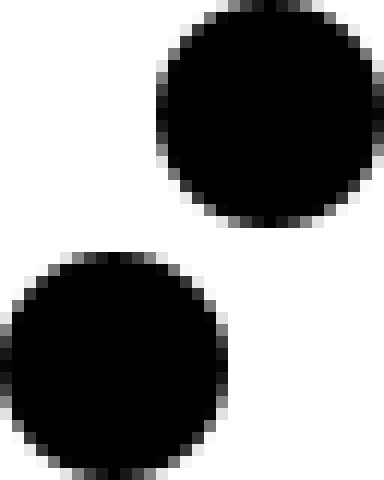
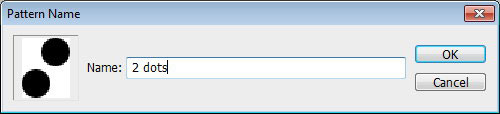
Save the pattern by selecting around the canvas (Ctrl/Cmd + A) and going to Edit > Define Pattern. I named our pattern “2 dots”, but feel free to name it anything you want.
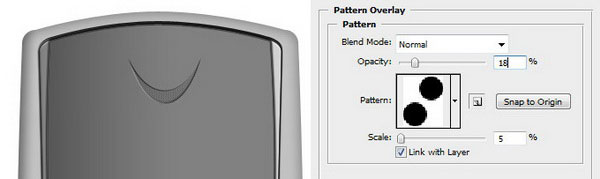
Step 23: Apply the “2 dots” Pattern
Return to speaker layer. Double-click the layer to access the Layer Styles dialog window.
Add a Pattern Overlay layer style, choosing the “2 dots” pattern we created from the Pattern dropdown menu.
Step 24: Add the Cell Phone’s Name
We won’t get fancy with our mobioe phone’s name. Just use the Horizontal Type Tool (T) to write a simple text block for the cell phone’s brand (in my case, I just called it “CELLPHONE”).
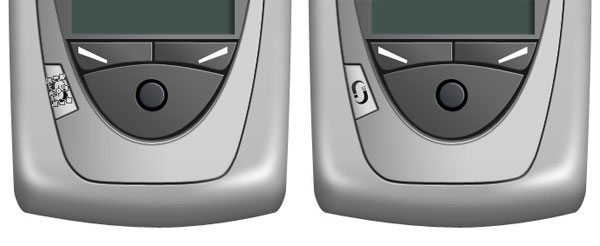
Step 25: Drawing the “Connectivity” Icon
Remember the button we drew on the left side of the phone? We’ll revisit it and give it an icon.
Start by creating a small rounded rectangle with the Rounded Rectangle Tool (U).
Duplicate the path and move it a few pixels down and right. Transform the duplicated path’s size to around 95% of the original and select the Subtract from path area option.
Then create a rectangular shape on the left side, also selecting the Subtract from path area option.
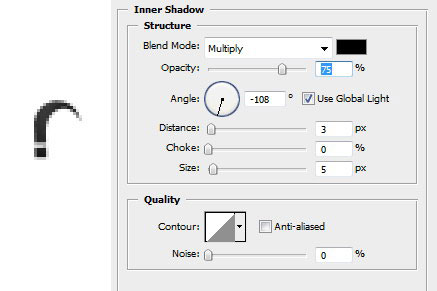
Add an Inner Shadow layer style to give the “connectivity” icon a debossed effect.
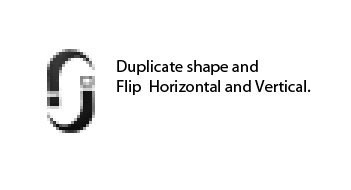
Duplicate the shape, flip it horizontally (Edit > Transform > Flip Horizontal), and then flip it vertically (Edit > Transform > Flip Vertical).
Move this button on top of the left side button. Use Free Transform to angle it appropriately.
Step 26: Draw the Power Button
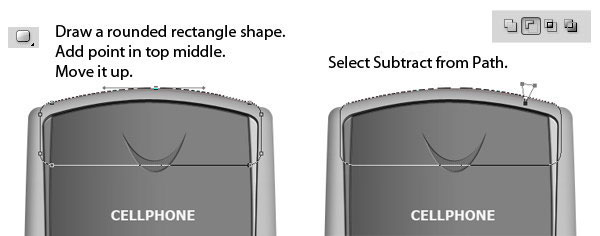
Draw a rounded rectangle with the Rounded Rectangle Tool that goes across the top of the mobile phone.
Add a new anchor point at the top middle of the rounded rectangle’s path (using the Pen Tool) and pull it up to create an arc at its middle.
Draw a triangular path and select the Subtract from path area option to make an indentation at the top of the cell phone.
Apply an Inner Shadow layer style and a Bevel and Emboss layer style to give it a 3D effect.
Inner Shadow
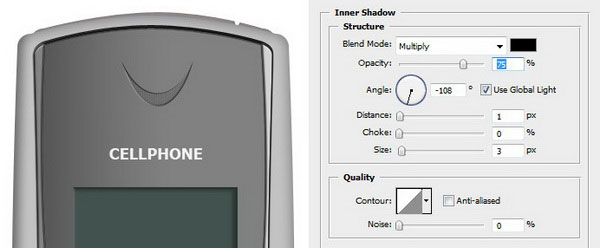
Bevel and Emboss
Step 27: Draw the Base of the Keypad
Our phone is a sliding mobile phone. When you slide it down, the keypad is revealed. Let’s draw this keypad starting with the base shape.
Use the Rounded Rectangle Tool to draw a rounded rectangle at the base of our cell phone.
Use the Pen Tool to modify the rounded rectangle’s anchor points to get the shape depicted in the image below.
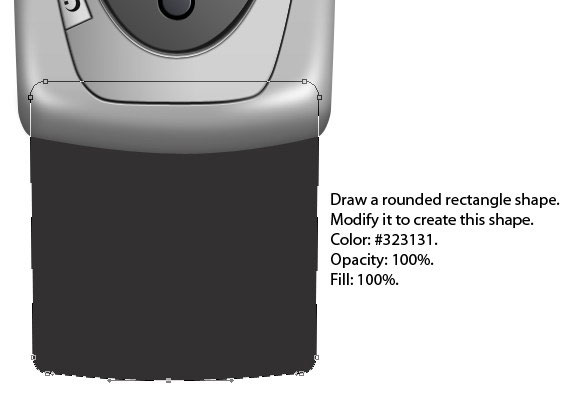
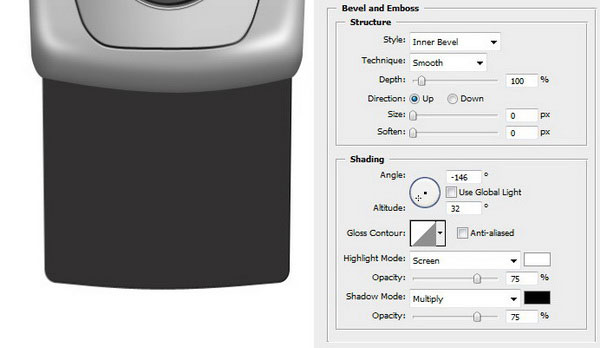
Give the shape an Inner Shadow and a Bevel and Emboss to give it a 3D effect.
Inner Shadow
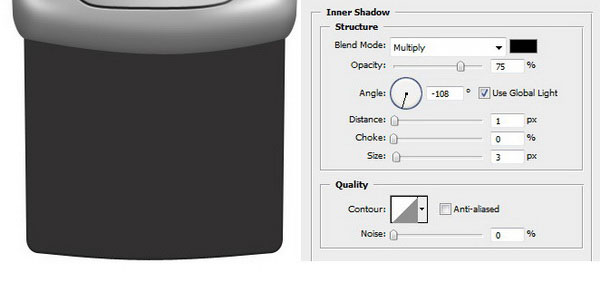
Bevel and Emboss
Step 28: Duplicate the Keypad Base Shape
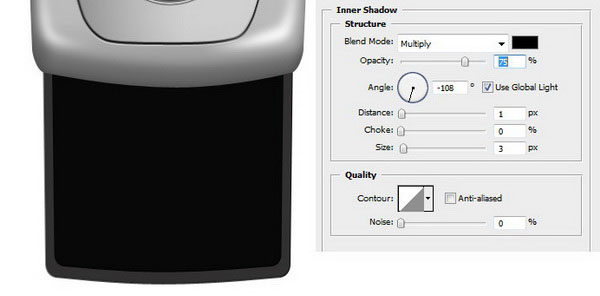
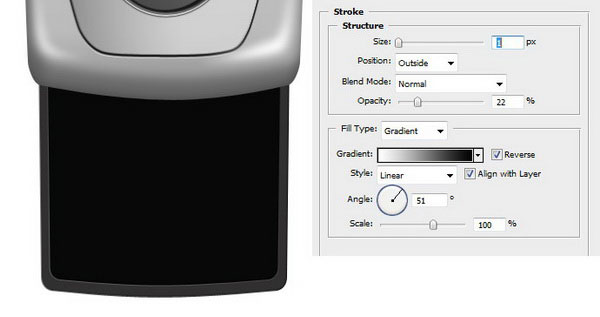
Next, we need to create the inner area of the keypad. Start by duplicating the base shape and then transforming the copy to a smaller size (about 80% of the original size). Also, change its color to #080808.
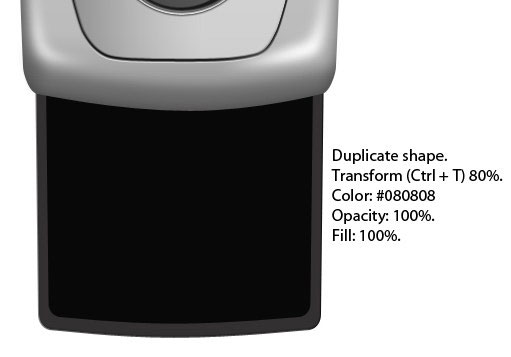
Add an Inner Shadow layer style and a Stroke layer style.
Inner Shadow
Stroke
Step 29: Create the Second Inner Shape of the Keypad
Duplicate the previous shape, then resize it down.
Change its color to #323131.
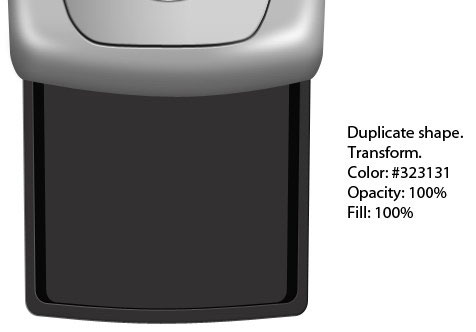
Give the second inner shape a Stroke and an Inner Shadow.
Stroke
Inner Shadow
Step 30: Draw an Indentation at the Bottom of the Keypad
Duplicate the second inner shape. Draw a rounded rectangle path at the center bottom and select the Intersect path areas option.
Give this shape an Inner Shadow to create the effect of an indentation.
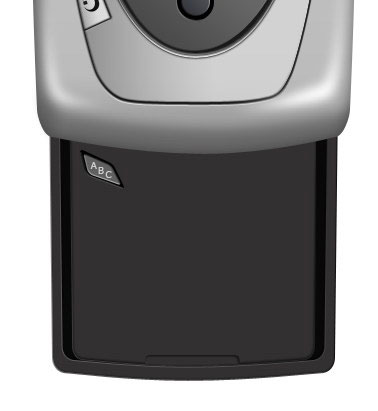
Step 31: Draw the Base of a Key
Now we need to create the keys for our key pad. Start by drawing a black rounded rectangle and modifying its anchor points with the Pen Tool until you create an irregular diamond shape.
Give this shape a Bevel and Emboss layer style.
Step 32: Create the Inner Area of the Button
Duplicate shape we just created and resize it down to 95% of the original size.
Change its color to #606060.
Add a Bevel and Emboss layer style onto it to give it a 3D effect.
Use the Horizontal Type Tool (T) to type some letters onto the key.
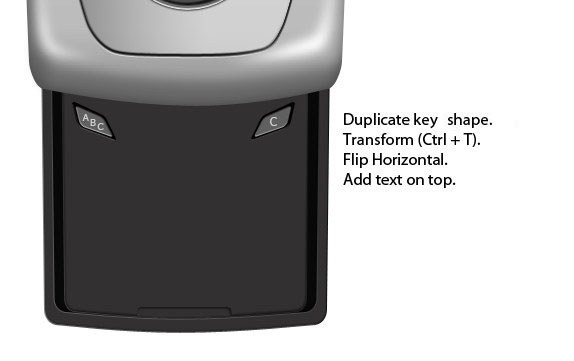
Step 33: Duplicate the Key
Duplicate shape we created, press Ctrl/Cmd + T to activate Free Transform, right-click inside the transform box, and choose Flip Horizontal. Move this to the other side of the keypad and also add a different letter using the Horizontal Type Tool (T).
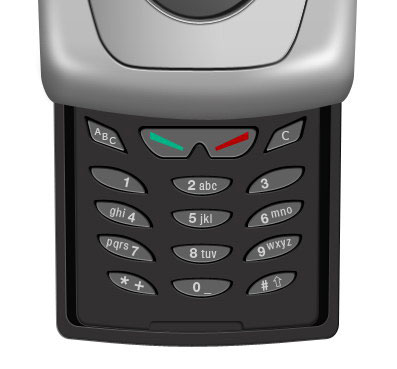
Step 34: Draw More Keys
At this point, you already know how to draw a key on our keypad, so I’ll let you use your creativity to finish it up. Use the techniques we’ve already discussed.
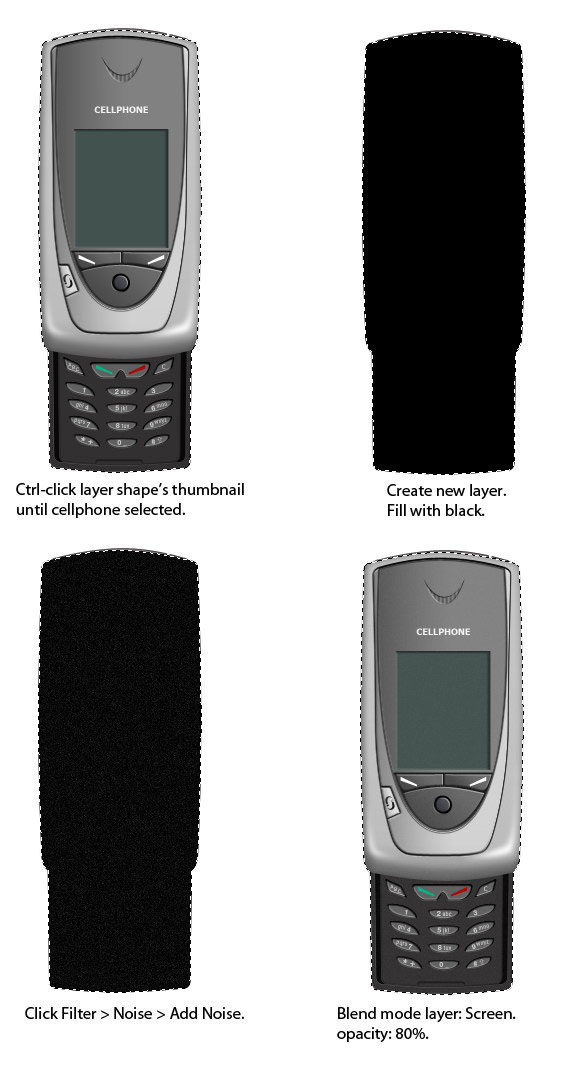
Step 35: Give the Mobile Phone a Texture
In real life, nothing’s perfect — there’s always some sort of defect on every product; whether it’s through normal wear-and-tear or a manufacturer’s shortcomings, cell phones will always have imperfect surfaces.
To make our work as realistic as possible, we need to add these flaws to our design.
Hold down Ctrl/Cmd and click every layer’s thumbnail in the Layers Panel until the cell phone has a selection around it.
Create a new layer above all the other layers and fill it (Shift + F5) with black (#000000).
Choose Filter > Noise > Add Noise.
After applying the filter, switch the Blend Mode to Screen and reduce the layer’s Opacity to 80%.
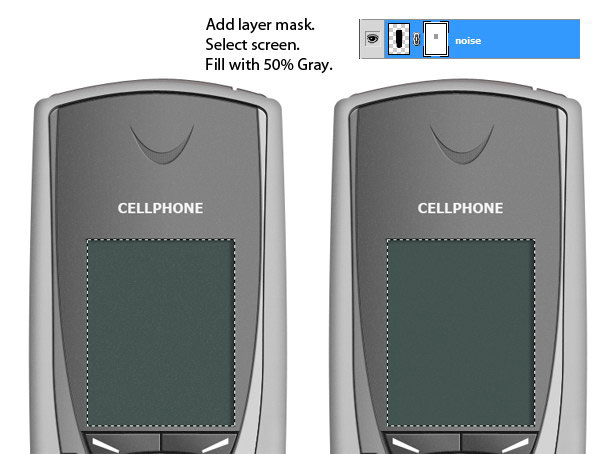
Step 36: Reduce the Noise on the Mobile Phone’s Screen
We don’t need the noise texture to be too — shall we say, “noisy” — on our mobile phone’s screen.
To do this, make sure to select the noise layer and then click on the Add layer mask icon at the bottom of the Layers Panel. Use the Rectangular Marquee Tool (M) to create a selection of the mobile phone’s screen. Go to Edit > Fill and in the Use option, pick 50% Gray.
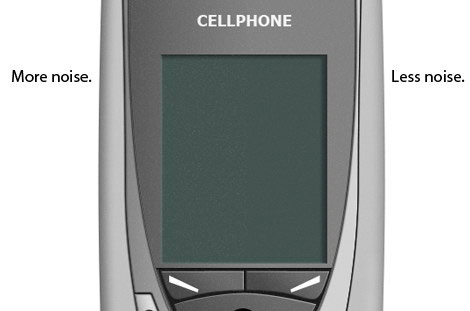
In image below, we can view the difference before and after we remove some of the noise.
The difference is subtle, yet important.
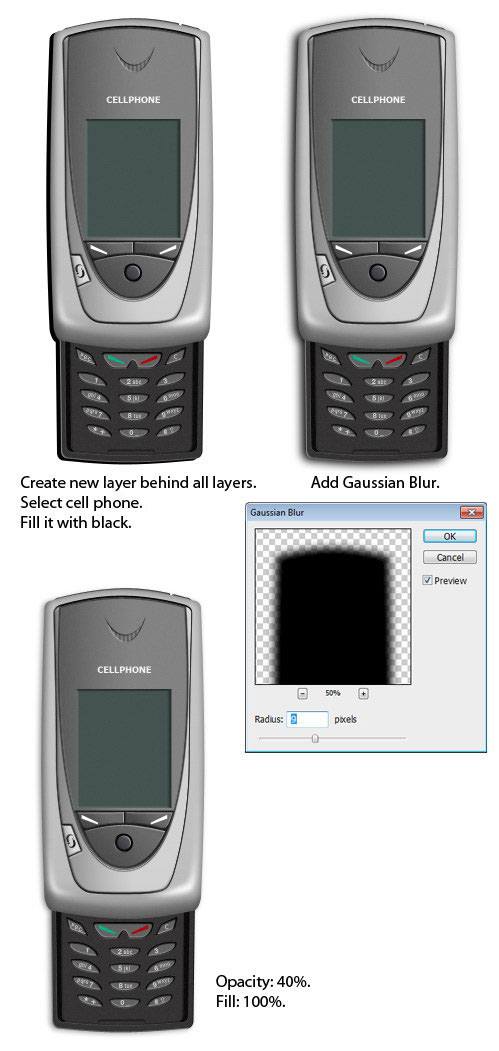
Step 37: Create a Drop Shadow
Create a new layer and place it behind all the other layers in the layer stacking order. Select the cell phone again using the method we discussed previously.
Fill the selection on the new layer with black.
Use the Move Tool (V) to shift the filled selection down and left (because our light source is from the top right corner).
Go to Filter > Blur > Gaussian Blur with Radius at around 9px. Then, reduce the layer’s Opacity to 40%.
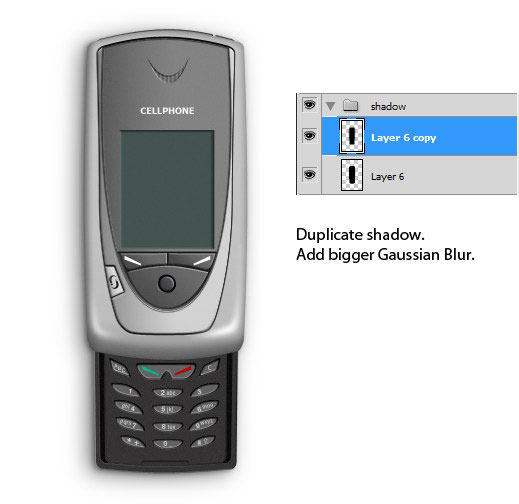
Step 38: Finish up the Drop Shadow
This is the final step we need to accomplish.
The shadow will cast a softer drop shadow on the floor. To do this, we just need to duplicate the previous shadow we created and apply another Gaussian Blur filter on it using a bigger Radius value.
Tutorial Summary
In this tutorial, we created a realistic cell phone completely from scratch using shape tools, the Pen Tool, and plenty of layer styles. I hope these techniques have imparted a few tips to you that you can incorporate into your workflow when drawing your own realistic products.
Download Source Files
- realistic_cellphone_design (ZIP, 0.77 MB)
-
 Trevin serves as the VP of Marketing at WebFX. He has worked on over 450 marketing campaigns and has been building websites for over 25 years. His work has been featured by Search Engine Land, USA Today, Fast Company and Inc.
 -

WebFX is a full-service marketing agency with 1,100+ client reviews and a 4.9-star rating on Clutch! Find out how our expert team and revenue-accelerating tech can drive results for you! Learn more
Make estimating web design costs easy
Website design costs can be tricky to nail down. Get an instant estimate for a custom web design with our free website design cost calculator!
Try Our Free Web Design Cost Calculator
Table of Contents
- Preview
- Step 1: Determining the Light Source
- Step 2: Drawing the Base Shape
- Step 3: Adding Layer Styles for a 3D Effect
- Step 4: Draw the Inner Area of the Cell Phone
- Step 5: Duplicate the Inner Shape
- Step 6: Create the Right Button
- Step 7: Duplicate the Button
- Step 8: Create the Second Inner Shape
- Step 9: Duplicate the Second Inner Shape
- Step 10: Create the Background of the Center Buttons
- Step 11: Create the Cell Phone’s Screen
- Step 12: Draw the Main Button
- Step 13: Draw the Left Button
- Step 14: Create the Right Button
- Step 15: Draw the Joystick Navigation Background
- Step 16: Draw the Joystick Control
- Step 17: Draw the Button Icons
- Step 18: Draw a Bottom Corner Highlight
- Step 19: Create the Left Bottom Corner Highlight
- Step 20: Create a Dark Spot on the Left Corner
- Step 21: Draw the Speaker
- Step 22: Create a Photoshop Pattern for the Speaker’s Fill
- Step 23: Apply the "2 dots" Pattern
- Step 24: Add the Cell Phone’s Name
- Step 25: Drawing the "Connectivity" Icon
- Step 26: Draw the Power Button
- Step 27: Draw the Base of the Keypad
- Step 28: Duplicate the Keypad Base Shape
- Step 29: Create the Second Inner Shape of the Keypad
- Step 30: Draw an Indentation at the Bottom of the Keypad
- Step 31: Draw the Base of a Key
- Step 32: Create the Inner Area of the Button
- Step 33: Duplicate the Key
- Step 34: Draw More Keys
- Step 35: Give the Mobile Phone a Texture
- Step 36: Reduce the Noise on the Mobile Phone’s Screen
- Step 37: Create a Drop Shadow
- Step 38: Finish up the Drop Shadow
- Tutorial Summary
- Download Source Files
Share this article


Web Design Calculator
Use our free tool to get a free, instant quote in under 60 seconds.
View Web Design Calculator
Make estimating web design costs easy
Website design costs can be tricky to nail down. Get an instant estimate for a custom web design with our free website design cost calculator!
Try Our Free Web Design Cost Calculator