- Home
- Blog
- Web Design
- Surreal Train Cabin Photo Manipulation with Photoshop
Surreal Train Cabin Photo Manipulation with Photoshop
-
 11 min. read
-
 Trevin Shirey
 VP of Marketing
- Trevin serves as the VP of Marketing at WebFX. He has worked on over 450 marketing campaigns and has been building websites for over 25 years. His work has been featured by Search Engine Land, USA Today, Fast Company and Inc.
Preview
Click on the image below to view the full size. 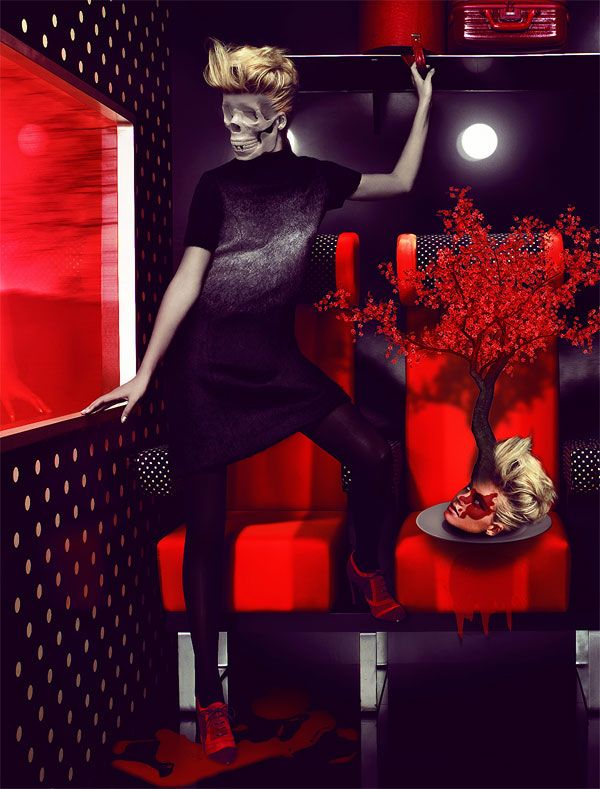
Resources
- advertising image_03 by cybaBABE (free)
- Skull Reference Photos by Jimiyo (free)
- plate_02 by twodoubleu-stock (Read personal stock rules)
- Cherry Tree 2 by Mark Douglas (Read personal stock rules)
- Shad0ws Blood Brush Set by James Rushforth (Read personal stock rules)
Step 1: Prepare your Photoshop canvas
Download and open the image called advertising image_03—which features a woman standing in a train cabin—in Photoshop. Select the whole canvas (Ctrl/Cmd + A) and copy it (Ctrl/Cmd + C). Now open a new canvas (Ctrl/Cmd + N), make sure that Background Contents is (always) set to Transparent.
The width and height of the new canvas should automatically be filled in for you, using the dimensions of the image in your clipboard. Press OK and then paste your copied image (Ctrl/Cmd + V) onto the new canvas. 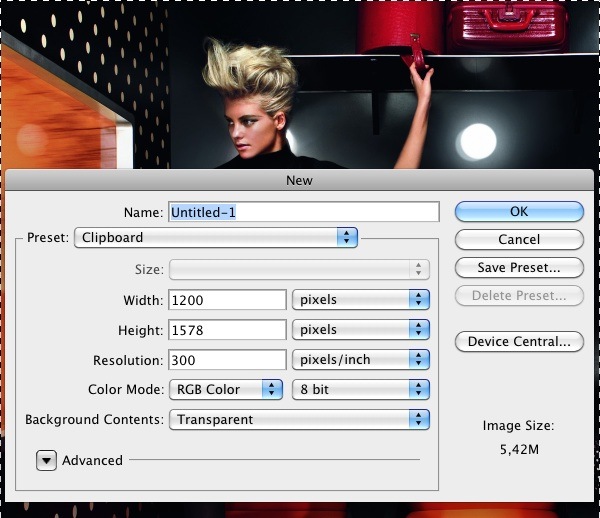
Step 2: Add the skull into the composition
Open the Skull Reference Photos in Photoshop.
Choose a skull that will fit in the right angle. Paste your skull into the image and resize it (Ctrl/Cmd + T) until you feel that it fits. Next, lower the opacity of the skull layer until you can see the head.
In this case, 60% opacity was enough for me. Now take out the Eraser Tool (E) and choose a round, soft brush (70px and 0% hardness). Erase all parts of the skull that go off the skin.
Afterwards, change the opacity of the layer back to 100% afterwards. 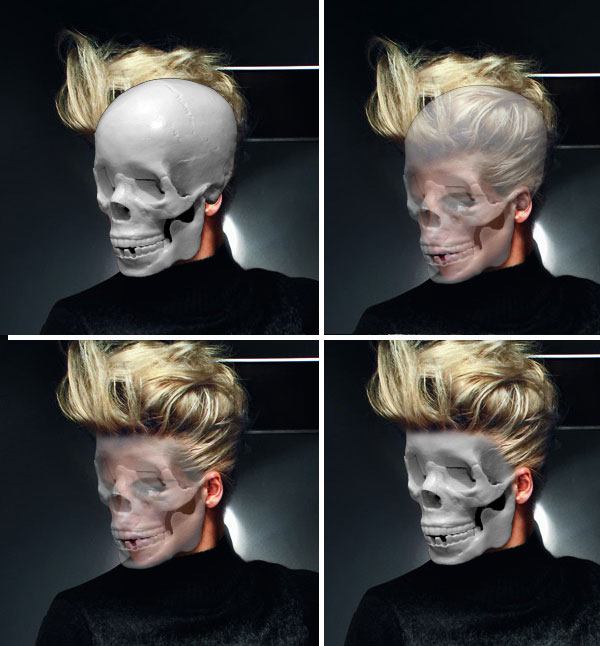
Step 3: Color in the skin of the subject
In order to make this a little bit more realistic, I decided to color the whole skin grey, just like the skull. Take the Eyedropper Tool (I) and sample a color from the skull; the sample I got was #b8b8b8.
Next, take out the Brush Tool (B) and use the same options as before (70px and 0% hardness). Create a new layer and brush over the skin. After you finished this, change the layer’s blending mode to Color.
The brushing does not have to be perfect (unless you’re a perfectionist); the imperfections can add a uniqueness to your composition. I also brushed on both her legs, because there are skin-like colors there too. 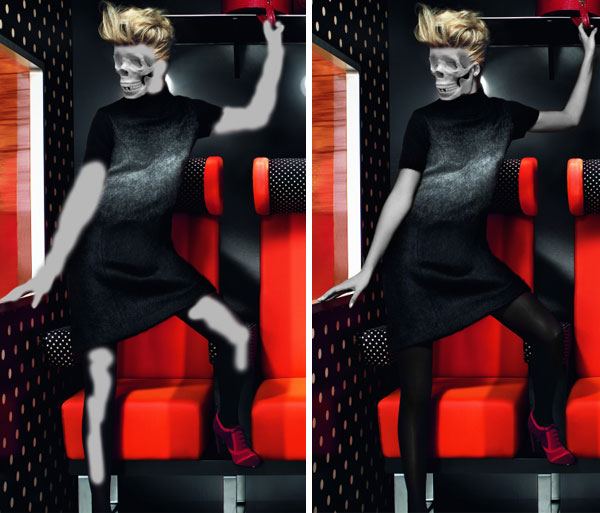
Step 4: Add a subtle shadow on the model’s forehead
After this, I decided to give the model a faint and understated shadow on her forehead.
To do this, just keep your brush settings the same as in previous steps, create a new layer, and brush on the new layer with a dark (black works) color. Then, turn the layer’s opacity down slowly until you get down to a value that looks good to you. 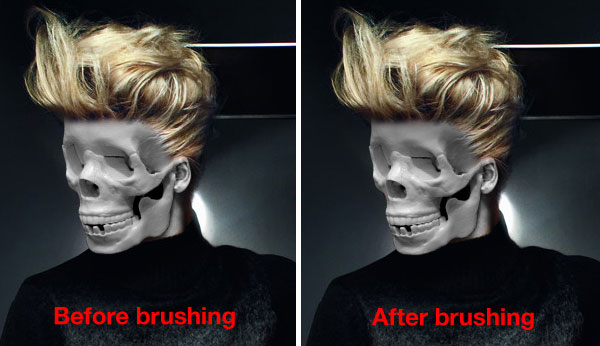
Step 5: Add the plate to the scene
Open the image of the plate_02 in Photoshop.
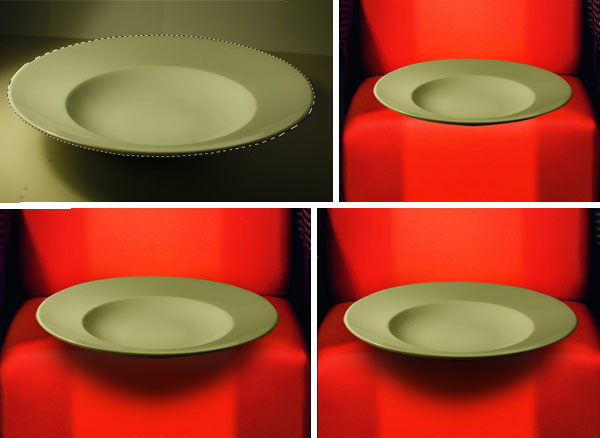
Take out your Polygonal Lasso Tool (L) and create a lasso selection around the plate. Copy and paste it into your canvas and resize it as desired. Create a layer beneath it and brush again with a soft, round black brush to make shadows.
Lower the opacity of the layer—my choice was 72%. Make a new layer and brush right below the plate where the shadows should stronger. Also, lower the opacity of this layer to about 52% to reduce the intensity of the shadow.
Step 6: Correct the color of the plate
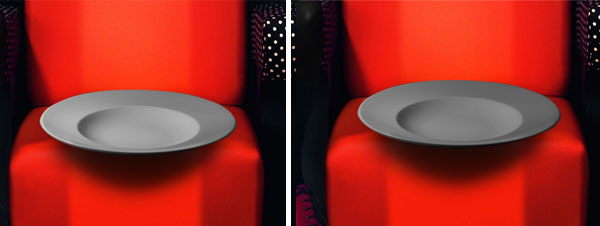
Since the yellowish color of the plate does not fit in with the rest of our composition, I made a new layer on top of it, and then created clipping mask (Ctrl/Cmd + Alt + G) so that we can adjust the color. Fill (G) the clipping mask layer with the color you used to color the skin (#b8b8b8). After filling the clipping mask, change the layer’s blending mode to Color.
Duplicate this layer and make another a clipping mask. This time change the layer’s blending mode to Multiply and lower the opacity to 21%. We’re doing this to darken the plate a bit.
Step 7: Put the head on a platter
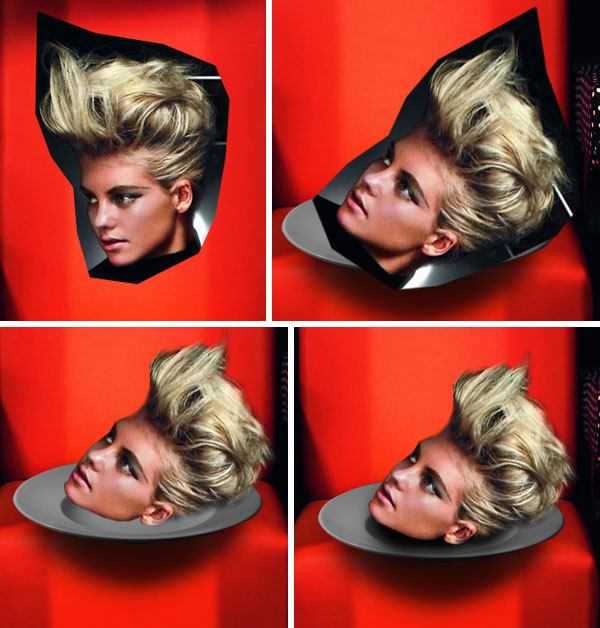
Next, we need the head. Trace around the head of our subject with your Polygonal Lasso Tool from the original image, and copy and paste it to our scene. Change the angle of the head by pressing Ctrl/Cmd + T to activate the Free Transform command, and then tilting the head so that the subject’s face is facing upward.
Now take out your Eraser (E) and remove all parts of the model’s head that you do not want to have using the Brush Tool (B) and a soft, round brush. Just as before, make a new layer beneath the head and brush some shadows onto the head. This time I did not lower the opacity, but depending on your brush strokes and preference, you may wish to lower the layer opacity.
Step 8: Color the subject’s pupils
This process is for detail-lovers. For the subject’s eyes, take the same color (#b8b8b8) from the coloring in of the skin in the earlier part of this tutorial, and brush on top of the pupils with a small, soft brush. Lower the opacity to 35% to make her pupils a little bit grey—just like the skull.
This process gives the subject a ghoulish, zombie-like look that can add a nice touch to our composition. 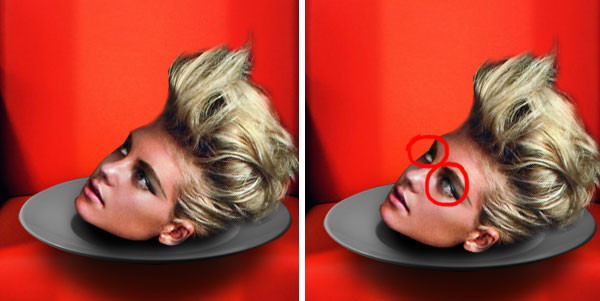
Step 9: Add the cherry tree
Open the Cherry Tree 2 image. It is already processed, so you just have to copy and paste it into your canvas.
Resize it with the Free Transform command (Ctrl/Cmd + T). Then realign the cherry tree by choosing Edit > Transform > Flip Horizontal. Take out your Eraser Tool (E) again and erase some of the lower portions of the cherry tree with a soft brush tip.
Now smudge the area where the tree and the head of our model meets using any brush—preferably a rough and grungy brush. This should blend the two elements of our scene together. 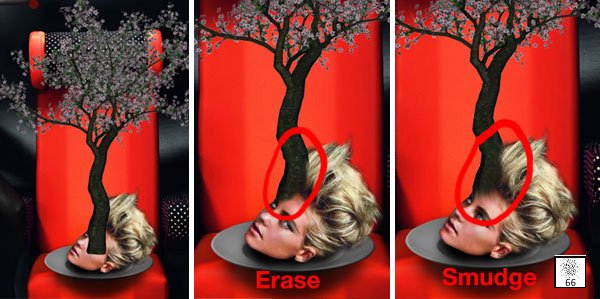 The tree’s color does not fit in with our scene, so create a new layer and make a clipping mask (Ctrl/Cmd + Alt + G).
Take your Eyedropper Tool (I) and sample a color from the picture. I picked a random red color from the handbags on the upper part of the image (#b20307). Take your Brush Tool (B) and brush the tree with a big and soft brush on a new layer.
Change the blending mode of the new layer to Color.
Step 10: Color the window red
Since we are coloring things, some of you may wish to color the window red. To do this, you can take the same color you just picked from the handbag (#b20307) and brush the window with a big, soft brush.
Then, set the layer’s blending mode to Color. 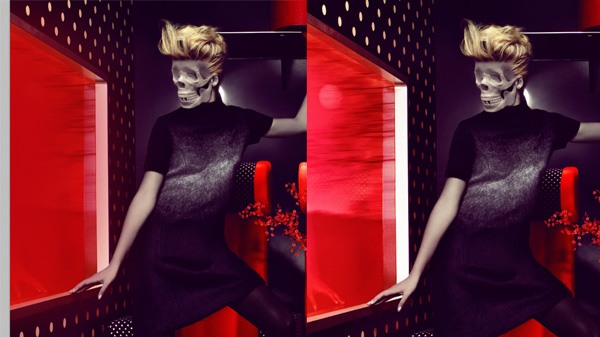
Step 11: Add a shadow behind the tree
Next, we need a shadow behind the tree. To do this, Ctrl/Cmd + click on the thumbnail of the cherry tree layer to automatically create a marquee selection around it.
Create a new layer beneath the tree and fill (G) it with black (#000000). Displace the filled selection a little bit using the Move Tool (V) and your arrow keys. Use Filter > Blur > Gaussian Blur with the Radius to about 3.2 pixels to soften the edges of our shadow.
Lower the opacity to about 59% to soften up the shadow further. Then, use the Eraser Tool (E) with a soft brush to get rid of any parts of the shadow that spill over onto the head. 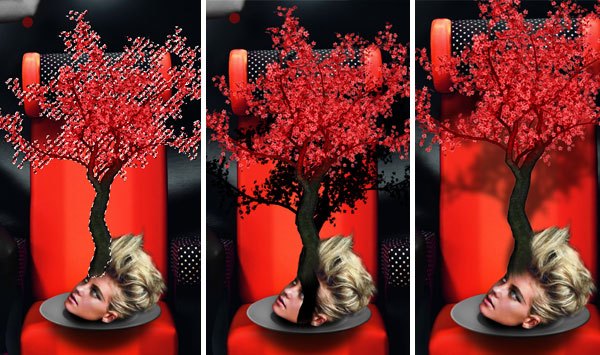
Step 12: Add some blood stains
Download the Shad0ws Blood Brush Set and install it.
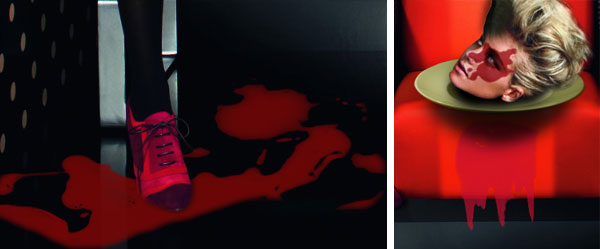
Take your Eyedropper Tool (I) again and pick a reddish color from the handbags. Choose your desired brushes from the set and brush over any place you would like to add bloodstains onto. I brushed on the floor under her shoe (with a color of #660607) and on her head (#ae2231), then I set the blending mode to Multiply.
I also painted bloodstains on the chair (#d41423). Make your scene as bloody and gory as you want. To clean things up a bit, erase the bit of blood that goes over the shoe with the Eraser Tool (E).
Step 13: Add shadows and highlights to the bloodstains
Add some shadows and highlights on the bloodstains to make them more realistic. Let’s take the blood on the floor first. Create a new layer above the bloodstain and make a clipping mask (Ctrl/Cmd + Alt + G).
Take a big soft brush and brush onto the bloodstain with black (#000000). After brushing the bloodstain, lower the opacity of the layer to about 80%. Again, create a new layer with a clipping mask and brush on it with white (#ffffff) as shown in the image below.
You could lower the opacity of this layer too, but I chose to instead switch the blending mode to Soft Light. Do the exact same thing with the bloodstain on the head except for the opacity changes. Instead, lower the opacity of the layer with the shadows on it to about 10%, and this time, lower the opacity of the layer with the highlight to 10% too.
Ctrl/Cmd + click on the thumbnail next to the layer with the bloodstain on the chair and create a new layer beneath it. Fill (G) the new layer with black (#000000). Choose Filter > Blur > Gaussian Blur and set the Radius of the blur to about 3.1 pixels.
Use the Move Tool (V) and your arrow keys to displace a little bit. Then use the Eraser Tool (E) with a soft, round brush tip to take out the areas shown in the following image. 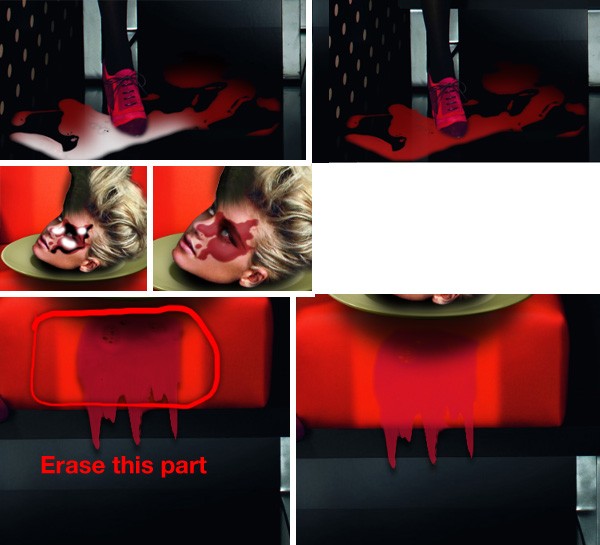
Step 14: Adjust the scene’s colors with a Photoshop Action
Image adjustments are great for tweaking the scene we’ve made, and they also make all design elements blend together better.
We’ll need to use the Selective Color image adjustment eight times. A bit much, isn’t it? So what I did was include a Photoshop action file in the source file download of this tutorial.
Download the surreal_cabin_selective_color_action file and install it. If you use a different picture than the one I used, you might have to play around with the settings of the action a bit. Once you’ve installed the action, open up the Actions Panel (Alt + F9), and find the action that you’ve downloaded and installed.
Click on it and press the Play selection button to execute the action.
Conclusion
In this tutorial, I showed you how to easily create a surreal photo manipulation. We learned how to blend images together using a variety of techniques.
You also saw how to add quick and simple shadows and highlights, and how to apply blood stains using a free brush pack. With these basic techniques, you will be able to perform impressive, realistic photo manipulations. I hope you enjoyed this tutorial, and I’m looking forward to your comments and thoughts!
If my tutorial inspired you in any way, please join the Design Instruct Flickr group pool as well as share your work there.
Download Source Files
- surreal_train_cabin (ZIP, 6.1 MB)
-
 Trevin serves as the VP of Marketing at WebFX. He has worked on over 450 marketing campaigns and has been building websites for over 25 years. His work has been featured by Search Engine Land, USA Today, Fast Company and Inc.
 -

WebFX is a full-service marketing agency with 1,100+ client reviews and a 4.9-star rating on Clutch! Find out how our expert team and revenue-accelerating tech can drive results for you! Learn more
Make estimating web design costs easy
Website design costs can be tricky to nail down. Get an instant estimate for a custom web design with our free website design cost calculator!
Try Our Free Web Design Cost Calculator
Table of Contents
- Preview
- Resources
- Step 1: Prepare your Photoshop canvas
- Step 2: Add the skull into the composition
- Step 3: Color in the skin of the subject
- Step 4: Add a subtle shadow on the model’s forehead
- Step 5: Add the plate to the scene
- Step 6: Correct the color of the plate
- Step 7: Put the head on a platter
- Step 8: Color the subject’s pupils
- Step 9: Add the cherry tree
- Step 10: Color the window red
- Step 11: Add a shadow behind the tree
- Step 12: Add some blood stains
- Step 13: Add shadows and highlights to the bloodstains
- Step 14: Adjust the scene’s colors with a Photoshop Action
- Conclusion
- Download Source Files


Web Design Calculator
Use our free tool to get a free, instant quote in under 60 seconds.
View Web Design Calculator
Proven Marketing Strategies
Make estimating web design costs easy
Website design costs can be tricky to nail down. Get an instant estimate for a custom web design with our free website design cost calculator!
Try Our Free Web Design Cost Calculator
What to read next
