Table of Contents
- Preview
- Step 1: Create the Photoshop Canvas
- Step 2: Create the Video Area
- Step 3: Create the Control Bar
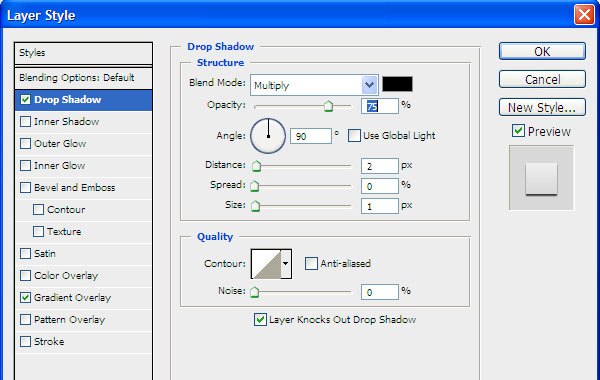
- Step 4: Give the Video Player a Shadow
- Step 5: Add the Video Controls
- Step 6: Create the Video Progress Bar
- Step 7: Write the Time Indicator
- Step 8: Create a Big Play Button on the Video Area
- Tutorial Summary
- Download Source Files
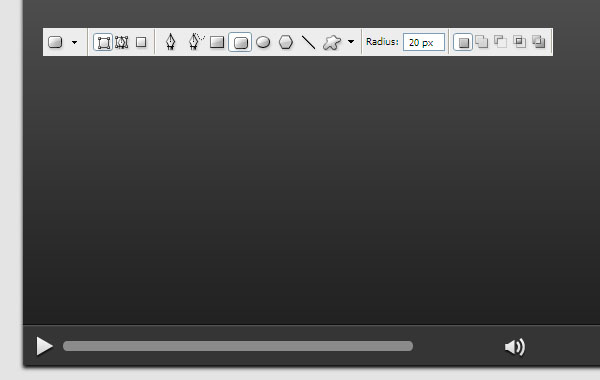
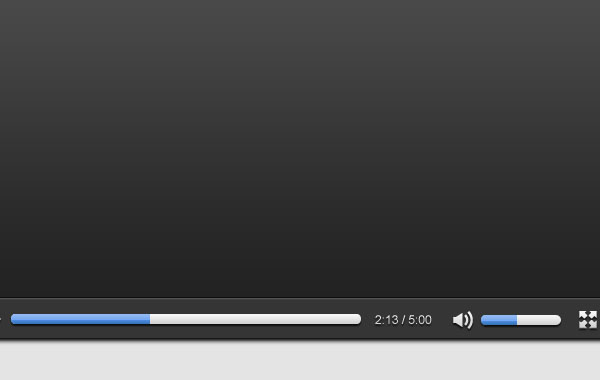
Preview
Step 1: Create the Photoshop Canvas
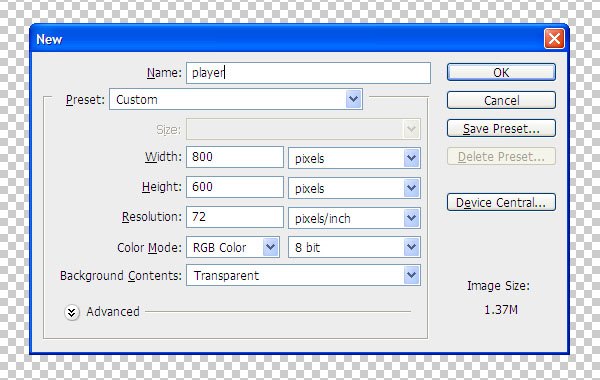
Create a new Photoshop document by going to File > New. The canvas dimensions should be 800x600px. Set Background Contents to Transparent, which will produce a transparent Background layer.
Now, select the Paint Bucket Tool (G) from the Tools Panel and fill the transparent Background layer with a neutral color like #e4e4e4 (which is a light gray).
Step 2: Create the Video Area
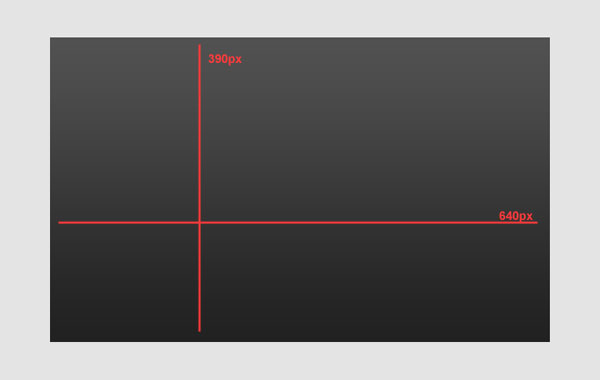
A typical standard dimension for streaming videos is 640x390px.
(YouTube, for example, uses this as the default video dimension.) Following this dimension, we’ll create a rectangle and then we will add a smooth, black color gradient to it.
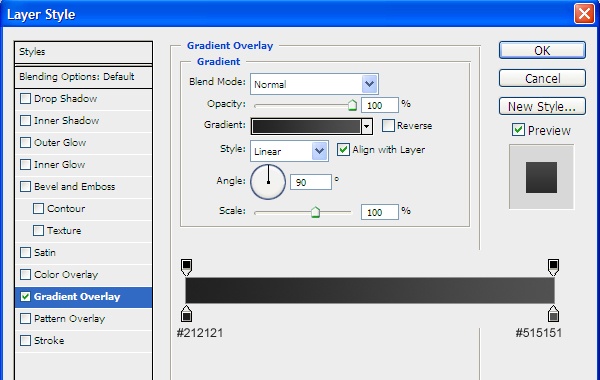
To create the rectangle, select the Rectangle Tool (U). In the Options Bar, make sure that the Shape layers option is selected so that the tool produces a shape layer instead of a vector path (which is the Paths option) or a rasterized shape (which is the Fill pixels option).
Also, if you have the Info Panel up — which can be toggled by going to Window > Info (F8) — it can help you draw the rectangle (and other objects in this tutorial) precisely.
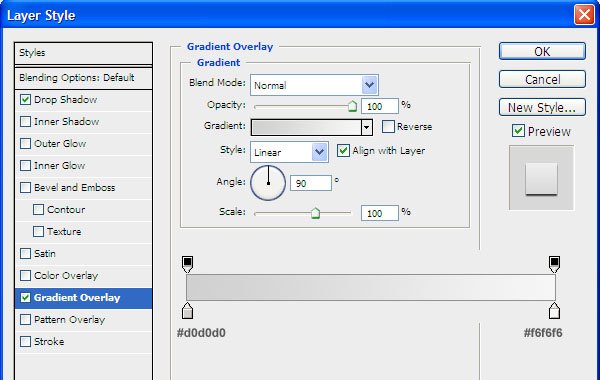
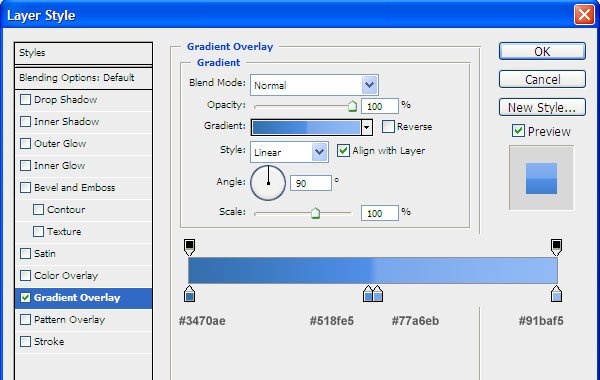
Once you have drawn the rectangle, double-click on its layer in the Layers Panel to access the Layer Style dialog window. Give it a Gradient Overlay with the following settings:
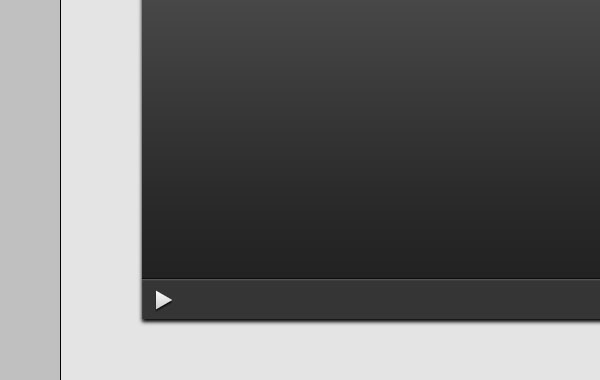
Step 3: Create the Control Bar
The video control area is represented by the play button, full-screen button, volume button, the volume bar and the progress bar.
We’ll start with the shape on which the elements will lay on top of, which (for the purpose of this tutorial) we’ll refer to as the control bar.
To start, choose the Rectangle Tool (U) again and, under the big rectangle (video area), draw a rectangle sized at 640x40px.

Give the control bar an Inner Shadow. The settings below will give it a subtle inner shadow effect.
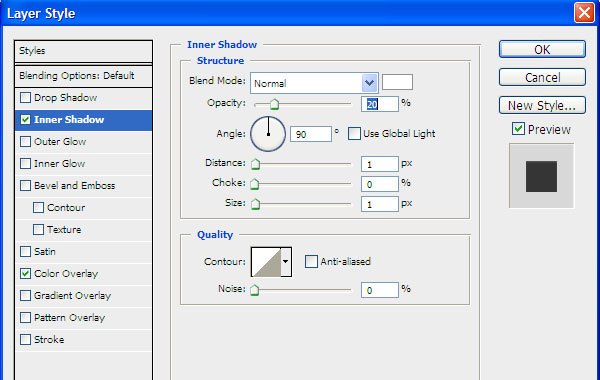
Also, give it a dark gray (#353535) Color Overlay layer effect.

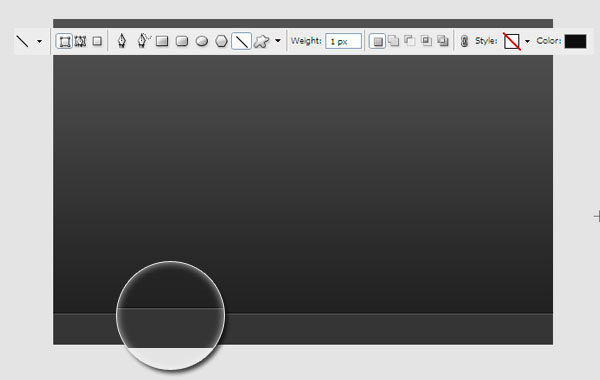
At the top of the control bar where the video area and the control bar meets, draw a 1px horizontal black line.
This line will give us a nice inset effect.
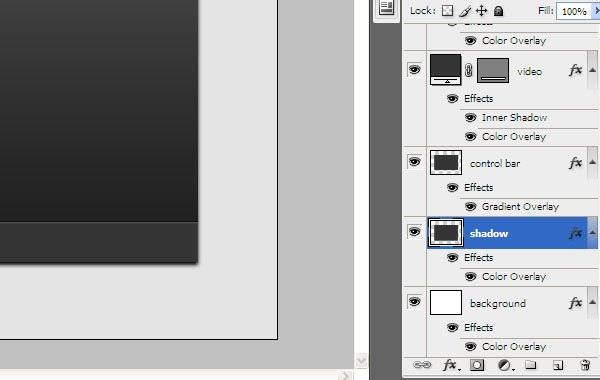
Step 4: Give the Video Player a Shadow
Now I’ll show you how to create a nice shadow effect around the video player. Select the Rectangle Tool (U), draw a black rectangle sized at 640x430px and place the layer under the video area and control bar layers.
Next, choose Filter > Blur > Gaussian Blur, set the Radius to 2px, and then press OK to apply the filter.
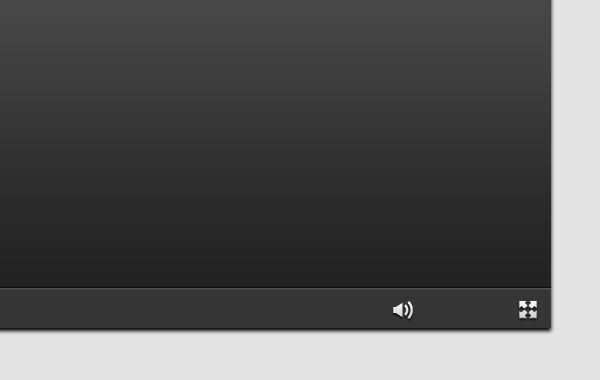
Step 5: Add the Video Controls
Let’s continue with the controls. Next step is to import three icons into our document: a volume icon, a full-screen icon and a play icon.
You can easily find icons through Iconfinder. Also, try the free Wireframe Toolbar Icons, which are icons made for GUI designers; this icon set will have all the icons you need for this step. Look for plain and simple icons, which will give us a better opportunity to tweak and style them.
Position your chosen icons as shown below.
If they are too big, use the Free Transform command (Ctrl/Cmd + T) to rescale them.
![]()
Double-click on the play icon’s layer so that you can give it a Drop Shadow and Gradient Overlay.
Drop Shadow
Gradient Overlay
You should end up with a clean play button as shown below:
Add the same effect to the other two buttons. To do this, right-click/Control-click on the play button layer (which should already have the layer style we applied above) and select Copy Layer Style. Ctrl-click/Cmd-click on the volume icon layer and the full-screen icon layer to simultaneously select them both, then right-click on one of them and choose Paste Layer Style.
Doing this should copy the layer style from the play button layer to both the volume icon and full-screen icon layers.
Step 6: Create the Video Progress Bar
Choose the Rounded Rectangle Tool from the Tools Panel, set its Radius to 20px in the Options Bar, and then draw a 350x10px rounded rectangle. Use the Move Tool (V) to position it beside the play button as shown below.
Copy the layer style we gave to the play, volume, and full-screen buttons in the previous step, and then paste it onto this one.

Let’s mock up our UI as though we’re in the middle of playing a video. We’ll do this by drawing a blue rounded rectangle on top of the progress bar that indicates the position of the video.
First, load a selection around the progress bar by Ctrl-clicking/Cmd-clicking on the shape layer’s thumbnail.
Then select the Rectangular Marquee Tool (M) and, in the Options Bar, choose the Intersect with Selection option. Make a selection around the first half of the progress bar. This should reduce our selection.

Create a new layer above the progress bar.
In this new layer, fill (Edit > Fill) your selection with any color. Once filled, double-click on the layer to access the Layer Style window so that we can give this layer a Gradient Overlay.
Now, at the middle of the progress bar, draw a 1px horizontal line with a blue color (#75aafb), which will add a nice detail to the progress bar.
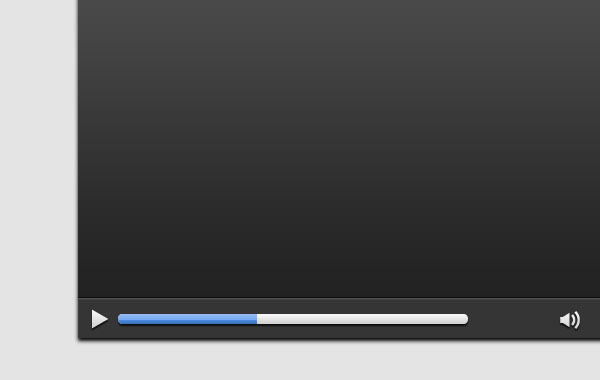
The progress bar should now look like this:
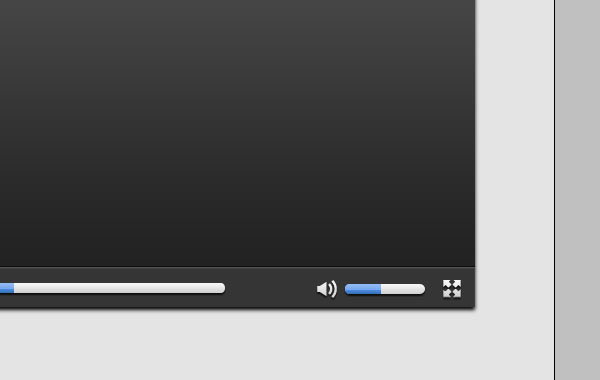
Repeat the process above to create a volume bar, but instead of using a rounded rectangle with a Radius of 20px, double it to 40px because the volume bar will be narrower than the progress bar.
Step 7: Write the Time Indicator
Select the Horizontal Type Tool (T), set the font to Arial, Regular, 12px and type the current progress and the duration of the video at the right of the progress bar. Copy the layer style from the play button layer, then paste it onto the text layer.
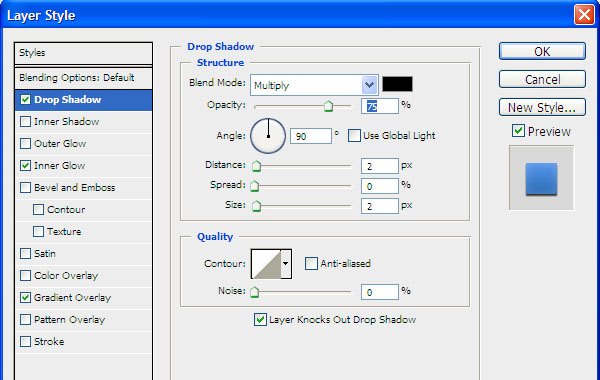
Step 8: Create a Big Play Button on the Video Area
The UI is now done.
Now, we’ll make a big play button at the center of the video area. You can use the same play icon you used for the video controls bar (just scale it up using the Free Transform command), or draw it yourself using the Polygon Tool (just set the Sides option in the Options Bar to 3 to draw a triangle).
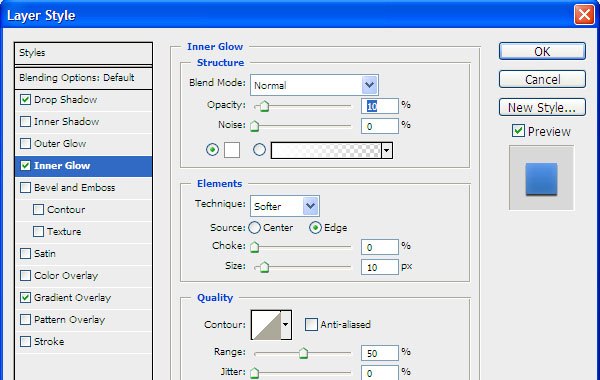
Afterwards, give the layer a Drop Shadow, Inner Glow and Inner Shadow.
Drop Shadow
Inner Glow
Gradient Overlay

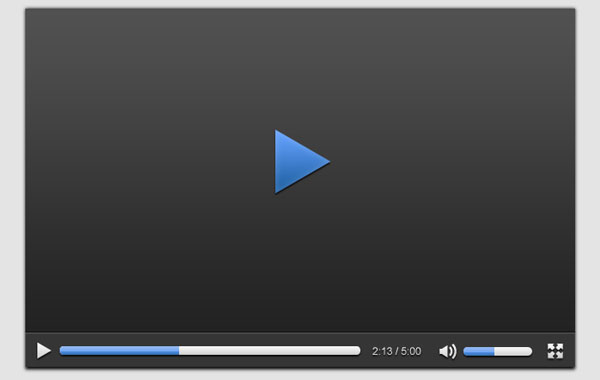
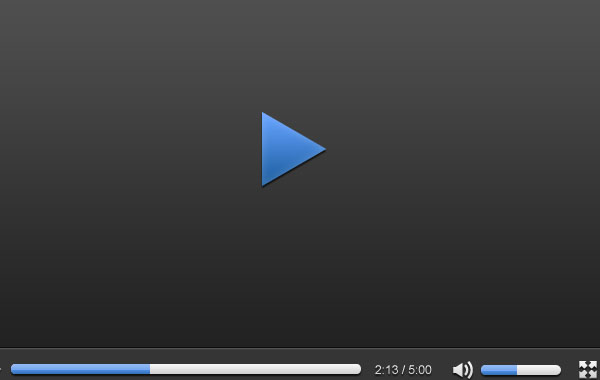
Here’s what the button should look like:
Tutorial Summary
The video player is now done. We used simple techniques to draw a nice video player user interface.
We used simple layer styles and drawing techniques (with Photoshop shape tools) to arrive at a clean and sleek aesthetic that you’ll often see in modern web designs.
I hope you are happy with what you have created, and I look forward to hearing your feedback and questions, so share your thoughts in the comments below!
Download Source Files
- slick_videoplayer_ui (ZIP, 0.03 MB)
-
 Trevin serves as the VP of Marketing at WebFX. He has worked on over 450 marketing campaigns and has been building websites for over 25 years. His work has been featured by Search Engine Land, USA Today, Fast Company and Inc.
 -

WebFX is a full-service marketing agency with 1,100+ client reviews and a 4.9-star rating on Clutch! Find out how our expert team and revenue-accelerating tech can drive results for you! Learn more
Make estimating web design costs easy
Website design costs can be tricky to nail down. Get an instant estimate for a custom web design with our free website design cost calculator!
Try Our Free Web Design Cost Calculator
Table of Contents
- Preview
- Step 1: Create the Photoshop Canvas
- Step 2: Create the Video Area
- Step 3: Create the Control Bar
- Step 4: Give the Video Player a Shadow
- Step 5: Add the Video Controls
- Step 6: Create the Video Progress Bar
- Step 7: Write the Time Indicator
- Step 8: Create a Big Play Button on the Video Area
- Tutorial Summary
- Download Source Files
Share this article


Web Design Calculator
Use our free tool to get a free, instant quote in under 60 seconds.
View Web Design Calculator
Make estimating web design costs easy
Website design costs can be tricky to nail down. Get an instant estimate for a custom web design with our free website design cost calculator!
Try Our Free Web Design Cost Calculator