- Home
- Blog
- Web Design
- How to Design a Logo: A 5-Step Process
How to Design a Logo: A 5-Step Process
-
 8 min. read
-
 Trevin Shirey
 VP of Marketing
- Trevin serves as the VP of Marketing at WebFX. He has worked on over 450 marketing campaigns and has been building websites for over 25 years. His work has been featured by Search Engine Land, USA Today, Fast Company and Inc.
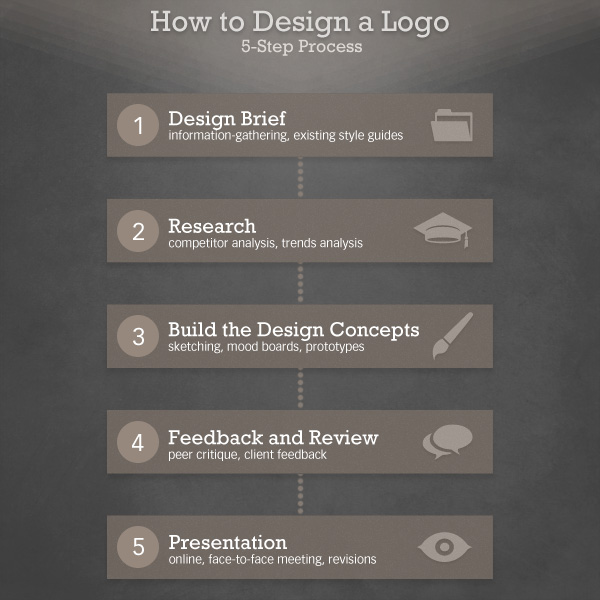
There are no shortcuts to a great logo design; if you don’t put in the work at each step of the design process, you won’t get the most optimal results. You owe it not only to your clients, but also to your design portfolio, to follow a judicious logo design process so that you can complete the project efficiently and effectively. Here’s a visual that summarizes the five-step process that I will discuss: 
Step 1: Design Brief
The time and effort required to complete a design brief, as well as what content the design brief will have, will depend on the client you are working with.
Some clients know exactly what logo they want and give you all the information you need to produce it without you having to ask. One situation where this can be the case is when your client is also a designer, or has extensively worked with other designers in the past. Some clients, on the other hand, only know that they need a logo and would rather leave the rest to you.
Often, this is the case when you work with non-designers, such as new entrepreneurs. At this step, your challenge as a logo designer is to get the information you need about the project to enable you to come up with the perfect logo for them. Some logo design information-gathering questions to ask are:
- What does the company do?
- Who are the company’s typical customers?
- Who are the company’s business competitors?
- How is the company positioned in the market compared to its competitors?
- Does the company have existing design style guides (company colors, typefaces, etc.)?
Interview your client until you are satisfied you have the answers to all these questions. Tips for Creating a Logo Design Brief
- Formalize the briefing process with your client — if you take it seriously, so will they.
- Make this step easy for your client by providing a design brief questionnaire or template so they know what information you are looking for, and also to give this process more structure.
- Create a web page on your site or a document that discusses the basics, and the importance of, design briefs. You can use your guide to design briefs as an educational resource for your clients.
- At the minimum, strive to cover these fundamental items in your design brief:
- Target market
- Message objectives
- Existing design style guides and parameters (e.g., company colors, typeface, etc.)
- Budget
- Schedule, milestones, and deadlines
Further Reading on Design Briefs
- Client Questionnaire Template for Logo Design Brief
- The Art of Interviewing Your Client
- How Do You Write a Design Brief?
- How to Write an Effective Design Brief and Get the Design You Want!
- 10 Tips for Writing Graphic Design Briefs
- SampleBoard — Digital mood board editor for creative industries
- What to Ask Your Client before Creating Their Design Brief
Step 2: Research
This step requires you to find out more about the industry your client is in. Consider the historical perspective of your client and their industry, and look at emerging trends in the marketplace. This is also a good time to do your visual research, which may involve reviewing the logo designs of your client’s competitors.
Analyze what you find: What makes one logo good, and others not so good? If you see a definite trend in logo designs within your client’s industry, decide whether going with the trend or innovating on the trend is beneficial to your client’s business. Following an industry design trend could potentially improve the association of a business to that industry.
The downside of following design trends, however, is that it often means that the logo design becomes stale when the trend fades out of popularity, which is bad for logo designs that are ideally supposed to be timeless and unique. Tips for Logo Design Research
- Use your client’s resources to learn more about their business. Perhaps you can conduct interviews with some of their company’s staff members or request a meeting with their in-house designers.
- Ask your client for a list of their main competitors during the design brief, and perform online research on these competitors.
- Use logo design galleries for visual research and inspiration.
Further Reading on Design Research
- Logo Design: Conducting Preliminary Research
- Logopond — identity inspiration
- Brands of the World — a library of logos
- Logo Design Inspiration: Top 10 Galleries to Check Out
- Demystifying “Design Research” (PDF)
- A Designer’s Research Manual: Succeed in Design by Knowing Your Clients
Step 3: Build the Design Concepts
Once you have done your research, you can get on to the fun part of the logo design process. Let your ideas run free and get them down on paper. This is the step in which every designer will have his/her own way of doing things.
 This is your time to develop an often elusive good blend of great graphics that also convey the right message for your client. In this step, you are trying to encapsulate the diverse and complex nature of a business into a small and simple design, suitable for use in a multitude of different circumstances (business cards, marketing material, website design, and more). For each logo design concept you create, you can ask yourself these questions:
- Will this logo design work for my client?
- Will this logo resonate with the client’s customers?
- How does this logo fare against the competition?
Tips for Building Logo Design Concepts
- Get all of your initial ideas down on paper and sketch out rough drafts, no matter how far out they seem.
- Spend some time on brainstorming and idea-generation sessions. Read some tips on more productive brainstorming sessions.
- Make sure your logo design concepts match the parameters of the design brief.
- Refine the best logo design concepts into something you can show to others.
Further Reading on Building Logo Design Concepts
- Logo Design Tutorial: How to Create an Iconic Logo Design
- What Makes a Great Logo
- How Do Designers Create Unique Identities?
- Logo Design That Works: Secrets for Successful Logo Design
- Constructing the Perfect Logo
- Ten Logo Design Tips from the Field
- The Design Process: Development Methods
Step 4: Feedback and Review
Step back from your work, take a break, and look at it later or even the next day. If you have come up with a lot of logo design concepts, focus on the stronger ones and discard the weak ones. Make changes and let the designs develop; now is a great time to get feedback from colleagues and other designers, and possibly even from your client.
Tips for Design Feedback and Reviews
- No one likes to see his/her work criticized, but constructive criticism will enable you to improve upon your work, so this step is an essential component of design projects. Don’t take critiques personally.
- Be open-minded to the opinions of others and experiment with the changes they suggest.
- Analyze how and why the changes will improve the current design.
Further Reading on Design Feedback and Reviews
- Brands of the World: Critique — You can upload and post your logos on Brands of the World to get comments and a rating from other logo designers
- Free Logo Critiques
- A Few Forums for Logo Design Feedback
- Discussing Design: The Art of Critique — a slideshow presentation
- The Design Process: Targets, Evaluation and Feedback
Step 5: Presentation
Once you have finalized your designs, it’s time for a formal presentation to your client. They may have asked for a variety of logos to choose from, but this step, in my experience, generally works better if you keep the amount of logo design concepts you present to a minimum.  Hopefully, they will absolutely love the logo concepts you present to them but, as a paid professional, it’s up to you to take on board any comments they might have and resolve any issues if need be through a design revision process.
Tips for Design Presentations
- A professional presentation — whether you do the presentation remotely through a web app and Skype, or face-to-face with a client — is essential.
- A face-to-face presentation will give you the chance to explain your thinking and answer any questions. Take the opportunity to meet in person if possible.
Further Reading on Design Presentations
- How to Present Your Designs to the Client
- How to Make the Perfect Pitch
- 5 Logo Design Presentation Methods to Impress your Clients
- Presentation Zen: Simple Ideas on Presentation Design and Delivery
- The Designer’s Guide to Presentations
- Haiku Deck — free iPad app for creating slideshow/presentations
Summary
There’s no mystery to a good logo design. Follow a good design process, put in the work, and, if you understand your client’s requirements, the outcome will surely be great. To summarize, here is the five-step logo design process:
- Design Brief
- Research
- Build the Concept
- Feedback and Review
- Presentation
Do you have logo design tips to share to us? What is your own logo design process? Please share it with us in the comments!
-
 Trevin serves as the VP of Marketing at WebFX. He has worked on over 450 marketing campaigns and has been building websites for over 25 years. His work has been featured by Search Engine Land, USA Today, Fast Company and Inc.
 -

WebFX is a full-service marketing agency with 1,100+ client reviews and a 4.9-star rating on Clutch! Find out how our expert team and revenue-accelerating tech can drive results for you! Learn more
Make estimating web design costs easy
Website design costs can be tricky to nail down. Get an instant estimate for a custom web design with our free website design cost calculator!
Try Our Free Web Design Cost Calculator


Web Design Calculator
Use our free tool to get a free, instant quote in under 60 seconds.
View Web Design Calculator
Proven Marketing Strategies
Make estimating web design costs easy
Website design costs can be tricky to nail down. Get an instant estimate for a custom web design with our free website design cost calculator!
Try Our Free Web Design Cost Calculator
What to read next


