How to Use YouTube for Marketing: Creating a Channel


Table of Contents:
How to Use YouTube for Marketing
- Statistics on YouTube
- Creating a Channel
- Producing a Video
- Adding Extra Content to a Video
- Embedding a Video
- Promoting a Video
- Getting Subscribers
- YouTube Paid Promotion
- YouTube Best Practices
Creating a channel
To market on YouTube, you need to make a channel first.
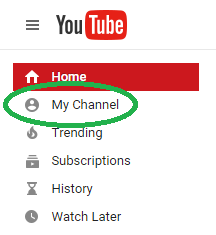
That’s as easy as going to YouTube.com and clicking “My Channel” in the left-hand column.
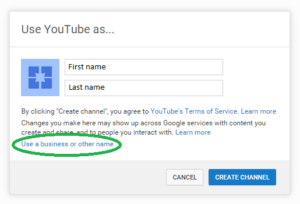
Then, YouTube will take you to this screen, where you can select your channel name and read YouTube’s terms of service. You’re also informed that Google may use this information across other properties it owns.
For businesses, you don’t want to enter a first and last name as you’re shown. Instead, you want to click the link that says “Use a business or other name.”
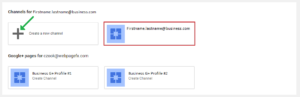
After clicking that, you’re taken to a screen that shows you the potential channels you can create. You can make one based on your name, email address, or properties you own in Google+.
For the best results, enter your company’s name however you’d like it to appear on videos. If your company has a more popular nickname, you could also consider using that.
Regardless of your choice, you’ll have to click “Create a new channel” on the left-hand side. Note that this option is not the option YouTube automatically highlights in red.
You’ll then go to a page that lets you name your channel and pick your company’s industry.
The most common options are “Product or Brand” and “Company, Institution or Organization.” Select whichever one that makes the most sense for your YouTube marketing strategy.

After you’ve chosen a name and picked your business type, check the box that agrees to the terms of Google+ Pages and you’re done!
Customizing your YouTube channel
After you create your channel, YouTube will automatically redirect you to your dashboard, which should look something like this:
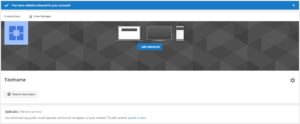
From this area, you can upload videos, manage your current videos, add profile pictures, configure your settings, and even customize your channel.
Since branding is key to running a successful YouTube channel, you should also click the Settings icon — the gear / cog wheel on the right-hand side.
That will take you to a screen where you can change your privacy and layout settings. It’ll also give you the option to go to advanced settings.
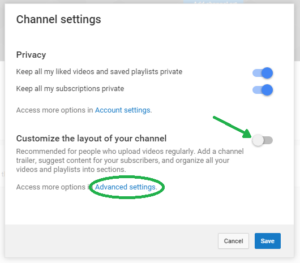
Since you want your YouTube channel to look professional, it’s important that you enable customization. That’ll let you change a lot of your channel’s appearance.
It’s also important that you go to the Advanced Settings so you can add essential information about your business.
Your Advanced Settings dashboard allows you to add keywords to your channel, enable ads, link your AdWords account, and even include your Google Analytics tracking ID.
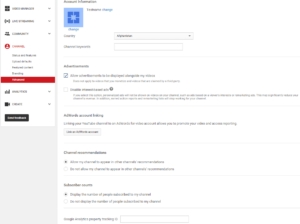
You can also add branded watermarks, featured content, default settings, and other features. Most importantly, you can also see whether your channel is in “Good standing” with YouTube.
Every new channel will be in good standing with YouTube unless you’re associated with a previous channel that lost privileges. Otherwise, you only have to worry about falling into bad standing if you try to take advantage of YouTube, its users, or its policies.
Now that you have your settings updated and customization enabled, it’s time to go back to your dashboard.
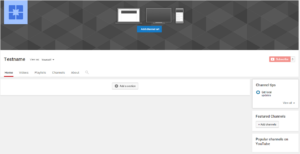
It’ll look slightly different than before — you now have a lot more options.
Adding YouTube channel essentials
You can add new sections of content to your channel, look up tips for your channel, show other channels you like, and endorse popular channels on YouTube.
Depending on what you want to achieve, you don’t have to use all of those customization settings. The most important ones for your channel are the Videos, Playlists, Channels, and About tabs.
Videos tab
The Videos tab is where you’ll find the videos you’ve uploaded. Since you just started your channel, your screen will look something like this.

Once you upload videos, YouTube will automatically list them here in chronological order with the newest videos first.
Playlists tab
The Playlists tab is for groups of videos that you manually create. Once you’re on this screen, you’ll have the chance to create a new playlist.

Playlists work best when you organize videos based on their subjects. So if you have lots of product demonstration videos, group them in a playlist called “Product Demonstrations.”
You could also have a more informal playlist called “Just for Fun” or “Behind the Scenes” that shows people what your company is like behind closed doors.
Channels tab
The Channels tab is less important than the previous two, but it gives you an opportunity to promote other YouTube channels you own or partner businesses.

This tab may not mean much right now, but it’s a great opportunity for cross-promotion. It’s especially useful once your business has lots of subscribers and you want to leverage that with other YouTube channels, which can turn a small profit in exchange for your endorsement.
About tab
Finally, you have the About tab. This is where you optimize your channel before you even have content to add.
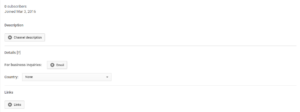
In the About tab, you have the chance to add a description of your channel. This description should include a one-sentence rundown of your business with branding and keywords that are important to your industry. Then, you can add supplemental information about what you specifically do.
The About tab also lets you attach a business email address to your channel so you can passively drive leads. You can also select your country of origin.
Finally, you have the chance to add links to your channel. Ideally, you’ll only have one or two links in this section to keep it looking clean. Those links should lead to major pages on your site, like your homepage and conversion page.
With all of this done, you’ve established the foundation of a successful YouTube channel! Now, it’s time to start producing content.
Go Back Start Reading: Producing a Video →