- Home
- Blog
- Web Design Create Metal Text Effect Using Photoshop Actions
Create Metal Text Effect Using Photoshop Actions
-
 10 min. read
-
 Trevin Shirey
 VP of Marketing
- Trevin serves as the VP of Marketing at WebFX. He has worked on over 450 marketing campaigns and has been building websites for over 25 years. His work has been featured by Search Engine Land, USA Today, Fast Company and Inc.
Preview

Tutorial Resources
- Background: Wall Texture by Jay Leonhart
- Texture: Old Film 10 by Lost and Taken
Before we start, make sure you are paying special attention to the settings in my screen captures, especially those dealing with Layer Style Blending Options. You will need to copy these settings in order to achieve the same effects.
Step 1: Setting Up Our Text
In Photoshop, go to File > New (Ctrl/Cmd+N) to create a new document.
Set the Width at 600 pixels, the Height at 300 pixels, and the Resolution at 72 pixels/inch. 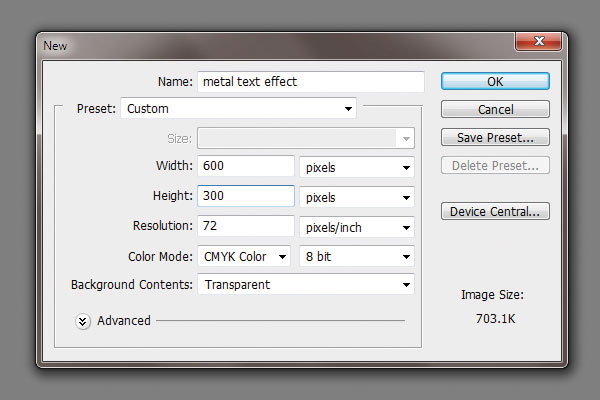 Next, grab your Horizontal Type Tool (T) to type the text “Design Instruct”. I am using Franklin Gothic Heavy, but feel free to use any bold font of your liking.

Step 2: Starting Our Action
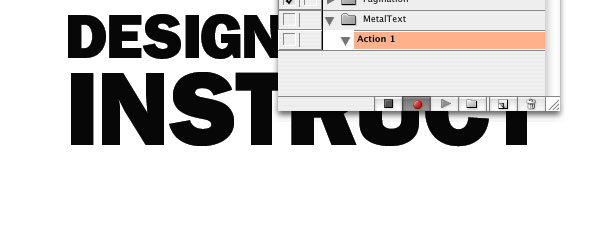
Before we go any further, we need to create a new action that will record what we do. Open Actions panel through Window > Actions (Alt/Option+F9), and click on the Create new set icon (looks like a folder) at the bottom of the Actions panel and call it “Metal Text”. Create a new action by selecting the Create new action icon (looks like Post-it note). 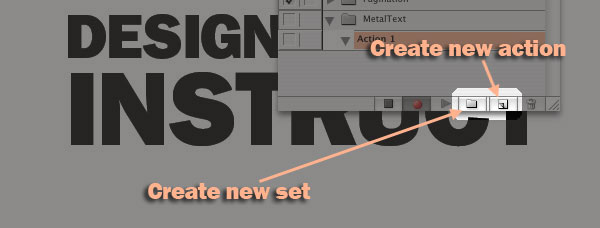 Once you create a new action it should start recording automatically (you will see a red record icon in the shape of a circle at the bottom of the Actions panel).
Step 3: Adding Our First Shadow
Go to Select > Load Selection, then create a new layer (Shift+Ctrl/Cmd+N).
Fill the new layer with white (#FFFFFF) and hide the original text layer. We are doing this instead of Rasterizing the text because we are trying to make the action universal with text as well as logos and other one-color images. Duplicate the new text by going to Layer > Duplicate Layer and move it down below the top text layer (alternative: you can do this by right-clicking on the layer from Layers panel and select Duplicate Layer).
We are going to have two light sources, so this text layer will be the first of the two sources. Go to Layer > Layer Style > Drop Shadow. When you change these settings, make sure to uncheck Use Global Light.
Global Light makes all the shadows and embossing the same angle, and we want two different light sources. Remember: both light source layers should be above the original text layer. 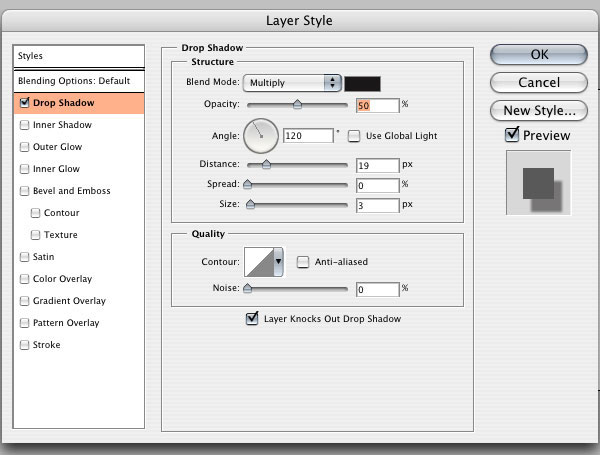
Step 4: Adding Our Second Shadow
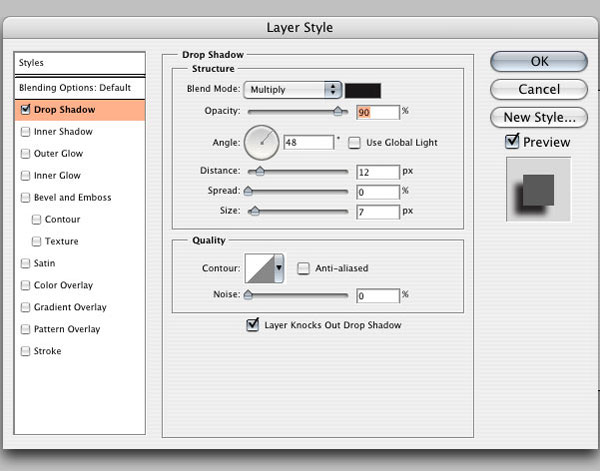
Select the top text layer and go to Layer > Layer Style > Drop Shadow.
Step 5: Adding the Bevel Layer Style
Now we are going to add in our Bevel, which will end up giving us that metal look. So click on the top layer and go to Layer > Layer Style > Bevel and Emboss. 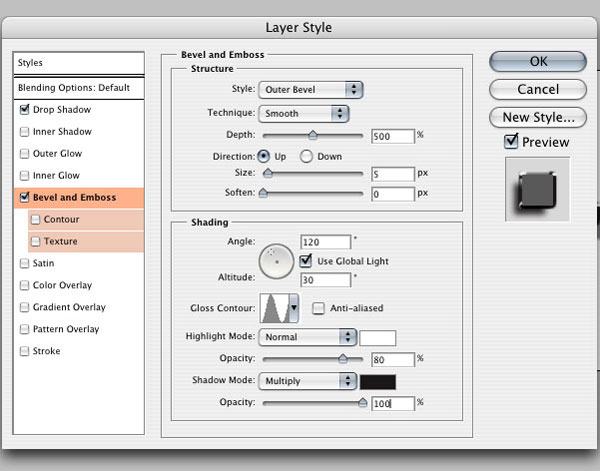
Step 6: Adding the Satin Layer Style
Next, we are going to add a Satin Layer Style.
This will give the surface of the text a little bit of inconsistency, adding realism. So go to Layer > Layer Style > Satin. 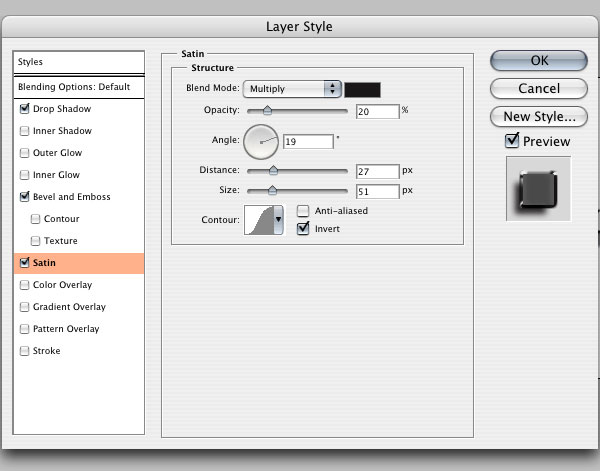
Step 7: Adding the Gradient Layer Style
The last Layer Style we are going to add to our text is going to darken the text as well as giving our text some light reflection.
We are going to use a gray/white gradient to give our text some light stripes going across. Go to Layer > Layer Style > Gradient Overlay. 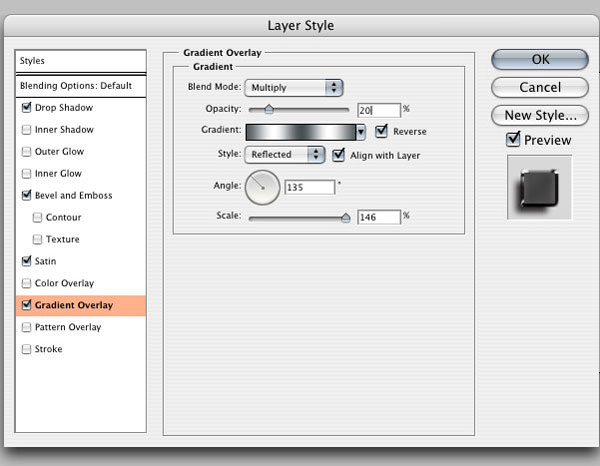
Step 8: Creating a Metal Texture
We are going to give our text some metal texture, so make sure you have the top text layer selected, and go to Select > Load Selection.
Go to Layer > New Layer (Shift+Ctrl/Cmd+N) and fill our selection with white. Now go to Filter > Noise > Add Noise. 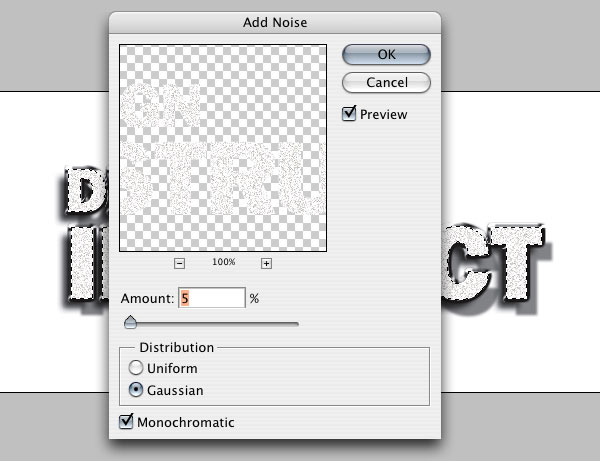
Step 9: Finishing a Metal Texture
Deselect our text by going to Select > Deselect (Ctrl/Cmd+D) and then go to Filter > Blur > Motion Blur.
Set the Angle to 42 degrees and the Distance at 38 pixels. 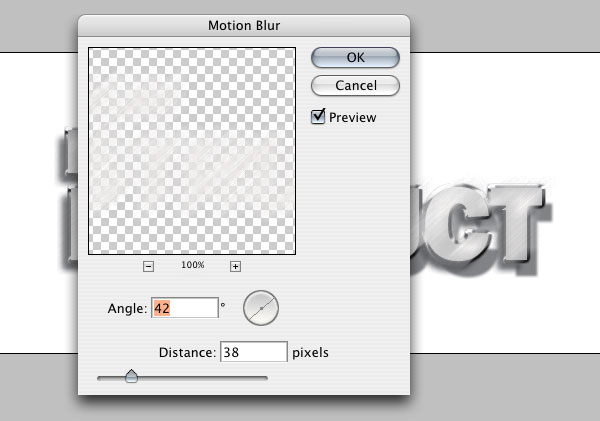 Select our first text layer and go to Select > Load Selection and Select > Inverse (Shift+Ctrl/Cmd+I). Delete the selected area.
This will get rid of the noise that is outside of our text. Change the blend mode to Multiply. You are now done creating our Photoshop action.
You can now press stop in and Actions panel.
Step 10: Bringing in Our Background Image
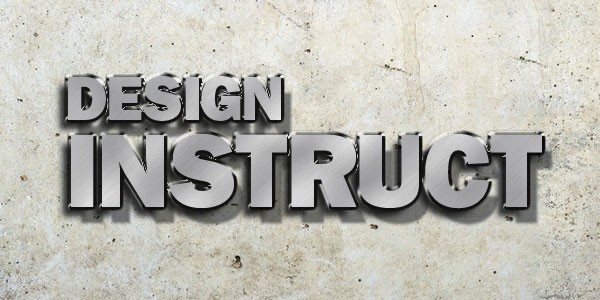
Now we can finish off the image. Download Wall Texture by Jay Leonhart and bringing it in as our background image and put it behind all the layers.
Step 11: Adding in a Text Texture
We are going to add in a texture to go over the text. Download the Old Film 10 texture by Lost and Taken, and bring it into our document. Move the texture above all the layers and size it down to around 30% using Edit > Free Transform (Ctrl/Cmd+T).
It should match the canvas size. Change the Blend Mode to Overlay. 
Step 12: Adding Some Color
Next, we are going to add some color to our image.
This will add consistency to our look while infusing warmth. Go to Layer > New Adjustment Layer > Gradient Map. Select the Yellow to Purple Gradient and check the reverse box.
Change the Blend Mode to Overlay and set the Opacity to 30% 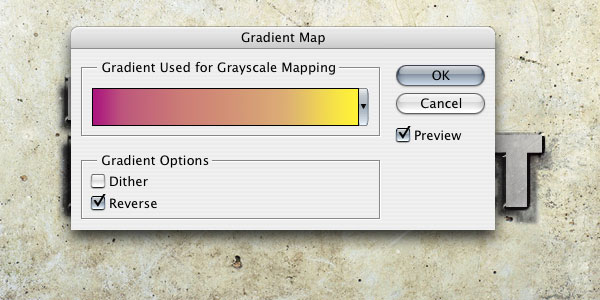
Step 13: Darkening the Edges
Now we are going to darken the edges by using the Rectangular Marquee Tool (M) and changing the Feather (Shift+F6) to 50 pixels. Go to Layer > New Layer (Shift+Ctrl/Cmd+N), then Select > Inverse (Shift+Ctrl/Cmd+I) and fill the new layer with black. Change the Blend Mode to Color Burn.

Step 14: Adding Some Shine
We are going to give our text a little extra shine by using a Brush Tool (B). Set the Size to 20 pixels and Hardness to 0%. Create a new layers, so Layer > New > Layer (Shift+Ctrl/Cmd+N) and place the new layer under the Old 10 Film texture layer.
Use white (#FFFFFF) as your brush color; dot the spots where the white parts are on the text edges. Change the Blend Mode to Soft Light. 
Step 15: Sharpening the Image
We’re almost there!
Let’s add the finishing touches. First, flatten the image by going to Layer > Flatten Image. Now duplicate the layer by going to Layer > Duplicate Layer.
Go to Filter > Other > High Pass and set the Radius to 10 pixels. Change the Blend Mode to Color Burn and the Opacity to 30%. Flatten these two images.
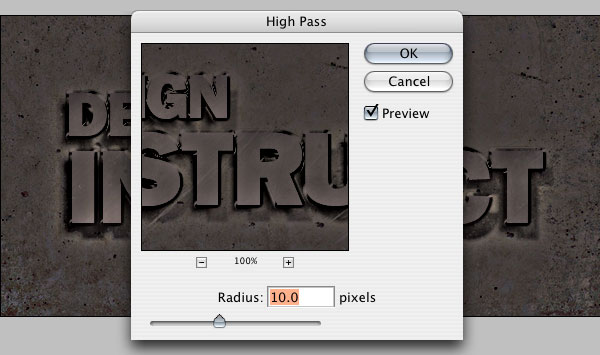
Step 16: Masking the Edges
Click on the icon to Edit in Quick Mask Mode (Q) from the Tools window.  Using the Gradient Tool (G), select Radial Gradient to click and drag a circle in the middle of the document.
 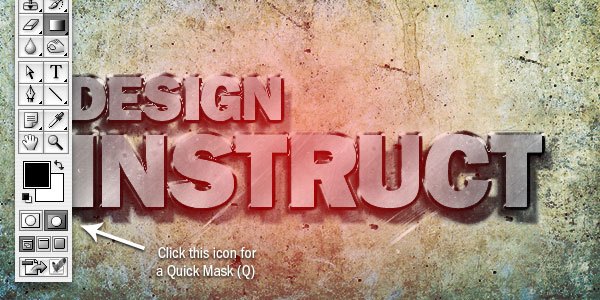 Now, click on the icon to Edit in Standard Mode (Q).
If the marquee showing isn’t on the edges of the canvas go to Select > Inverse (Shift+Ctrl/Cmd+I).
Step 17: Blurring the Edges
Alight, final step: with the area still selected, go to Filter > Blur > Lens Blur and use the settings that I have below. 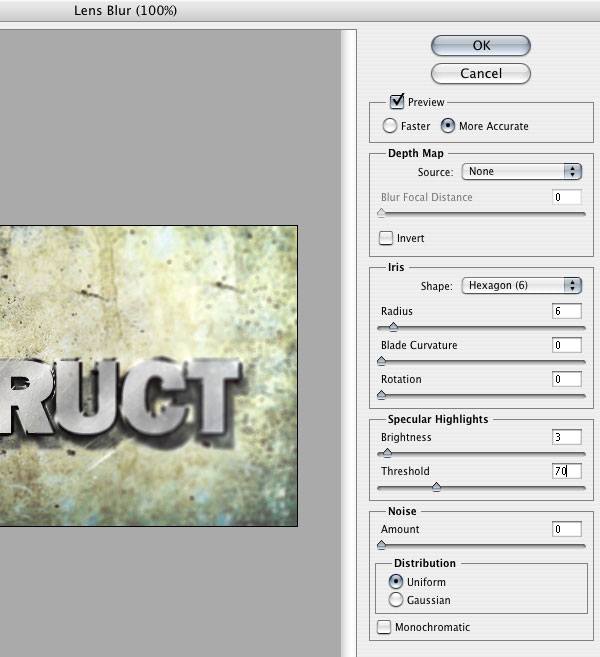
Tutorial Summary
With the use of simple Photoshop techniques and some stock textures, we were able to create a grungy metal text scene.
We added shadows and lights using a variety of techniques, used a few filters, and incorporated textures to make our scene come alive. Most importantly, you can recreate the same metal effect by simply pressing Play with Photoshop Actions. I hope you enjoyed this tutorial and found a few tricks that you can put in “action”. 
Download Source Files
-
 Trevin serves as the VP of Marketing at WebFX. He has worked on over 450 marketing campaigns and has been building websites for over 25 years. His work has been featured by Search Engine Land, USA Today, Fast Company and Inc.
 -

WebFX is a full-service marketing agency with 1,100+ client reviews and a 4.9-star rating on Clutch! Find out how our expert team and revenue-accelerating tech can drive results for you! Learn more
Make estimating web design costs easy
Website design costs can be tricky to nail down. Get an instant estimate for a custom web design with our free website design cost calculator!
Try Our Free Web Design Cost Calculator
Table of Contents
- Preview
- Tutorial Resources
- Step 1: Setting Up Our Text
- Step 2: Starting Our Action
- Step 3: Adding Our First Shadow
- Step 4: Adding Our Second Shadow
- Step 5: Adding the Bevel Layer Style
- Step 6: Adding the Satin Layer Style
- Step 7: Adding the Gradient Layer Style
- Step 8: Creating a Metal Texture
- Step 9: Finishing a Metal Texture
- Step 10: Bringing in Our Background Image
- Step 11: Adding in a Text Texture
- Step 12: Adding Some Color
- Step 13: Darkening the Edges
- Step 14: Adding Some Shine
- Step 15: Sharpening the Image
- Step 16: Masking the Edges
- Step 17: Blurring the Edges
- Tutorial Summary
- Download Source Files


Web Design Calculator
Use our free tool to get a free, instant quote in under 60 seconds.
View Web Design CalculatorMake estimating web design costs easy
Website design costs can be tricky to nail down. Get an instant estimate for a custom web design with our free website design cost calculator!
Try Our Free Web Design Cost Calculator


