How to Get Your Ecommerce Store Listed on Amazon
Starting to sell
Before you sell on Amazon, you have to create a seller account.
To start the process, you can jump to any of Amazon’s seller-specific pages.
Materials you need
Before you begin, make sure you have the following information:
- Your business’s name, address, phone number, and other contact information
- A credit card with a valid billing address that can be charged internationally
- A phone number to contact you directly during the registration process
- Your tax identification information (personal and business)
With all of that in hand, you’re ready to strike a deal with the biggest retailer in the country.
Terms and conditions
They may be long, annoying, and difficult to understand sometimes, but read the terms of service before you agree. Set aside two or three hours and go through everything — or have a lawyer do it — to make sure you understand your new responsibilities as an Amazon seller. This is critical to selling on Amazon.
The terms and conditions spell out what’s expected of you and what benefits you enjoy as an Amazon partner. And if anything in that agreement doesn’t sit well with you, don’t agree to it. It’s better to scrap the idea now than to try and get out of it later.
Also, be aware that special terms and conditions apply to international sellers and those who want to sell internationally. So if you want to sell outside your country of operation, those terms apply to you.
Professional vs. individual sellers
Amazon has two different seller options: Professional and individual. They differ by when and how much Amazon charges you to sell through them.
Professional accounts cost $39.99 per month, and you’re billed monthly. As a bonus, your first month of use is free. The flat rate is great for anyone who wants to move a lot of products through Amazon.
Individual accounts are charged a fee of $0.99 per sale, plus additional fees. That means the more you sell, the more you pay. 99 cents isn’t a lot of money, but if you sell small products at discount prices, the 99 cents (plus fees) can have a significant impact on your net earnings.
Legal name
This part is incredibly important. For tax and identification purposes, you have to enter the full, legal name that corresponds to either your business or yourself.
If you’re selling through your business, use your business’s name.
If you’re selling personally, use your full, legal name.

Next, you’ll need to provide your seller information.
See how we can help you GROW YOUR BUSINESS

Adding your seller information
As the “seller,” you’ll add all of your essential business information so Amazon and your customers know who you are.
This information includes:
- Your display name
- Your business’s address
- Your business’s phone number
- Your main product category (optional)
- The number of products you’ll sell (optional)
- Whether you own the brands of the products you sell (optional)
The first three qualities are all self-explanatory. The last three may need some explanation.

Product categories can be difficult for new users, though. Amazon has a number of product categories you can choose, and they all have different requirements for inclusion.
You can find a complete list in Amazon’s list of open categories.
Next, you have to consider how many products you want to sell, which is just the number of unique items in your inventory.
Last, you can say whether you own the brands of the products you’re selling. This isn’t an essential addition to your seller setup, and it’s most likely used for Amazon statistics. It could also be reassuring for customers to see that you’re selling brands you own, meaning you’re directly responsible for every part of a product’s creation.
Billing and contact
After this step, Amazon will request credit information from you. They’ll bill your card for a specified amount to verify that it exists, and once the transaction goes through, your card will be approved.
Then, they’ll call or text you to verify your contact information. They’ll tell you (either vocally or textually) a PIN to enter into a specific page. After you enter the PIN, your identification and contact information is verified.

Once your identity is verified, you can move onto the last step of setup.
Tax information
Now that you’ve agreed to their terms and your identity checks out, you have to give Amazon your tax information.
Tax information includes:
- Federal tax classification of your business
- Your name
- Business or trade name (optional)
- Your address
- Social security number, individual taxpayer identification number, or employer identification number
After you’ve filled in your tax information, you’ll receive a completed W9 for you to review and save. This W9 is incredibly important for your business once tax season rolls around, so save it in a safe location, and make multiple physical copies.
Once you have everything filled out, you have to “sign” your information electronically. This basically means you’ve reviewed everything for accuracy, and you’re not intentionally lying.
Just double-check your information and sign on the dotted line!

Get an instant breakdown of your Amazon sales margin with our free calculator.
Learn More
Adding products to sell
Now, you get to add products to Amazon.
First, you need to check if the item is already on Amazon. You can do that with a quick search on Amazon’s regular site. If you find the item, copy its ASIN (Amazon’s product ID number) and keep it to set up your own item.
Adding products that already exist
After that, click the button that says “Sell yours.”
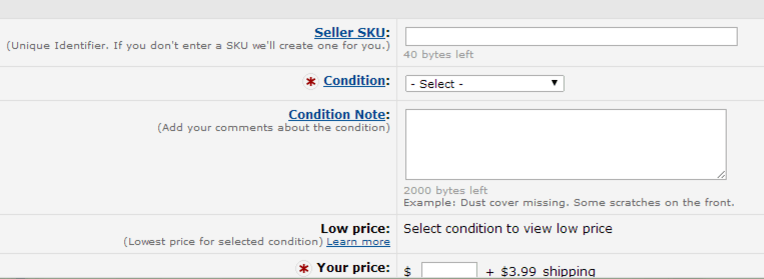
That allows you to enter the details of your product to sell alongside anyone who already offers it. This is where you get to enter your own product information, like SKUs, any conditions, and pricing (standard and sale).

You can also add up to six photos to show off your product.
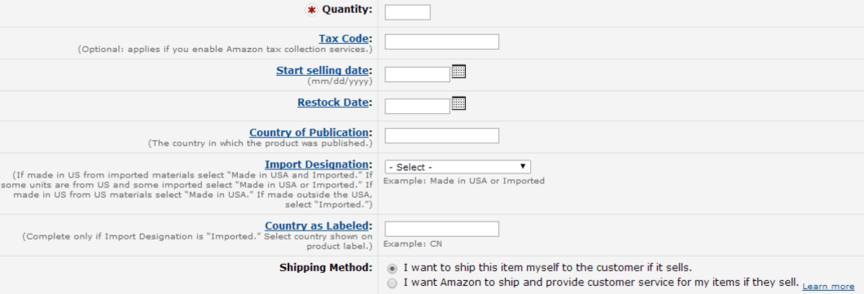
In addition, you have to add a tax code so Amazon knows what taxes apply to your products. You can also designate if your product is ever back-ordered, and you can note the time you expect to have it in stock again.

Finally, you need to pick a shipping option. You can either ship items yourself, or you can have Amazon do it for you. But if Amazon does it for you, you have to send them your inventory, and they’ll charge you a stocking fee.
![]()
If you choose to ship by yourself, you have a whole range of choices. Amazon includes information on the typical transit time for each option, the shipping credit you’ll receive upon purchase, the fees Amazon collects for each purpose, and the total you’ll receive after everything else is subtracted.
Keep in mind that even if the shipping credit doesn’t cover how much it costs you to ship the product, you’re still responsible for shipping it.
Adding new products
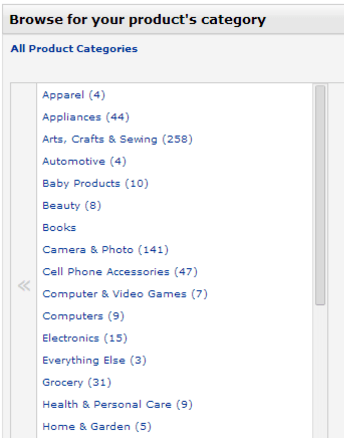
When you add a new product to Amazon, you have the chance to categorize it, so it’s easy to find.

While you may not find a perfect description for every product, so just pick the one that works best.
Next, you’ll add all the information about your products, including the product name, manufacturer, and other key specifications.
This also gives you the chance to add variations of your product, such as size or color. That way, you don’t have to create a bunch of individual products just to accommodate minor differences in a product line. You can sell all of them with a single, convenient listing.

After you create all of your variations, you still have a few choices to make. These include handling times, the option to gift wrap the purchase, and warranty descriptions.
Then, you can add a unique description to your product along with some key features in bullet points. You can also select the keywords that you want to trigger the product and any extra details after that.
Repeat as needed
Regardless of whether you’re selling one product or 100 products, you can use this process to place your inventory on Amazon for sale.
You’ll have to pay some fees, and you may not make as much profit on a per-sale basis, but the sheer volume of product that you can move through Amazon makes it a great sales move for any small business.
Partner with a team of ecommerce masters!
WebFX campaigns have delivered more than 14,936,451 ecommerce transactions in the last 5 years
Read the Case Studies

WebFX knows ecommerce on Amazon
At WebFX, we’ve built our careers on researching and understanding the details of ecommerce. We know how to help your ecommerce company sell more online, and we’re familiar with all the ins and outs of Amazon. If you want to move more product, we’ll help you do it on your site — and if you want to sell even more, we’ll help you do it on Amazon!
Do you want your ecommerce company to grow? Contact us today to set up an ecommerce plan specifically for your company!
Related Resources
- 6 Amazon Storefront Examples to Inspire Your Online Store
- 7 Tips for Building a Competitive Amazon Marketing Campaign
- Amazon Business vs. Seller Account
- How to Become an Amazon Seller
- How to Open a Store on Amazon
- How to Sell on Amazon Successfully As an SMB: 13 Proven Tips
- Learn How to Sell on Amazon
- Marketing Products on Amazon
- What Are Amazon Posts? (And How to Create Amazon Posts Like a Pro)
Related Services
- B2B Marketing Services for Amazon
- Brand Registry Consulting Services for Amazon
- Consulting Services for Amazon
- Ecommerce Marketing Services for Amazon
- Marketing Agency for Amazon
- Marketing Services for Amazon
- Meet Your SEO Agency for Amazon: WebFX
- PPC Management Services for Amazon
- Review Management Services for Amazon
How We Drive Revenue for Businesses
- Ecommerce Packages
- Ecommerce Solutions
- End-to-End Marketing Solutions
- Enterprise Marketing Agency
- Inbound Marketing Company
- Inbound Marketing Pricing: How Much Should You Pay in 2024?
- Inbound Marketing Services
- Internet Marketing Agency
- Internet Marketing Prices for Every Strategy
- Professional Marketing Company


