Retention Rate
Industry average: 50%
WHY IS OUR RETENTION RATE SO HIGH?
Scalable solutions
Industry specialists
Proven results
CLIENT SATISFACTION SCORE
Industry average: 72%
WHY IS OUR SATISFACTION SCORE SO HIGH?
Project management
ROI tracking
Diverse skillsets
“I have 16 years of industry experience, and WebFX is the best agency I’ve ever worked with.”
 Flavia A, Review from Clutch.co
 Rated 4.8/5 stars on G2
Rated 4.9/5 stars on Clutch
Rated 4.8/5 stars on G2
Rated 4.9/5 stars on Clutch
HIGHER NPS® SCORE THAN
Industry average: 16
WHY IS OUR NPS SO HIGH?
Turn-key solutions
Real business results
Consistent communication
Marketing Analytics Services from WebFX
Monitor your campaign’s performance with marketing analytics services from WebFX. Our team of over 750 experts will help you pick the right marketing analytics strategies for your business and help you optimize your campaigns to drive more traffic, leads, and sales.
What do our marketing analytics services include?
If you’re looking for marketing analytics services, look no further than WebFX. We offer everything you need to make the most of your marketing analytics. Check out our services below!
- Google Analytics consulting
- Conversion rate optimization
- PPC management
- Social media advertising management
- And more!
 Google Analytics consulting
Google Analytics consulting
When you look at marketing analytics services, you want to see Google Analytics consulting in your package. Google Analytics is an essential part of your online marketing efforts.
Whether you invest in PPC management services or SEO services, you’ll use Google Analytics to monitor your strategy and its results.
At WebFX, we offer Google Analytics consulting to help you get the most out of your analytics.
When you invest in Google Analytics consulting, you’ll get:
- Google Analytics tracking setup
- Ecommerce setup
- Audience segmentation
- Google Analytics troubleshooting
- Data analysis
- And more
With Internet Analytics consulting, we’ll help you understand your data and devise ways for you to improve your campaigns. When you know how your campaigns drive results, you can optimize them to produce even better results for your company.
If you partner with WebFX for your Google Analytics consulting, we’ll:
- Get Google Analytics tracking set up on your website
- Help you set custom goals and events
- Segment your audience for better results
- Create custom monthly reports
- Integrate your account with social media
- Generate custom notifications and alerts
Our team of over 750 experts will help you understand your Google Analytics and optimize your campaign to drive better results for your company.

 Conversion rate optimization
Conversion rate optimization
An essential part of your analytics is your conversion rate. You want to earn more conversions so you can help your business grow. With conversion rate optimization (CRO) services from WebFX, you’ll receive more conversions and see the results in your analytics.
When you invest in CRO services, you’ll get:
- Usability analysis
- Confirmation/thank you page setup
- Audit of current conversion efforts
- Raw heatmap data
- Internet marketing conversion analysis
- Conversion funnel analysis
- Website copy analysis
- Aesthetic analysis
- Analytics and reporting
- And more
With our CRO services, we’ll look at your conversion strategy (if you have one) and help you figure out where you can make improvements. We’ll optimize your plan to help you see where people drop off in the buying funnel and develop a strategy to turn more people into customers for your business.
When you invest in our conversion rate services, you’ll help you:
- Get insight into your website’s strengths and weaknesses
- Improve your contact forms to earn more completions
- Help you make data-backed decisions about your site
- Decrease your abandoned shopping cart rate
- Increase your sales and form completions
You’ll reap numerous benefits from investing in CRO services. If you want to find the right marketing analytics agency, look no further than WebFX. We’ll help you optimize your conversion process to drive more sales and improve your analytics.

 PPC management
PPC management
Are you running PPC campaigns for your business? If so, WebFX can manage and track your PPC campaign performance. With our PPC management services, we’ll help you track your paid advertisements and give you follow-up reports to see how you can improve your campaign.
With our PPC management services, you’ll get setup and management features like:
- Keyword selection
- Ad remarketing
- Google customer match and audience match
- Campaign development and strategy
- Ad campaign copywriting
- Ad copy performance testing
- Results analysis and reporting
- Strategic bid management
- And more
Our team of experts will help you set up your PPC campaign and monitor the results. We’ll help you test different ad copy to ensure you’re putting out the best version of your ad. Once we monitor your campaign’s performance, we’ll optimize your advertising campaign to drive better results.
If you partner with our team of experts, you’ll get:
- A custom PPC strategy tailored to your business, industry, and goals
- A comprehensive keyword research campaign
- Advanced artificial intelligence (AI) technology to research competitor ad strategies
- Custom ad campaign copy
- Bid optimization strategy
If you want to invest in effective marketing analytics services, WebFX has you covered. We’ll provide you a comprehensive PPC management and analysis plan that will help you drive better results with your paid advertising campaigns.

 Social media advertising management
Social media advertising management
Aside from PPC ad management, we also offer social media advertising management. When you run a social media campaign, you want to know how it’s performing and if you’re driving the best results for your business.
When you partner with a marketing analytics firm like WebFX, you’ll get everything you need to run and monitor your social media campaigns and analytics.
With a social media advertising campaign from WebFX, we’ll provide you with:
- 4+ unique ads each month
- 2+ advertising campaigns
- 4+ monthly advertising copy tweaks
- Ad account setup and optimization
- And more
We’ll help you run an advertising campaign on any platform you need. From Facebook to Pinterest, we have them all covered and can help you develop a campaign that drives valuable results for your business.
When you partner with WebFX, we’ll help you:
- Reach the right audience
- Remarket to site visitors
- Use AI technology for data-backed targeting
- Optimize ad spend to maximize return on investment (ROI)
- Analyze your social campaign results to improve on them
When you’re running an advertising campaign, you want to know how it’s performing and where you can improve. With marketing analytics services from WebFX, we’ll help you manage your social media campaigns and monitor the results so you can drive more sales and revenue for your business.

 And more!
And more!
Learn more about what our marketing analytics services include in this video:


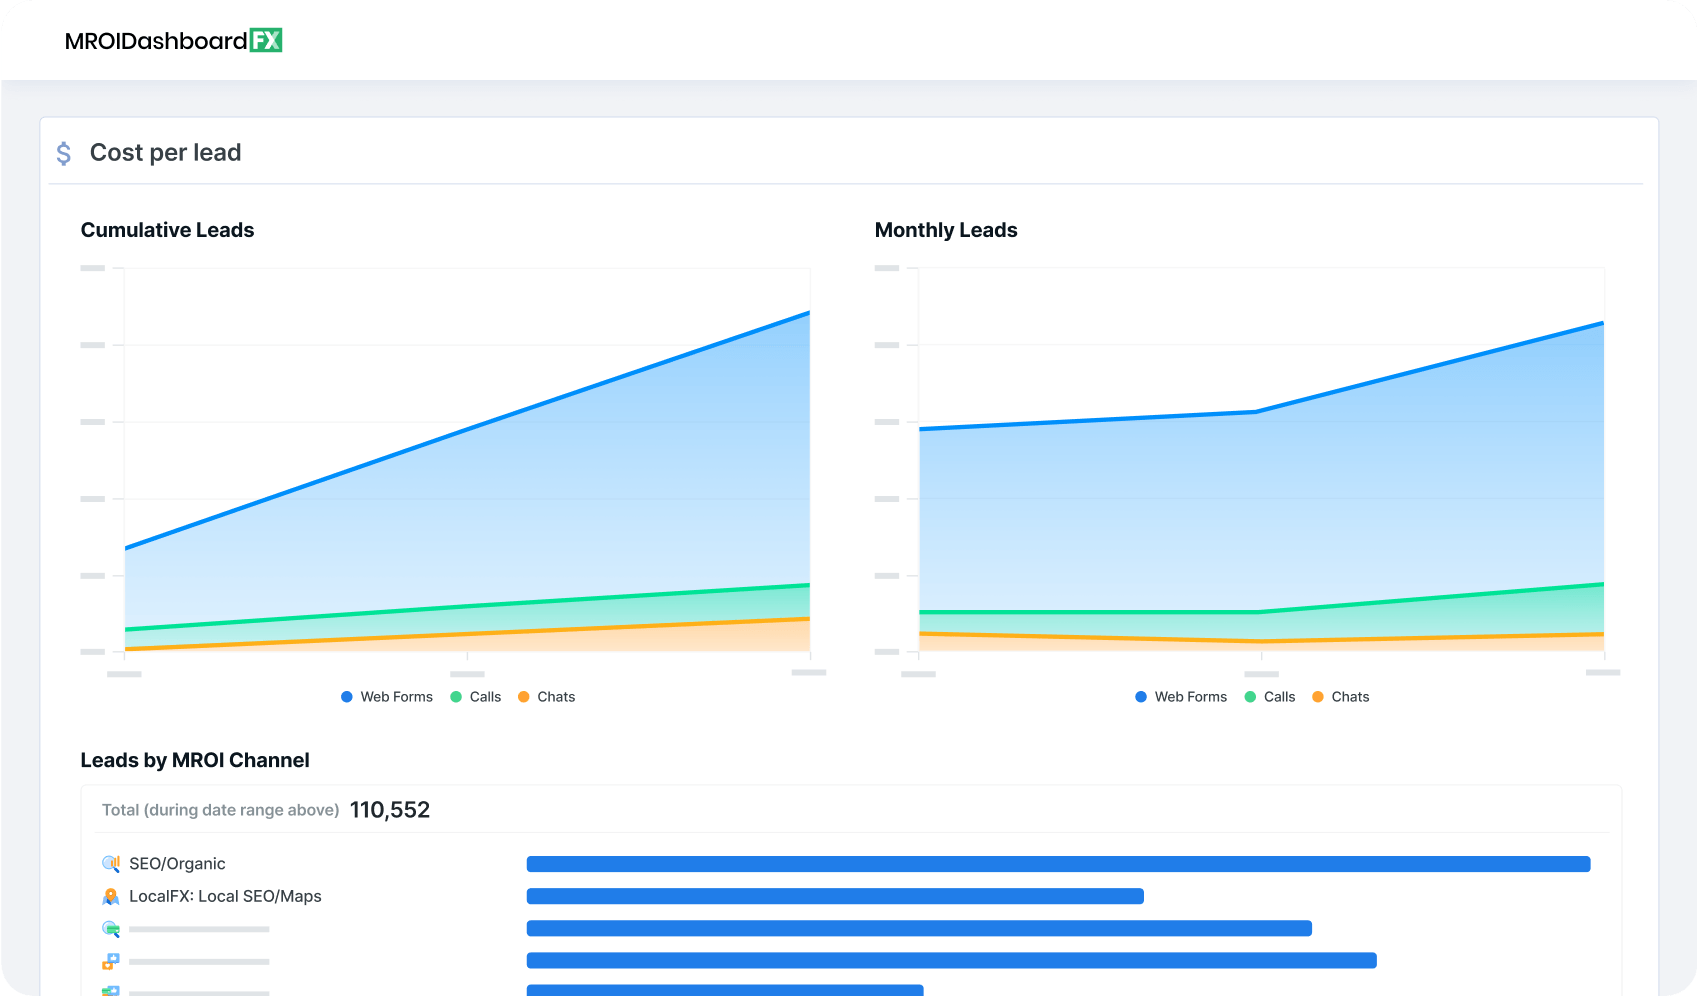
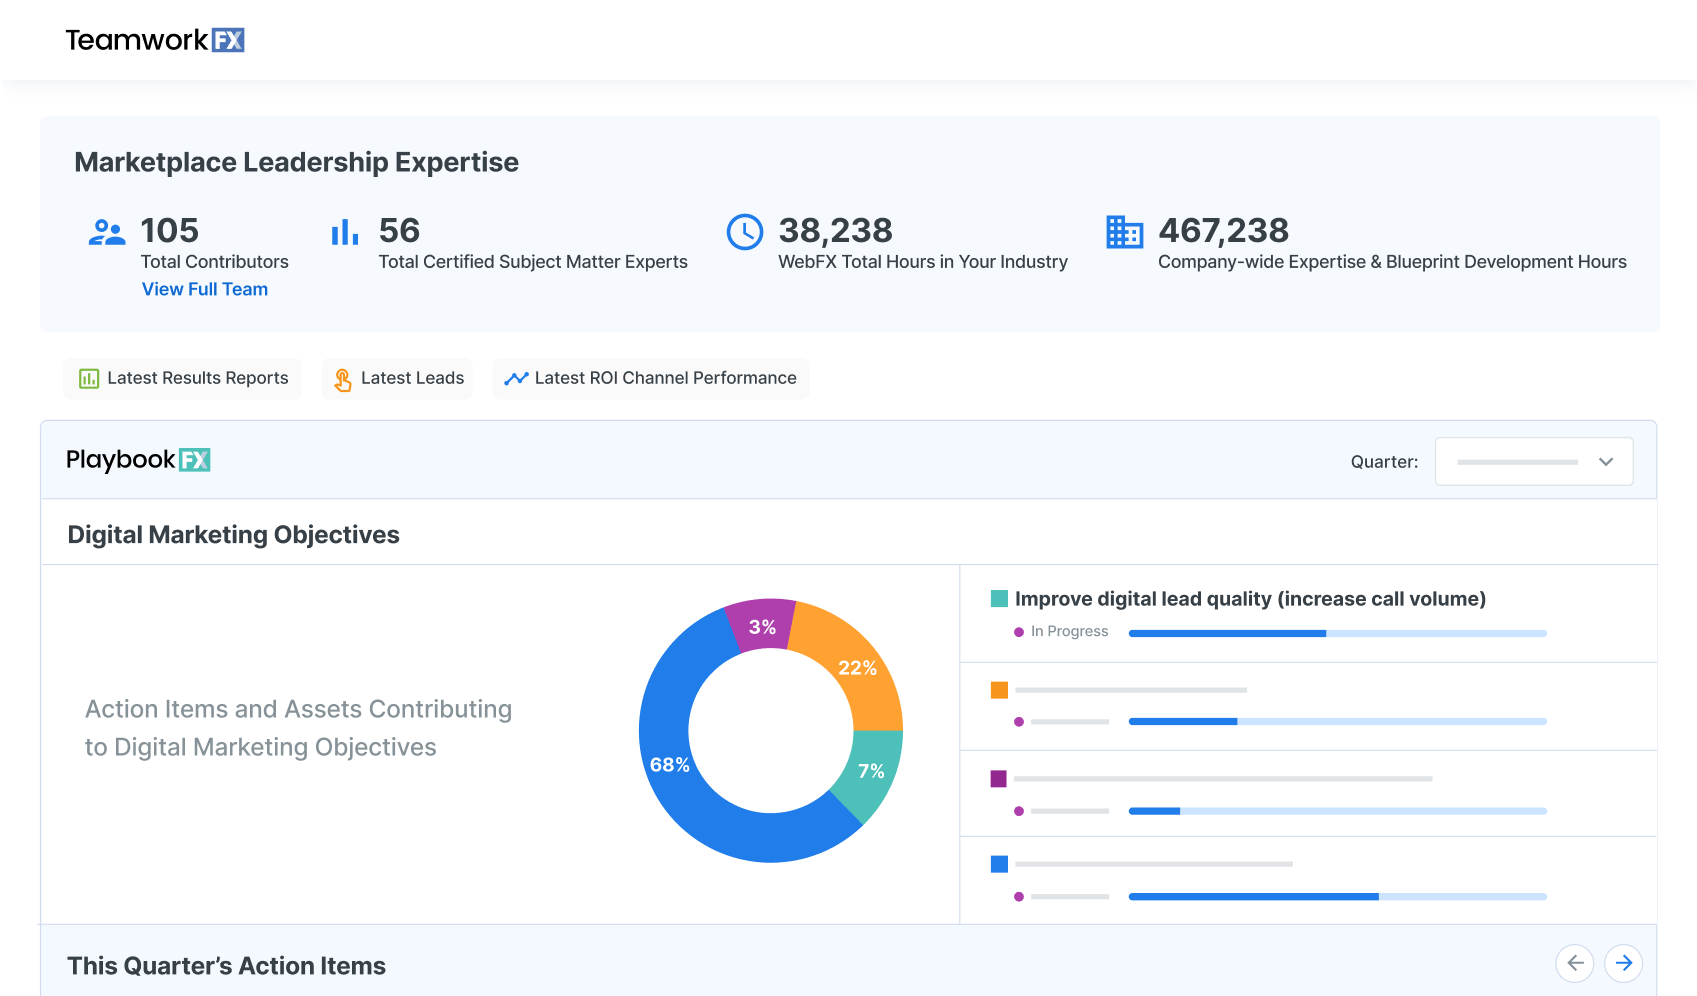
Data-Driven Digital Marketing
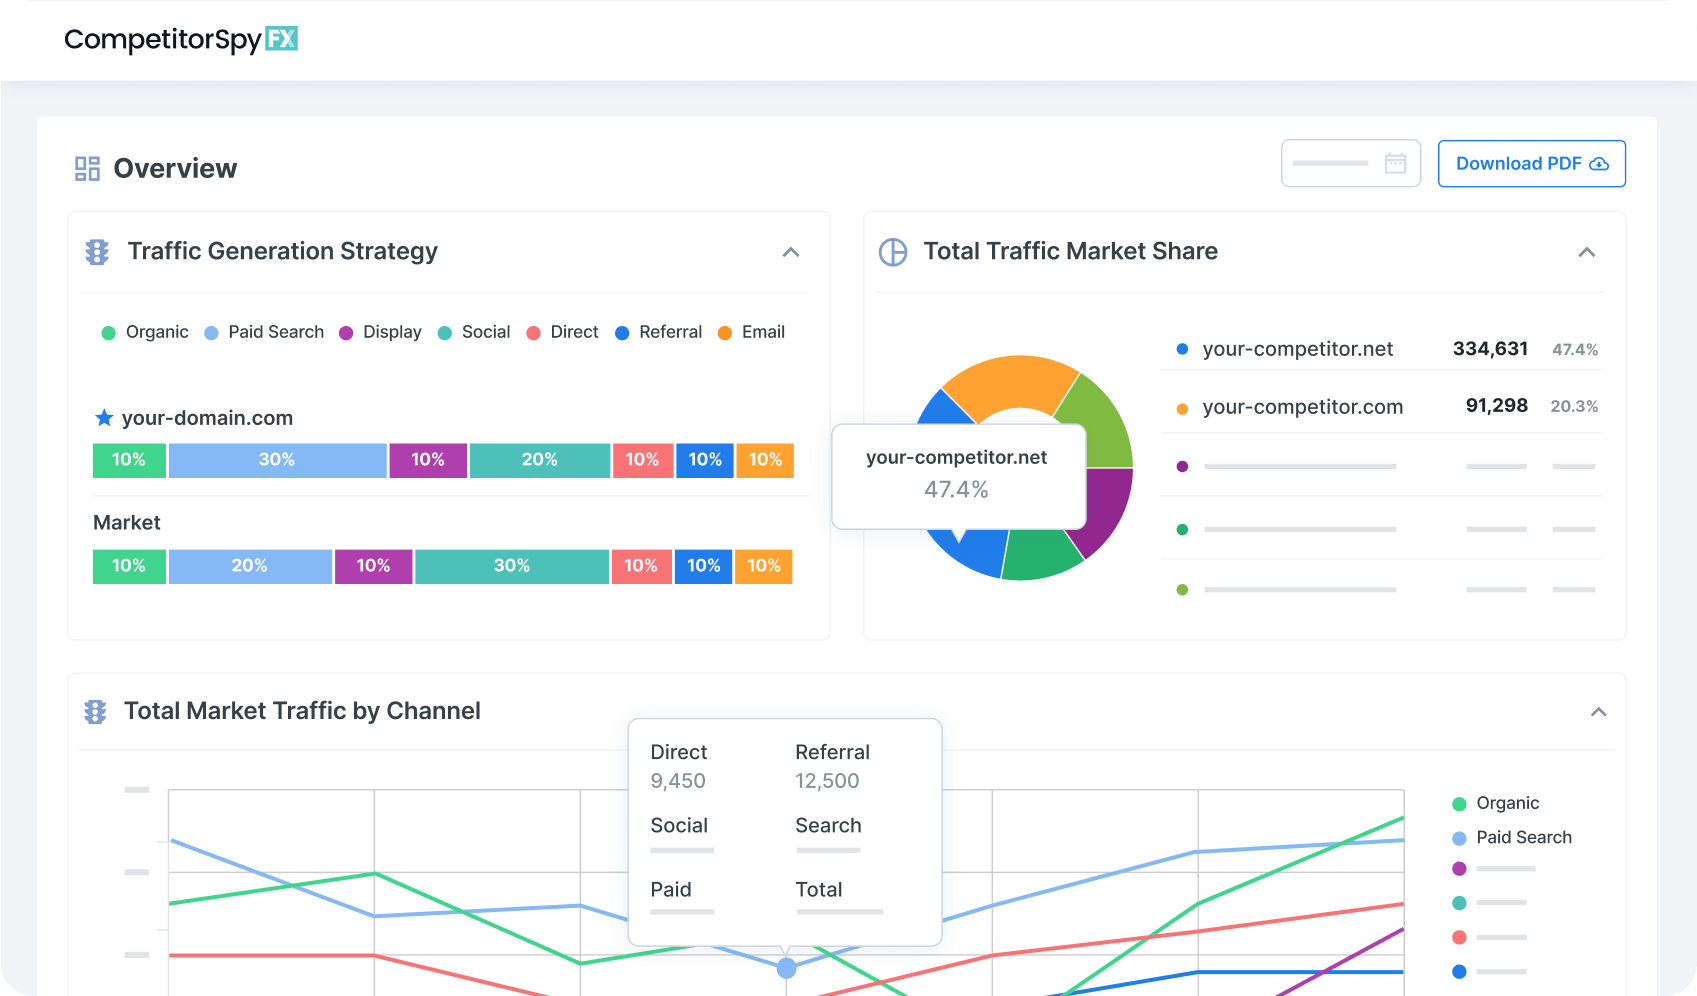
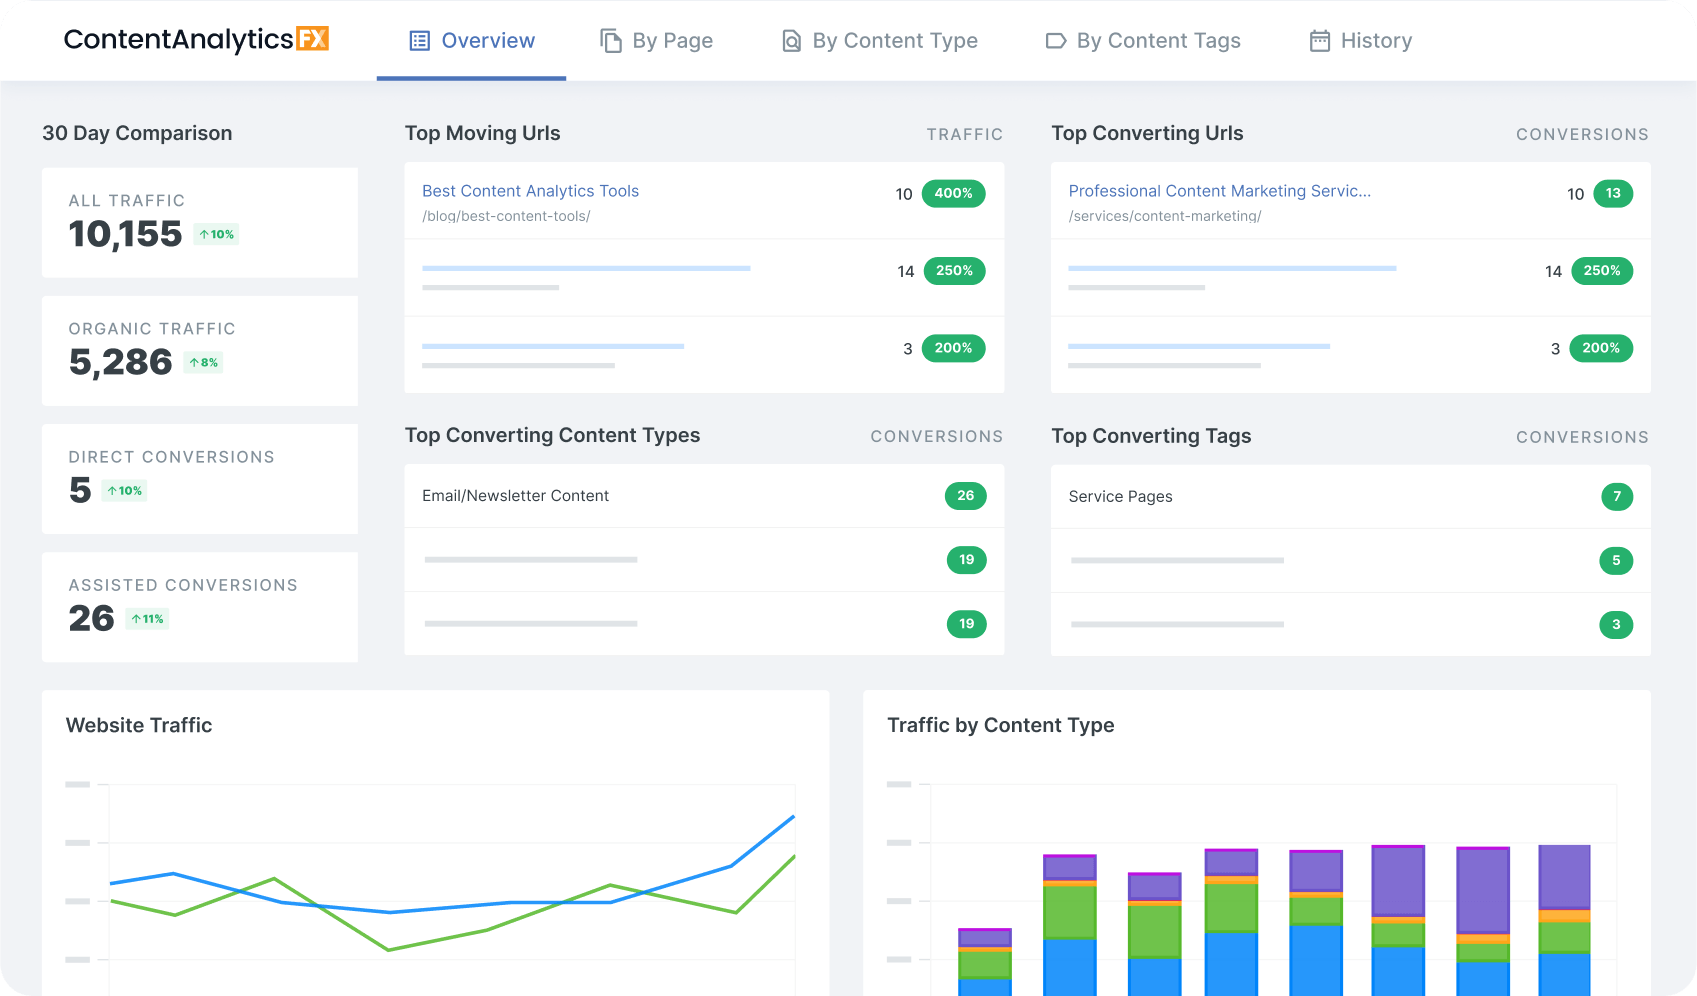
RevenueCloudFX is our proprietary marketing software built to enable our client’s website strategies and digital campaigns.
With 20+ different features, this client-exclusive platform makes it easier than ever to track digital marketing performance and make strategic decisions.
20%
$500K+
1+ billion
20%
$500K+
1+ billion
Your search for marketing analytics services ends here
When your company partners with WebFX, you:
Make data analytics stress-free
At WebFX, we offer as little or as much support as you need. Our team provides completely do-it-for-you marketing analytics solutions, so we can take care of analyzing your data and implementing optimizations while you sit back and watch the revenue roll in.
Implement custom, data-driven campaigns
Stop guessing and implement strategies designed to drive revenue from the start with our marketing analytics solutions. We’ll analyze data from all your marketing channels to ensure each and every strategy drives the highest possible return on investment (ROI) for your business.
Access industry-leading analytics software
When you partner with WebFX, you’ll receive access to our in-house marketing analytics software, RevenueCloudFX. Powered by IBM Watson, RevenueCloudFX syncs billions of data points across your campaigns and delivers a 20% average increase in ROI for clients.
Deliver results that power business growth
Implement data-backed campaigns that drive the results leadership wants, all while reaching your business goals and objectives. In just the past few years alone, we’ve helped clients drive over $10 billion in revenue with our marketing analytics solutions.
Pricing custom to you.
Starting at $3,000 per month.

Solving key challenges for businesses

When Merrimack Valley Psychological Associates wanted to help more clients, they turned to WebFX. Learn how our partnership expanded their reach and results.
“My practice has grown quickly and improved our accessibility to those we serve or hope to serve within our community. WebFX is directly responsible for our growth and the fact that we have more than doubled our revenue in six months.”
![]()
Net Friends turned to WebFX to help them boost their presence in search engines to attract qualified traffic and leads for their business.
“Web traffic is up well over 100% and our marketing qualified leads are more than double what they were before our WebFX engagement.”

Hurst Pediatric Dentistry wanted more clients to find their kid-friendly dental office. Here’s how our partnership helped them serve up more smiles!
“Rather than pushing us to make changes on our website that would make it more similar to so many other websites, WebFX offers suggestions for simple tweaks we can make to get the results we want, while still allowing our personalities to shine through.”


Unlock a 20% greater marketing ROI with WebFX’s award-winning marketing analytics team
- Dedicated account manager, interfacing with a team of 500+ digital marketing experts
- RevenueCloudFX access for optimizing, measuring, and reporting ROI
- In-depth analysis of your business goals, industry, and competitors
- In-house project management software, 24/7 help desk, and direct client phone line
In-House Marketing
- One or two team members trying to keep up with fast-paced marketing advancements
- Analytics suite for measuring and improving campaign performance
- S.M.A.R.T. goals, but limited resources needed to execute
- Reporting roadblocks leading to project delays and wasted spend
Typical Marketing Agency
- Dedicated account manager responsible for strategy, but will need your help implementing solutions
- Third-party tracking and analysis with subscription costs passed to you
- Cookie-cutter checklists and solutions for optimizing your campaigns
- Regular, but unreliable support when issues arise with your account
Why invest in marketing analytics services from WebFX?
Now that you’ve looked at our marketing analytics services and tools, you may wonder why you should partner with WebFX.
Let’s look at six reasons to invest in marketing analytics services from WebFX!

- 1. We offer the tools you need
- 2. We have a dedicated team of experts
- 3. We have an extensive portfolio
- 4. We have a high client retention rate
- 5. We have experience driving real results
- 6. We have transparent pricing and packages
1. We offer the tools you need
1. We offer the tools you need
When it comes to choosing marketing analytics services that work for your business, you want to look for services that offer everything you need. To drive success with marketing analytics, you need the right tools to monitor your campaign.
At WebFX, we have everything you need to manage your analytics. With our software RevenueCloudFX, which has IBM Watson, we can help you compile, analyze and act on valuable data to drive better results with your campaign.
2. We have a dedicated team of experts
2. We have a dedicated team of experts
When it comes to your marketing analytics, you don’t want to work with just anyone. You want to work with a team that knows what they’re doing and has experience launching and running successful campaigns.
At WebFX, we have a team of over 500 dedicated marketers that will help you interpret and act on your marketing data. From social media experts to CRO pros, we have a diverse group that will use their knowledge and experience to help you get the most out of your marketing analytics.
We’re a Google Cloud Partner and our team is Google Analytics certified too, so you can count on us to know how to understand your metrics and make the best recommendations to accelerate your campaign.
As a Google Premier Partner, our team knows how to build and analyze PPC campaigns that drive better results and help you get the most out of your digital advertising investment.
Those are just a few of the qualifications our team holds that can help you drive better results with your marketing analytics. If you want to partner with a company that has a team of knowledgeable, experienced experts, WebFX is the answer.
3. We have an extensive portfolio
3. We have an extensive portfolio
When you choose a marketing analytics agency, you want to partner with one that has experience and knows how to work with different industries.
At WebFX, we have experience running different types of digital marketing campaigns with a variety of industries. From construction companies to medical practices to food companies, we’ve worked with a diverse group of clients and drive results that help them grow their business.
Just check out our portfolio to get a taste of the kind of work we do for our clients!
4. We have a high client retention rate
4. We have a high client retention rate
When you look at marketing analytics firms, you want to find ones that keep their clients happy. After all, if you’re investing time and money into marketing analytics services, you want to partner with a company that’s going to work well with your business and drive the results you desire.
If you partner with WebFX, you’re partnering with a team of experts that knows how to keep clients happy. We have a 91% client retention rate because our clients love the work we do for them and the results we drive!
Additionally, we have a client recommendation score that’s 488% higher than the industry average!
Just look at the 1,100 client testimonials that share the excellent work we do!
5. We have experience driving real results
5. We have experience driving real results
In addition to happy clients, you want marketing analytics services from a company that knows how to drive results. Your marketing analytics company should analyze your campaigns and continuously improve them to deliver better results to your business.
Whether you want to increase conversions or leads, WebFX has you covered.
We know how to drive real results for our clients and help them grow their businesses through marketing.
6. We have transparent pricing and packages
6. We have transparent pricing and packages
When you’re investing time and money into marketing analytics services, you don’t want to get left in the dark with what you’re getting in your package. Many companies will hide their prices or package information, making it difficult for you to know what you’re getting.
That’s not the WebFX way, though.
At WebFX, we offer transparent pricing and packages for marketing analytics services. Whether you’re looking to invest in PPC advertising or CRO services, you’ll know exactly what you’re getting and how much it will cost.
We don’t leave you in the dark about what you can expect from your marketing package, either. Our company gives you the details upfront, so you can decide if one of our standard or custom plans would fit your needs best.
For services where the price depends on what you need, like how many platforms you’re advertising on for social media, we give you an estimate so you know how much you can expect to invest.
If you’re looking for the right place to get marketing analytics services, look no further than WebFX. With our transparent pricing and packages, you’ll always know what you’re getting for your business.
FAQs about marketing analytics services
What is marketing analytics?
Marketing analytics is the practice of gathering, managing, and analyzing data from your marketing campaigns. It also involves interpreting that data to gather insights into what’s working well, and what isn’t, in relation to your marketing strategies.
What are marketing analytics services?
Marketing analytics services are paid services offered by an agency with the goal to help businesses gather, analyze, and interpret data from their marketing campaigns. Some agencies, like WebFX, can even take care of optimizing your strategies based on the insights gathered from your data.
How much do marketing analytics services cost?
Marketing analytics services costs start at $250 – $750 per month, but you may spend up to $6000 per month depending on the scope of your campaigns and size of your business. At WebFX, our marketing analytics start at $3,000.
WebFX has thousands of reviews praising our transparency, communication, and results.
WebFX Agency Rating

4.9/5
based on over 550 third-party reviews